How to Transfer Photos from iPhone to SD Card: Everything to Know
You can move pictures from an iPhone to an SD card either directly with a Lightning/USB-C card reader, via a computer, through cloud sync, or with third-party file transfer tools. Here's how.

Katrin Gray
Updated on Dec 24, 2025
With Apple's iTunes or Finder, it's possible and easy to move photos from SD card to iPhone using the SD card reader. What about the other way round? Is it possible to transfer photos from iPhone to SD card either using the Apple's software or a third-party app?
SD cards remain a low-cost, portable way to store large photo and video libraries for offline backup. However, unlike many Android phones, iPhones don't have built-in SD slots to import or download pictures, so the migration requires extra hardware or an intermediary device.
But worry not; we've got you covered. We'll show you transfer pictures from an iPhone to a SD card. If you are the kind of person who likes to know exactly where your media files (photos, music, videos, etc.) is and how it's handled, Higospot iPhone Data Transfer is the way to go. It began as a simple file transfer tool and now has grown into one of the most efficient and flexible suites for managing Apple iPhone and iPad.
Table of Contents
Why use an SD card for photos
Transferring photos from iPhone to SD card gives you a physical copy you control—no subscription, no cloud privacy concerns. This is useful for long-term archival or when you need to hand files to someone without internet access. A high-capacity SD card is often cheaper per GB than expanding cloud storage plans, especially for large photo/video libraries.
Even better, SD cards are widely supported by cameras, laptops, and many display devices, making them convenient for travel or presentations.
Prerequisites
Before you begin to move photos from iPhone to SD card, you will want to take a few important steps to make sure the transfer is smooth.
1. Hardware
The first thing you should do is prepare a compatible card reader or adapter for your iPhone's port (Lightning or USB-C). ensure the reader is powered if required.
2. SD card and reader specs
You should use a SD card with sufficient capacity and speed class for storing your files (UHS-I/UHS-II for large video/pictures files). If the reader requires external power, have a powered hub or adapter ready
3. Update iOS software
iPhone should be updated to a recent iOS version so Photos app can export to memory cards; computers should have the latest OS updates and drivers that can recognize the card reader.
4. Cables and connectors
If you're transferring iPhone photos to SD card using computer, a Lightning/USB-C cable or a USB cable for the card reader is required; for wireless readers, ensure you have a stable and strong Wi-Fi network.
5. iCloud settings awareness
If you use Optimize iPhone Storage, originals may be in iCloud only—download originals before exporting to ensure full-resolution copies are transferred
Related: How to Transfer Videos from iPhone to PC
Direct import using an Apple camera adapter or card reader
Apple's Photos app supports exporting to external drives and memory cards when the proper adapter or reader is connected. This can be very useful for travelers or field photographers who need immediate, offline backups.
To export photos from iPhone to SD card, you just plug an Apple camera adapter or compatible card reader into the iPhone, insert the SD card, open Photos app, select images, then select Share, and pick the SD card to save. Here're detailed steps:
1. Plug the compatible card reader into your iPhone's Lightning or USB-C port, then insert the SD card into the card reader.
2. Wait a few seconds until the iPhone recognizes the accessory.
3. Launch the Photos app on your iPhone.
4. Navigate to the album or photos you want to transfer.
5. Tap Select in the top-right corner, choose the photos/videos you want to copy.
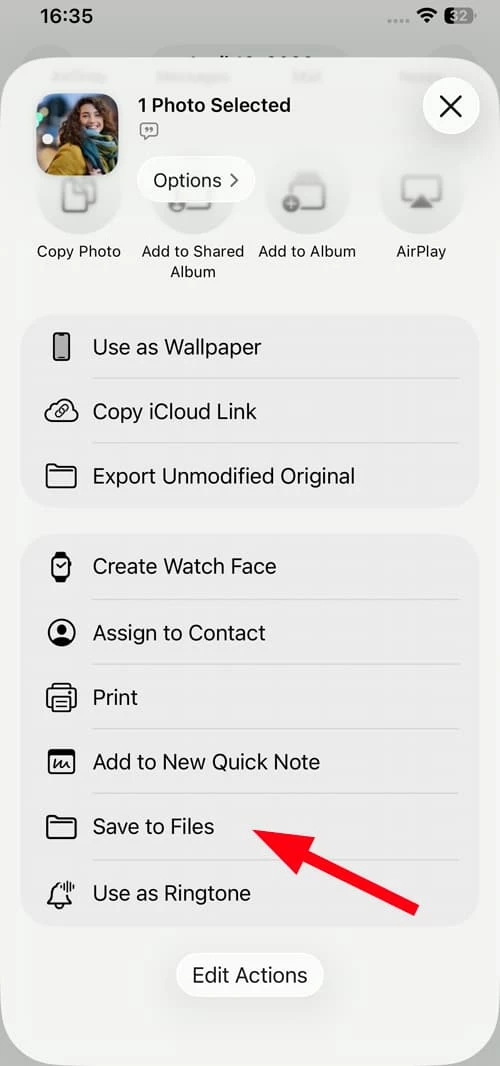
6. Tap the Share icon (square with arrow pointing up).
7. In the Share menu, choose Save to Files. Under Locations, your SD card should appear (sometimes labeled as "Untitled" or with the card's name).
8. Select the SD card as the destination.
9. Tap Save.
Moving photos to SD card from iPhone through a card reader is fast and direct, no computer required. It preserves original files when exporting iPhone photos and is good for on-the-go backups.
Related: How to Retrieve iMessages on iPhone
Transfer pictures via a PC or Mac computer
If you want to organize, edit, or archive photos before copying to SD card, you may also connect the iPhone to a Mac or Windows PC, copy pictures to the computer via Photos app, then insert SD card into the computer's reader and copy files over.
Follow these steps to transfer iPhone photos to SD card by connecting to computer.
1. Plug your iPhone into the Windows PC or Mac using the USB cable.
2. Unlock your device and tap Trust This Computer if prompted.
3. Open Photos app.
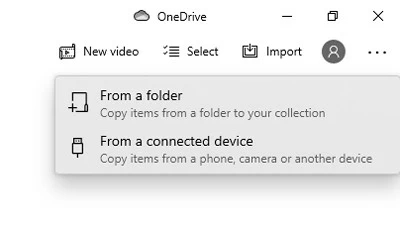
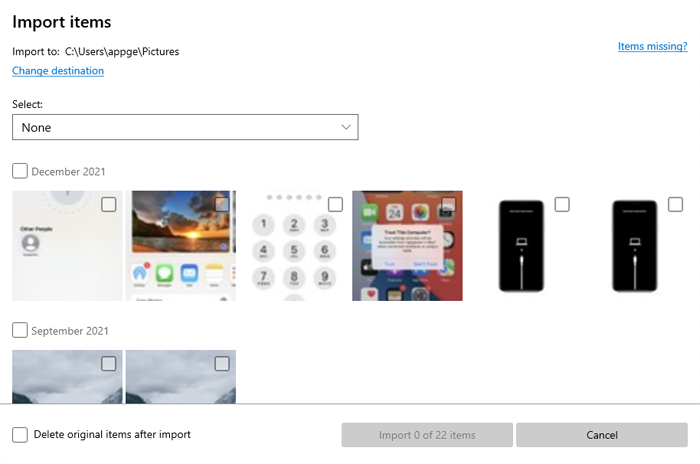
4. On PC, click the Import button, Choose From a USB device. On Mac, select your iPhone under Devices in the sidebar.
5. Select the photos you want to copy, or click Select All. On Mac, click Import Selected and select the items, or click Import All New Photos.
6. Choose a destination folder to save the items.
7. Insert your SD card to your computer slot with a card reader.
8. Copy the photos you previously saved and paste them to the SD card.
Third-party transfer apps and utilities
If you prefer having full control over your media library on iPhone, third-party utility like Higospot iPhone Data Transfer always perform better when it comes to . transferring photos to SD card from iPhone.
Known for its reliability, flexibility, and intuitive design, Higospot iPhone Data Transfer enables you to back up, export and manage media files and personal information far beyond what iTunes or iCloud can offer. With it, you can easily view your photos library in date, transfer photos to and from your iPhone (or iPad), move between album, and even convert the HEIC images to popular JPEG format. The same goes to music and videos.
Regarding personal files, you can even export SMS, iMessages, contacts, call history, WhatsApps chats, notes, and other files to archive them or even print them later. It's ideal if you sometimes just want to back up a few important info rather than doing a full backup.
Win Download Mac Download
The software runs on both Mac and PC, and installation is super straightforward. Let's have a look at how to transfer pictures from iPhone to SD card through Higospot iPhone Data Transfer.
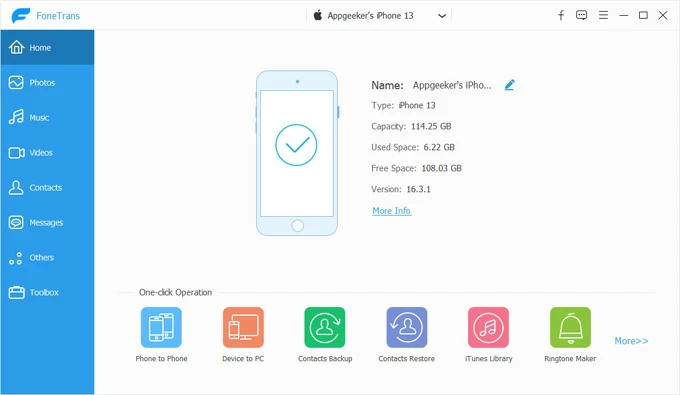
1. Open the software after installation, and then connect your iPhone into the PC using the cable. It will detect your iPhone and display its basic info on the screen.
You should get an intuitive user interface: Everything feels where it should be. Even if you're not tech-savvy, it's easy to navigate and accomplish tasks.
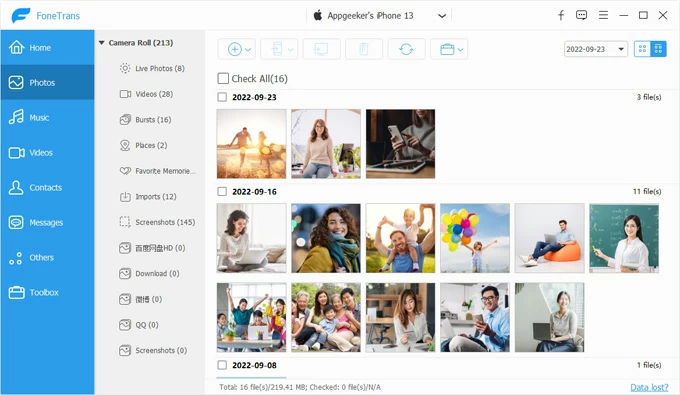
2. In the left sidebar, select Photos. The software will load thumbnails of all your iPhone photos and albums. You can preview them by date.
3. Browse through albums, then select individual photos, multiple photos, or entire albums you want to move to SD card. You can also click "Camere Roll" (see left upper corner below) and then tick the small box next to "Check All" to transfer everything.
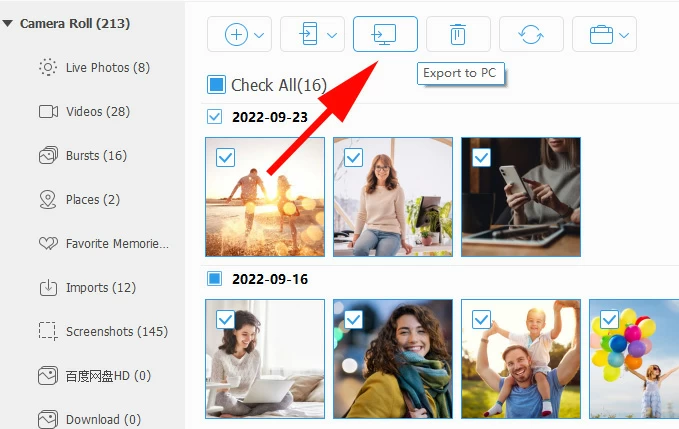
Next, click "Export to PC" (or Export to Mac if you're on Mac). In the opening dialog, choose a destination folder.
Alternatively, use the context menu to export your photos.
4. The software will begin copying the selected photos to your chosen folder.
5. Insert your SD card into the computer with a card reader, then move the folder to it.
After the process, confirm that your photos are there and accessible.
You can go through the similar steps to transfer your music from iPhone to your Mac, PC, or another Apple device.
Use iCloud as an intermediary
If you're a fan of Apple's iCloud service, you can choose to upload photos to iCloud Photos from the iPhone, access iCloud on a computer, download originals, then copy to SD card. Similar storage services like Google Photos, OneDrive, Dropbox also can accomplish the tasks.
Please note that the whole process doesn't involve physical adapter, but requires internet bandwidth and storage space. If you have a huge library of pictures and videos, you may need to upgrade your plan to get more cloud space.
How to get photos from iPhone to SD card using iCloud
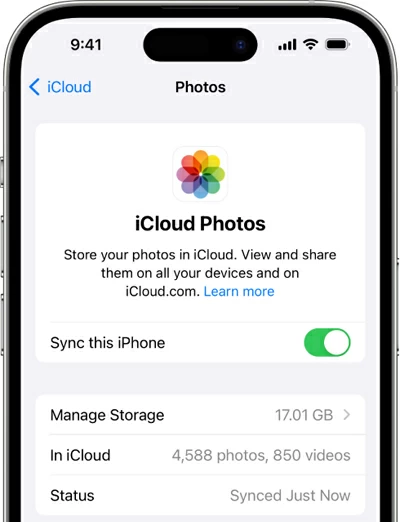
1. On your iPhone, go to Settings > tap your Apple Account > iCloud > Photos.
2. Turn on Sync This iPhone. Your photos will begin uploading to iCloud.
3. On your Windows PC or Mac, open a browser.
4. Go to iCloud.com and sign in to your same Apple Account.
5. Click the Photos icon.
6. Browse through your photos and select the ones you want to save onto SD card.
7. At the top, click the Download icon (cloud with arrow pointing down).
8. Your browser will download the selected photos as files. By default, they go into your Downloads folder.
9. Connect your SD card, and then move your photos to it.
Related: How to Bypass iPhone Lock Screen
Wireless SD card readers or Wi-Fi enabled cards
There are a few wireless SD card reader available in the market for you to transfer photos from iPhone to micro SD card, such as SanDisk Connect Wireless Stick, RAVPower FileHub, or similar Wi‑Fi enabled card readers. These devices create their own Wi-Fi network and companion app so you can copy files without cables.
What You'll Need
- Wireless SD card reader (with SD card inserted)
- Companion app (from App Store, e.g., SanDisk Connect, RAVPower FileHub, Kingston MobileLite, depending on your device)
- Stable Wi-Fi connection to connect iPhone to the reader's hotspot
Steps to put photos on SD card from iPhone
1. Insert the SD card into the wireless reader.
2. Power on the reader — most have a button or switch. Wait until the Wi-Fi indicator shows it's broadcasting.
3. On your iPhone, go to Settings > Wi-Fi.
4. Find the reader's Wi-Fi network (e.g., "SanDisk Connect" or "FileHub-xxxx").
5. Tap to connect. Enter the default password if required (often printed on the device or manual).
6. Download the reader's official app from the App Store.
7. Open the app — it will detect the SD card through the Wi-Fi connection. You should see options like My iPhone, SD Card, or File Management.
8. In the app, navigate to Photos or Camera Roll.
9. Browse and select the photos you want to transfer.
10. Tap Copy/Move to > SD Card.
11. Choose the destination folder and begin transferring importing photos from iPhone to SD card wirelessly.
Once complete, open the SD card view in the app, check that your photos are visible. Alternatively, remove the SD card and test it in a computer or camera to confirm.
About Katrin Gray
Katrin Gray is the Junior Editor at HigoSpot. With a bachelor's degree in Computer Applications, he has been covering Microsoft Windows, Apple macOS, iOS, Android, Social Media, Gaming, and more as a professional writer for over 5 years.
 iPhone UnlockerRemove iPhone & iPad lock screen
 iPhone Data TransferTransfer and manage your iPhone & iPad data
 Android UnlockerRemove Google FRP lock and bypass screen locks
 iPhone Data RecoveryRecover deleted files from iPhone, iPad
 Location ChangerFake a GPS location easily
 Video DownloaderDownload videos from 1000+ sites