How to Transfer Music from iTunes to iPhone: Everything to Know
Get a new iPhone and want to get your favorite music from iTunes library onto it? Here's how to transfer songs from iTunes to your iPhone, and tips for music transfer without erasing data.

Katrin Gray
Updated on Dec 24, 2025
Whether you purchased songs from the iTunes Store, imported CDs, or downloaded MP3 files from your computer, iTunes has traditionally served as the default tool for transferring music to an iPhone. Even though Apple has shifted to the Music app on macOS Catalina and later, Windows users still rely heavily on iTunes to add songs, sync playlists, and manage their music collections.
Yet despite being widely used, transferring music from iTunes to iPhone is not always intuitive. Many users struggle with syncing rules, device authorization, library configuration, and unexpected data overwrites.
This guide will bring clarity to the entire process of using iTunes for music transfer, from setup to syncing to troubleshooting. If you don't like the way iTunes does, resort to a reputable tool named Higospot iPhone Data Transfer, a comprehensive software tool that implements both drag-n-drop and click-to-add, bidirectional transfer (without erasing existing files on the device, and media management.
Table of Contents
Things to know
Although iTunes is powerful, it comes with several complications that frustrate users:
Syncing is not the same as copying
Unlike drag-and-drop file transfer, iTunes uses a syncing model. This means the iPhone mirrors the music library or playlist you select. Once you put music on iPhone from iTunes library, it may also appear from the iPhone, and your current music files on the device will be deleted after syncing.
You cannot freely add individual songs without affecting the rest of the library unless you enable manual management.
iTunes can overwrite existing music
If "Sync Entire Library" is enabled, iTunes may replace the music on your iPhone with the music in your iTunes library. It will also remove songs that were added from other computers or apps.
Device authorization and Apple ID restrictions
Before syncing music from iTunes to iPhone, Apple requires computer authorization before syncing purchased content, and you need to match Apple IDs for purchased songs. If the Apple Account has changed, you will have to re-downloading or re-authorizing content.
Format compatibility issues
iTunes does not sync FLAC files, or DRM-protected files from third‑party sources.
Related: How to Unlock iPhone without Passcode or iTunes
Preparing iTunes for music transfer
Before you decide to put music on iPhone with iTunes, you must configure iTunes properly.
Install or update iTunes
Windows: Download the latest version from Apple's website or Microsoft Store.
macOS Catalina or later: Use the Finder instead of iTunes
You will also want to update it to ensure compatibility with the latest iOS versions.
Add music to your iTunes library
You can add songs in several ways:
- Drag and drop MP3, AAC, WAV, or AIFF files into iTunes.
- Go to File > Add File to Library or Add Folder to Library.
- Insert a CD and choose Import CD.
- Download purchased music from the iTunes Store.
Once imported, your songs appear under Music > Library.
Check music format compatibility
iTunes supports MP3, AAC, WAV, AIFF, Apple Lossless (ALAC). FLAC, OGG, WMA is NOT in the supported list. If needed, use a video converter software to convert incompatible files beforehand.
How to put music from iTunes to iPhone
Once you've everything ready, follow the steps below to sync iTunes music to iPhone.
1. Connect your iPhone with a Lightning cable, or a USB-C cable (for newer models).
2. Once connected, your iPhone appears in iTunes. Click the iPhone icon in the top-left corner.
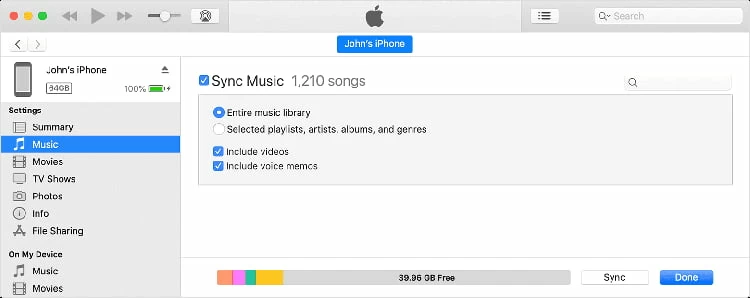
3. In the left sidebar, select Music.
4. Tick the box next to Sync Music, then choose your sync mode. You have two options:
Entire Music Library: This copies all your songs in entire iTunes library to your iPhone. It is best for users who want everything mirrored, and has large curated libraries.
Selected Playlists, Artists, Albums, and Genres: This allows you to choose exactly what transfers. It's best for selective syncing and managing multiple playlists.
5. Click Apply or Sync at the bottom right corner.
iTunes begins transferring music to your iPhone.
Related: Messages Disappeared from iPhone
How to transfer music from iTunes to iPhone without syncing (Manual Mode)
Rather than syncing music from iTunes to iPhone, it also offers a manual mode to help you copying songs to your device without touching the existing media library on the device.
Steps to add songs from iTunes to iPhone without a sync:
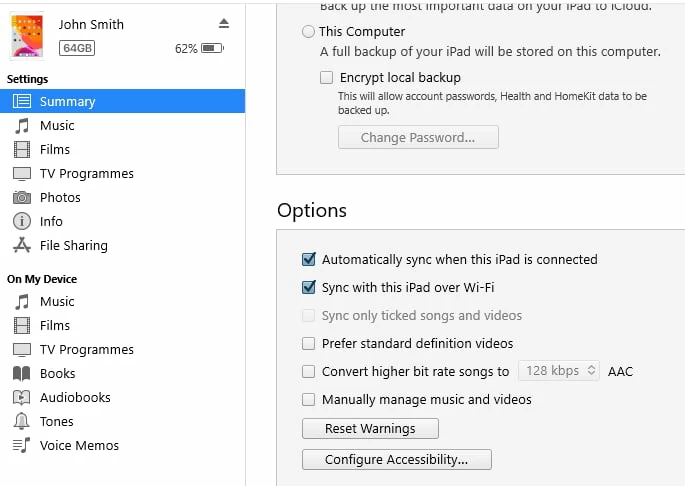
1. After iTunes detects your iPhone, go to Summary.
2. Check Manually manage music and videos.
3. Click Apply.
4. Now, you can drag individual songs, playlists onto your iPhone.
This is the closest method to copying music rather than syncing. Adding or removing songs won't affecting the rest of your library.
Related: Factory Reset iPad without Passcode
How to transfer purchased music only
If you only want to transfer purchased songs, do the following:
1. Open iTunes, and go to Account > Authorizations > Authorize This Computer.
2. Select File > Devices > Transfer Purchases from iPhone.
This ensures purchased music is synced safely.
Alternative: Add songs to iPhone without iTunes
Felt frustrated by iTunes syncing or its limitations? Higospot iPhone Data Transfer is a breath of fresh air. The desktop-based application offers a flexible and intuitive way to transfer music between your computer and iPhone without relying on iTunes, giving you full control over your library. It supports drag-and-drop importing, selective or bulk transfers, two-way transfer, and automatic format conversion so songs play smoothly on your iPhone or iPad.
Unlike iTunes, it won't overwrite existing music, and it preserves metadata such as playlists, artwork, and track info. Whether you're adding new songs, organizing your collection, or backing up your music, Higospot iPhone Data Transfer streamlines the entire process with a fast, cable-friendly or wireless workflow that fits both Windows and macOS users.
Win Download Mac Download
As an all-in-one data management and transfer tool, its main strength lies in enabling fast, flexible, and selective transfer of media files—including photos, music, videos, podcasts—to and from your Apple devices. It even enables you to organize files, back up personal information like messages, contacts, notes, call logs. Higospot iPhone Data Transfer centralizes everything into a streamlined, user-friendly workflow.
Here's how to transfer music to iPhone without using iTunes.
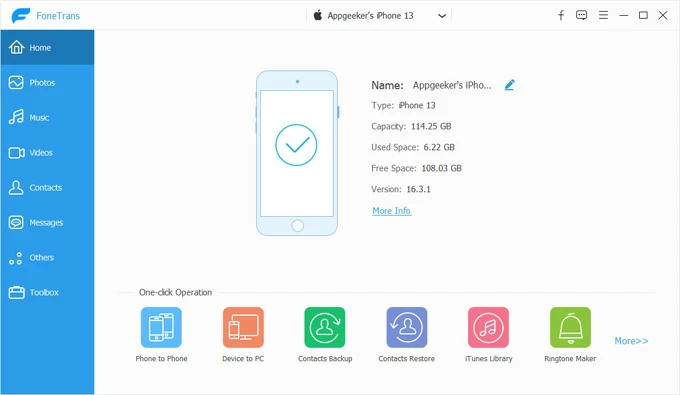
Step 1. Connect your iPhone to your computer and then launch the software. It will automatically detect your device and display its summary screen.
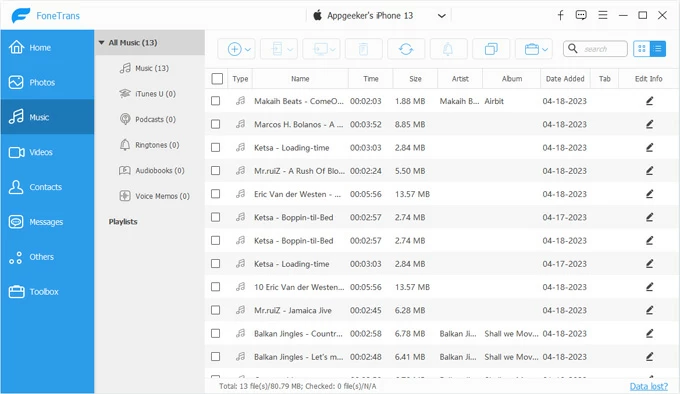
Step 2. On the left sidebar, click Music section. The software will scan and display all existing songs on your iPhone, sorted by different category: Music, iTunes U, Podcasts, Ringtones, Audiobooks, and custom albums you created.
You can also choose filters (Name, Time, Size, Artist, Album, Date Added, etc.) at the top menu to display your songs.
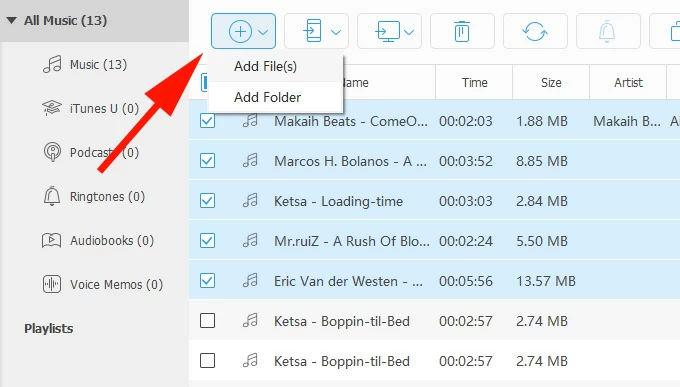
Step 3. To Click the + (Add) button at the top-left corner. From the drop-down menu, select Add File(s) or Add Folder. A file browser window will open. Select the music files or folders you want to transfer (MP3, M4A, FLAC, WAV, etc.). Click Open to confirm.
Alternatively, open the folder where saves your music files, simply drag them into the software's window and let go.
After selecting your songs, the software begins transferring them to your iPhone. A progress bar will show the status. Keep your iPhone connected until the transfer completes.
iPhone Data Transfer automatically converts unsupported formats into iPhone's compatible ones during transfer. No manual conversion is required; the process runs in the background.
Tip: If you're tired of the default ringtones on your iPhone, you may make use of the Ringtone Maker tool build in the software to create your personalized ringtone and add to your iPhone automatically.
Related: How to Transfer Photos from iPhone to PC
Troubleshooting: Why iTunes won't sync music
Adding music to iPhone from iTunes can be smooth once you understand how syncing works. However, some of you may still encounter some question while trying to transfer your music. Below are the most common issues and solutions.
iCloud Music Library / Sync Library is enabled
If you use Apple Music or iCloud Music Library, iTunes syncing is disabled, you must add music through Apple Music instead. To solve it, unlock your iPhone, head to Settings > Music > Sync Library, then turn it off. Then follow the procedure outline above to get music from iTunes to your iPhone.
iPhone is synced with another computer
If you get a "This iPhone is synced with another iTunes library" message while transferring music, you may use manual mode, or choose to erase and sync with the new library where your songs stored.
Unsupported formats
You need to Convert files to AAC or MP3 format that's readable by iPhone.
Outdated iTunes version
Go to Help > Check for Updates, update iTunes to the latest version.
USB connection issues
Try a different cable, or a different USB port. Sometimes, you will want to restart the iPhone and iTunes.
Conclusion
Whether you want to sync your entire library, add songs manually, or transfer purchased music, iTunes provides multiple options to import your music to iPhone — but also several limitations. Third-party tools like Higospot iPhone Data Transfer comes with a more flexible way to hand the tasks. It is hugely popular, and for good reason – it's easy to use, supports drag-n-drop without touching your phone's media library, and includes a set of tools to manage your device.
About Katrin Gray
Katrin Gray is the Junior Editor at HigoSpot. With a bachelor's degree in Computer Applications, he has been covering Microsoft Windows, Apple macOS, iOS, Android, Social Media, Gaming, and more as a professional writer for over 5 years.
 iPhone UnlockerRemove iPhone & iPad lock screen
 iPhone Data TransferTransfer and manage your iPhone & iPad data
 Android UnlockerRemove Google FRP lock and bypass screen locks
 iPhone Data RecoveryRecover deleted files from iPhone, iPad
 Location ChangerFake a GPS location easily
 Video DownloaderDownload videos from 1000+ sites