How to Transfer Music from iPhone to Mac (iMac, MacBook Air, Pro, Mini, etc.)
No matter you have songs downloaded free from online and stored on your iPhone, purchased by Apple Music or iTunes, you have options to transfer those music files to your Mac. Here's how.

Katrin Gray
Updated on Dec 22, 2025
Imagine this: you need to transfer your complete music library from your iPhone to your Mac. Finder asks you if you want to erase your iPhone library and replace it with the one on your Mac. You just want to download music from iPhone to the Mac. How can you do that without deleting anything from your device and without losing any data from the Mac?
Things become a little more complicated. While it is pretty straightforward to transfer music from a Mac to an iPhone, syncing music from iPhone to Mac isn't supported by Apple.
Take a deep breath and read on. Moving music from iPhone to Mac seems impossible, but it usually can be accomplished. In this article, we'll devise quick ways to help you transfer iPhone music—including purchased and free songs—to your Mac, so you can listen on your computer and make a backup locally.
For those who want to get a reliable and efficient way to transfer your music between your Apple devices, check out Higospot iPhone Data Transfer. It supports bidirectional transfer, and handle photos, videos, and other files, not just music.
Table of Contents
Things to know before syncing music from iPhone to Mac
The landscape changed when Apple split iTunes into separate apps (Music, Podcasts, TV) and moved device syncing into Finder on recent macOS releases. That means the old "iTunes to transfer purchases" workflow no longer applies in the same way on modern Macs, and users who switch between macOS versions or who subscribe to Apple Music/iCloud Music Library can encounter confusing behavior: some tracks are cloud-managed and won't copy directly, others are protected by DRM, and non-purchased songs may be inaccessible without third-party help.
At the same time, wireless options like AirDrop or iCloud offer convenience but have limits for bulk transfers and for non-Apple-Music files, so choosing the right method requires matching the file type, macOS version, and your goals (backup, sync, one-time copy).
Related: How to Add Ringtone to iPhone
Quick overview of approaches
For purchased songs, use Apple's built-in sync or transfer features (Music/Finder or iTunes on older macOS) or re-download from the Store when possible.
For non-purchased or imported tracks, you will need to use a dedicated transfer tool like Higospot iPhone Data Transfer or a manual export method. AirDrop works well for single files.
If you have a large libraries of music to transfer, it's advisable to use a wired transfer with Finder/Music or a third-party transfer app that supports batch export.
If you're an Apple Music subscriber, use iCloud Music Library (Sync Library) to keep content available across devices, then download on the Mac as needed.
Transfer music from iPhone to Mac with Music app
On PC, iTunes will work just fine for transferring music purchased through Apple to your computer. On Mac, however, if you have purchased items on your iPhone and want to move to your Mac, you will want to use Music app to handle the job.
Here's how to transfer music on iPhone to Mac:
1. Connect the iPhone to the Mac and open Music app.
2. Right click on your phone name under Locations on the left sidebar.
3. From the context-menu, select Transfer Purchases to move purchased items to the Mac.
Note, Apple's Music app can transfer purchases directly from an iPhone to a Mac, but it won't export songs from other sources without additional tools.
Related: iPad Unavailable
Import music from iPhone to Mac via AirDrop
The beauty of AirDrop is how it works seamlessly for transferring small numbers of songs from iPhone to Mac or vice versa. It works with any iOS device running iOS 7 or newer and any Mac running OS X Yosemite or newer.
Requirements:
- Both devices are within 30 feet of each other
- Have both Wi-Fi and Bluetooth turned on
- Registered with the same Apple account
Here we take an example of transferring music from iPhone to MacBook through Airdrop.
1. On your Mac and iPhone, check that you have Wi-Fi and Bluetooth enabled, and then turn AirDrop option on and set it to receive from Contacts Only or Everyone for 10 Minutes.
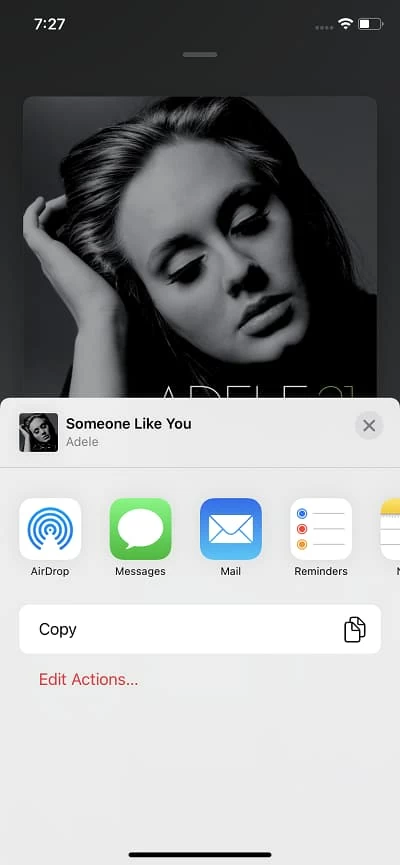
2. open the Files or Music app (if the file is shareable), select the song you want to copy to Mac, tap Share.
3. Next, choose AirDrop.
4. You will get a window where shows everyone with AirDrop enabled that you can send that song to, select your Mac name from the window.
5. Click Accept when prompted on your Mac. The music file you selected will be transferred instantly.
Music you've received through AirDrop will automatically go to the Downloads folder on your Mac.
Note, AirDrop is fast for a few files but impractical for large libraries.
If you're looking for a way to transfer your MP3s, FLACs, AACs, and other music files downloaded from the web or added via apps rather than purchased from Apple, definitely, you will need a third-party utility to export those songs to the Mac.
Our favorite is Higospot iPhone Data Transfer. It's a comprehensive device manager that gives you full control over your Apple device's data, far beyond what iTunes or Finder typically allow. With it, you can easily transfer music, photos, videos, ringtones, and other media files to and from iPhone without the need for messy syncing or restrictive settings.
The software does much more including the ability to export Message and Contacts, make custom ringtones, manage iCloud drive, and more.
Win Download Mac Download
Download the software by clicking the "Mac Download" button above and install it on your Mac.
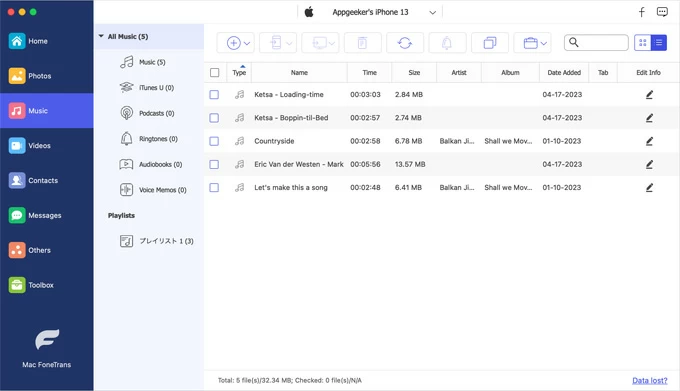
Step 1. Open the software, and connect your iPhone to the Mac. Your device should appear on the screen with basic info.
Step 2. Click on Music on the left sidebar to view all songs stored on your iPhone. You'll see playlists, albums, and individual tracks.
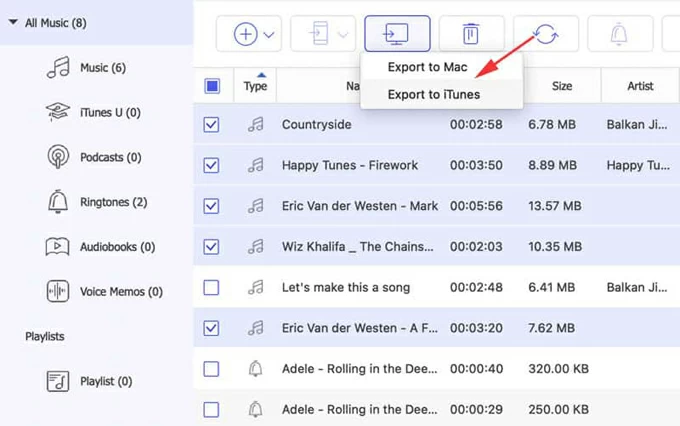
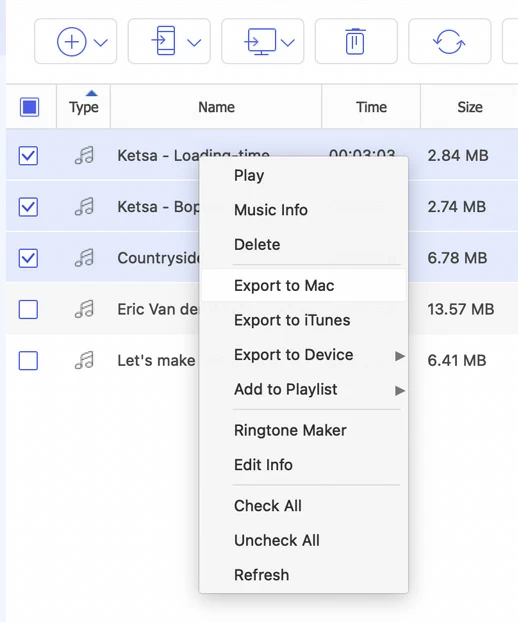
Step 3. Choose a specific album to display all its tracks, then select the songs you want to move to your Mac, click Export to Mac on the toolbar.
The software allows you to select exactly what you want to export: specific songs, albums, or the entire library.
Step 4. In the opening dialog, select your destination, click OK, and wait for the transfer to complete.
Alternatively, after selecting your desired songs, right-click, from the context menu that opens, select Export to Mac.
As you can see in the screenshot above, you can also transfer your music (photos, videos, etc.) to other Apple devices (iPhone, iPad, iPod Touch), or save to iTunes, create ringtones, or add to another playlist.
Higospot iPhone Data Transfer is especially useful when you want to do a large batch transfer of music, videos, and pictures.
Related: How to Erase iPhone without Passcode
Sync music from iPhone to Mac for Apple Music subscriber
If you're an Apple Music subscriber, Apple allows you to sync iPhone music to Mac as long as both are signed in with the same Apple Account. No more third-party software installed. All you have to do is turn Sync Library on; you can then stream those tracks on your Mac machine.
To use Sync Library, you need a subscription to Apple Music
To sync Apple music from iPhone to Mac:
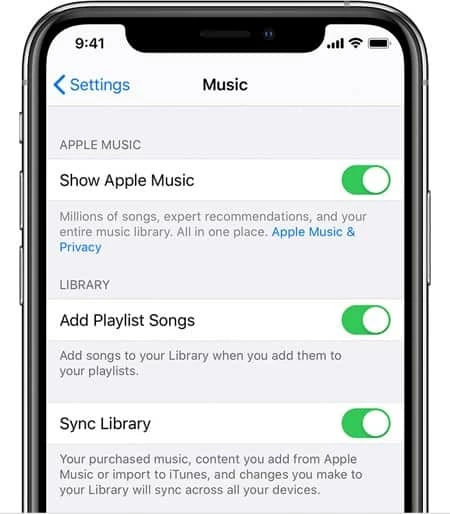
1. On your iPhone, launch the Settings app.
2. Find and tap the Music option in the list of apps.
3. Toggle the Sync Library switch to ON.
Make sure you're signed in with the Apple ID connected to your Apple Music.
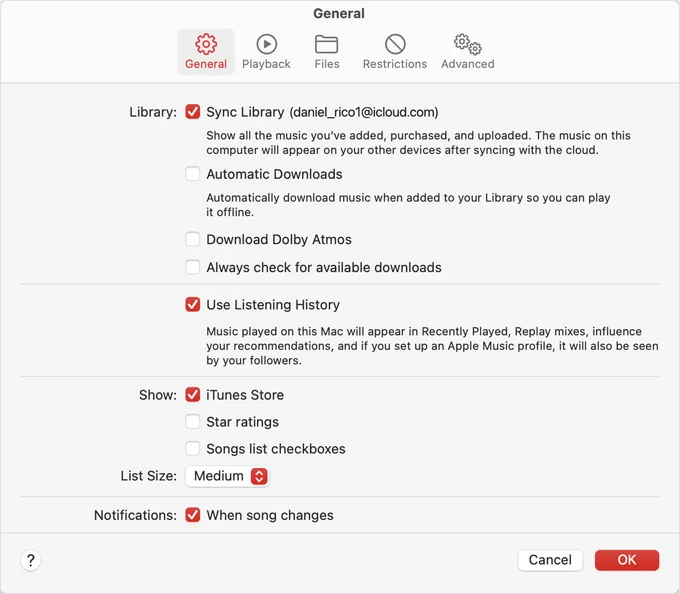
4. On your Mac, open the Music app.
5. Choose Music > Settings.
6. In General tab, check Sync Library.
Your iPhone music library will begin syncing across devices. This may take time depending on your collection size. Songs uploaded to iCloud will appear on the Mac and can be downloaded locally.
Related: How to Recover Old Messages on iPhone
Get music from iPhone to Mac using cloud services
Another way to move music from an iPhone to a Mac is through a cloud storage service (e.g., Dropbox, Google Drive) where you need to upload the tracks from your iPhone to cloud first, and then download them onto your Mac. This method is reliable for user-owned files but depends on the app's export capabilities.
Basic steps:
1. Open the app on the iPhone and locate the file.
2. Upload the tracks to a cloud service.
3. On the Mac, sign into the cloud service with the same account.
4. Download the music files locally.
Conclusion
Transferring songs from iPhone to Mac is straightforward once you match the method to the file type and your macOS/iOS setup. For purchased tracks and routine syncing, use Finder/Music; for a few files, AirDrop or iCloud works well; for non-purchased or bulk exports, a reputable third-party transfer tool like Higospot iPhone Data Transfer is often the fastest and most reliable choice.
About Katrin Gray
Katrin Gray is the Junior Editor at HigoSpot. With a bachelor's degree in Computer Applications, he has been covering Microsoft Windows, Apple macOS, iOS, Android, Social Media, Gaming, and more as a professional writer for over 5 years.
 iPhone UnlockerRemove iPhone & iPad lock screen
 iPhone Data TransferTransfer and manage your iPhone & iPad data
 Android UnlockerRemove Google FRP lock and bypass screen locks
 iPhone Data RecoveryRecover deleted files from iPhone, iPad
 Location ChangerFake a GPS location easily
 Video DownloaderDownload videos from 1000+ sites