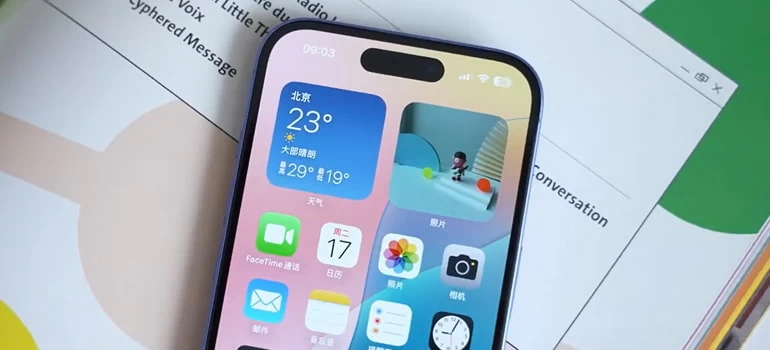
How to Transfer Photos from iPhone to PC — A Full Guide
Do your iPhone photos need to be downloaded into PC Windows 11 or 10? These Apple iPhone transfer tips and tricks will help get you through the ways to import your photos into a PC.

Katrin Gray
Updated on Oct 21, 2025
Moving photos from your iPhone to a PC is one of the most common daily tasks: free up space on the phone, create a local backup, or prepare images for editing.
Luckily for you, it has never been easier to transfer photos from an iPhone to a PC. In the past, you had to use a classic USB cable combined with Photos app or File Explorer, which may only show you a folder of photos in library without date, but now Apple introduces its cloud service—iCloud for mobile, desktop, and the web. And you can also use more efficient third-party tools, something like Higospot iPhone Data Transfer, to preview and selectively transfer what you need. Such tools even come with a set of tools to manage your media library.
Regardless of the methods, you'll want to get a fast, reliable workflow that preserves image quality and metadata. This article explains the main iPhone photos to PC transfer methods, give detailed step-by-step instructions, and show how to choose the best way for your needs.
Table of Contents
Using the Windows Photos App
Windows 11 and Windows 10 come with a built-in Photos app that can import photos directly from your iPhone to PC via USB. It's free, pre-installed, and integrates seamlessly with your PC. No need extra downloads.
For the fastest photo transfers of large iPhone library, use a USB 3.0 port on the PC and avoid USB hubs.
To import iPhone photos to PC:
1. Connect your iPhone to your PC using a USB cable.
2. Unlock your iPhone and tap Trust This Computer if prompted.
3. On your PC, open the Photos app (search "Photos" in the Start menu).
4. Click Import > From a USB device. The app will scan your iPhone and display available photos.
5. Select the photos you want to transfer.
6. Choose the destination folder on your PC.
7. Click Import Selected (or Import All) to begin.
8. After finishing the photo transfer to PC, safely eject the device.
This is the most straightforward way to transfer photos from an iPhone to an PC. It preserves original file quality and EXIF metadata when copying from the DCIM folder.
It's advisable to verify that a few pictures open correctly on your PC before deleting anything from the iPhone library.
Related: How to unlock iPhone without passcode
File Explorer (Drag-and-Drop Simplicity)
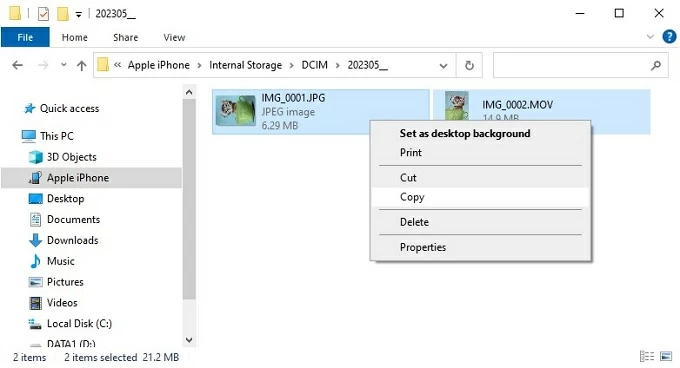
This method gives you full control over which photos to move and where to place them. When your iPhone is connected to your PC, Windows File Explorer recognizes your iPhone as a portable device and allows you to access photos on PC, you then can copy photos from iPhone to PC manually, just like moving files from a USB drive.
To use File Explorer to move photos from iPhone to PC Windows 11 or Windows 10, follow these steps:
1. Connect your iPhone to your PC with a USB cable, then unlock your iPhone and allow access.
2. Open File Explorer on your PC.
3. Under This PC, find your iPhone listed as a device.
4. Navigate to Internal Storage > DCIM.
5. Browse folders (100APPLE, 101APPLE, etc.) containing your photos. If photos don't appear, ensure Settings > Photos > Transfer to Mac or PC on the iPhone is set to Automatic for better compatibility.
6. Select photos or folders, then copy and paste them to your PC.
Wired transfer remains the best method to transfer iPhone photos to PC when speed and fidelity matter; Apple documents this approach as a primary option
To ensure that photos from your iPhone or iPad have the best compatibility with Windows, on your iPhone, open the Settings app, tap Camera > Formats, and then select Most Compatible.
Related: How to transfer music from laptop to iPhone
There are a number of apps in the market specialize in iPhone-to-PC transfers. They usually offer advanced features like selective transfer, full backups, and media management.
If you want to import iPhone photos to PC with more flexibility and even transfer other data types, check out Higospot iPhone Data Transfer. It's a dedicated transfer and manage tool to take care of your iPhone media library, offering more control than Photos app to make transfer seamless, including selective batch export, folder structure preservation, and HEIC format conversion.
Not just pictures, the tool allows users to transfer up to 16 types of data—including contacts, photos, music, videos, messages—between iOS devices, as well as between iPhone and computer. Beyond simple transfers, it supports downloading iCloud content, managing media library and even making custom ringtones for your iPhone. Its focus is on speed, security, and ease of use, helping users avoid the hassle of manual migration.
Win Download Mac Download
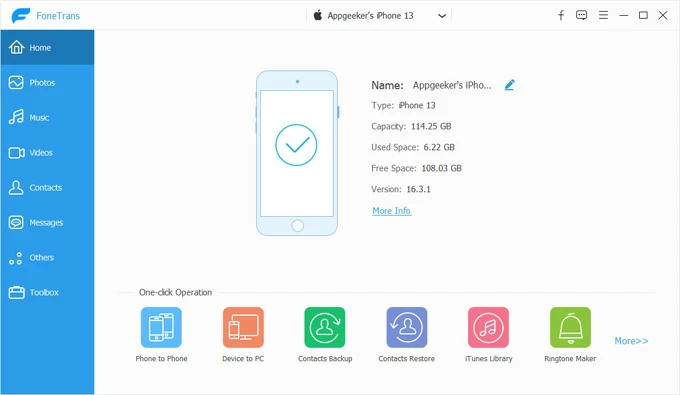
Here's how to import photos from iPhone to PC using iPhone Data Transfer. First of all, click the link above to download the installation package, then follow the on-screen instructions to complete installation.
Step 1. Use a USB cable to connect your iPhone to the PC. The software should automatically detect your device and display categories of data (Photos, Music, Videos, Contacts, etc.), like the screenshot below.
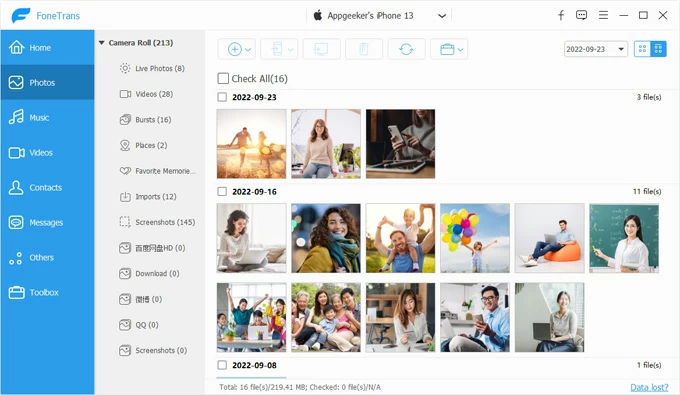
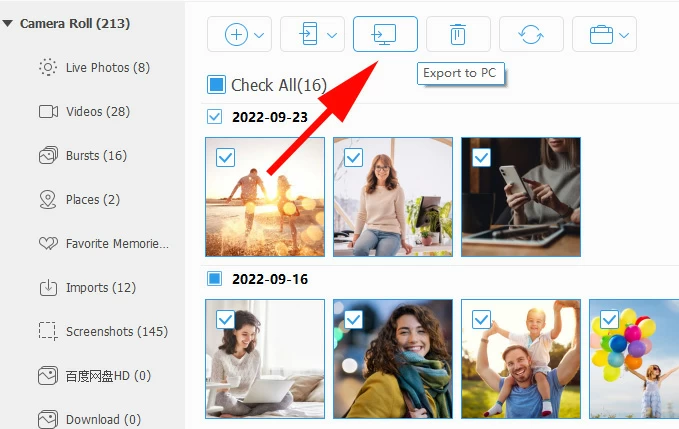
Step 2. Click Photos on the left sidebar. It displays all your photos sorted by Live Photos, Videos, Burst, Places, Imports and others.
Step 3. You can preview and select specific albums or individual pictures if you don't want to transfer everything. Then click Export to PC icon at the top menu to begin transferring your iPhone photos to PC.
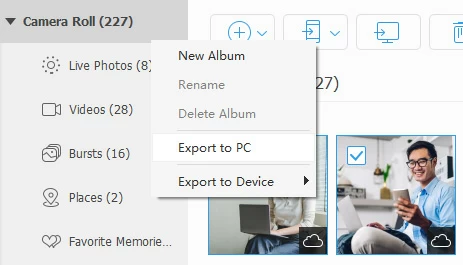
Alternatively, you can right-click the sub-category, from the context menu, select Export to PC.
By default, Higospot iPhone Data Transfer saves your transferred photos in a folder it specifies on your PC (but you can choose a new one). You can open this folder directly from the program or navigate to it in File Explorer.
iCloud Photos (Automatic wireless sync)
Want to view and access iPhone photos on PC anytime, anywhere? Apple's iCloud is your choice. You just enable iCloud Photos on your iPhone and install iCloud for Windows on the PC, let iCloud sync your iPhone library across devices, including Windows PCs. As long as you're signed into iCloud, iPhone photos automatically appear on your PC once synced, no cable needed every time.
Follow these steps to learn how to sync photos from iPhone to PC through iCloud.
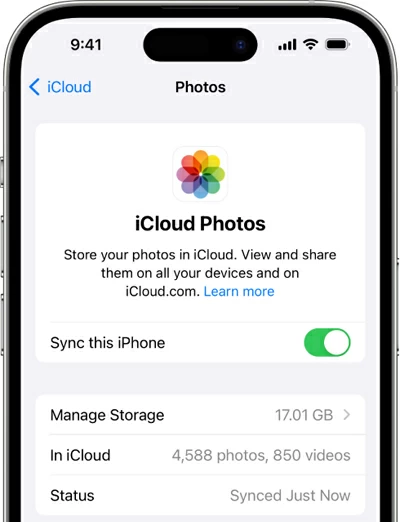
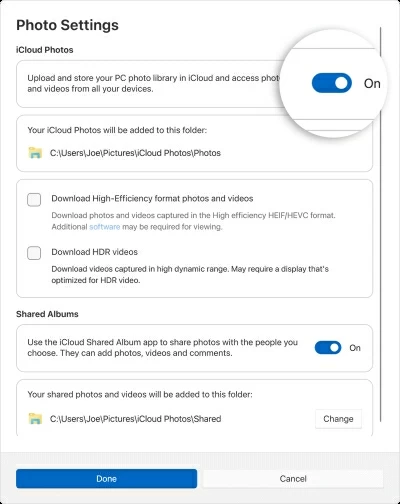
1. On your iPhone, go to Settings > [Your Name] > iCloud > Photos. Then enable Sync This iPhone.
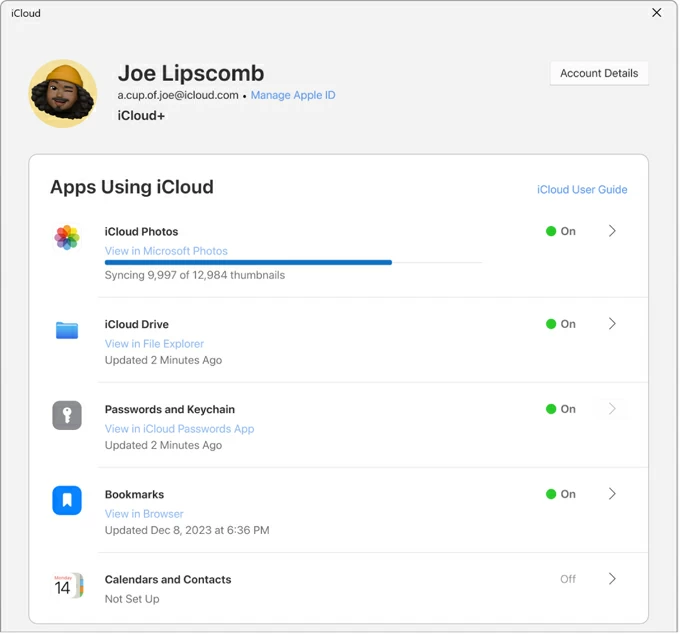
2. On your PC, download and install iCloud for Windows from Microsoft Store.
3. Open iCloud for Windows and sign in with your Apple account, then turn iCloud Photos.
4. Choose Download High-Efficiency format photos and videos.
5. Your iPhone photos will automatically import to the chosen folder on PC.
Keep in mind, iCloud Photos relies on internet speed; initial sync of a large library can take time.
Related: How to recover text messages from iCloud
Other Cloud Services
iCloud for Windows is a convenient option if you want to download photos from iPhone to PC continuously without repeated manual imports. Indeed, there are similar third-party cloud services available to choose from and, the mechanism behind most of them is similar in principle: upload photos from your iPhone to cloud, then access or download them on the PC via the desktop client or web browser.
Popular cloud services for photo transfer: Google Photos, OneDrive, Dropbox, Amazon Photos, Flickr, SmugMug, pCloud.
Example one: How to download iPhone photos to PC via Google Photos
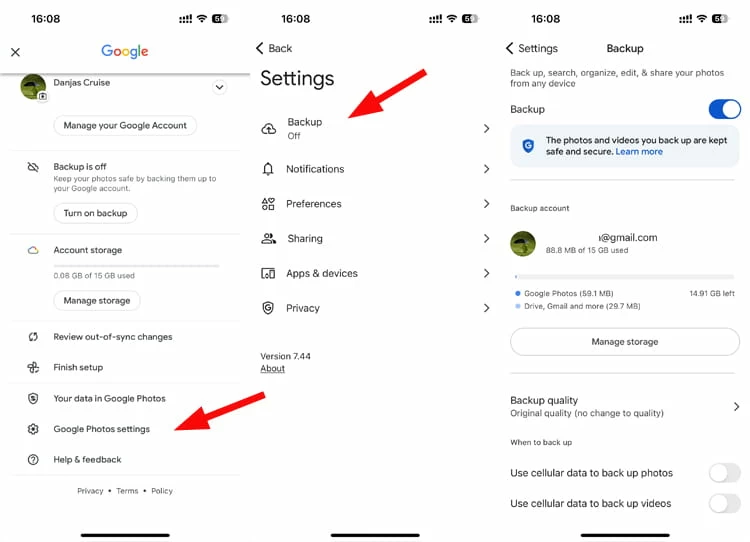
1. Install Google Photos app on your iPhone.
2. Tap your profile picture in the upper right corner, then tap Google Photos settings, and enable Backup & Sync.
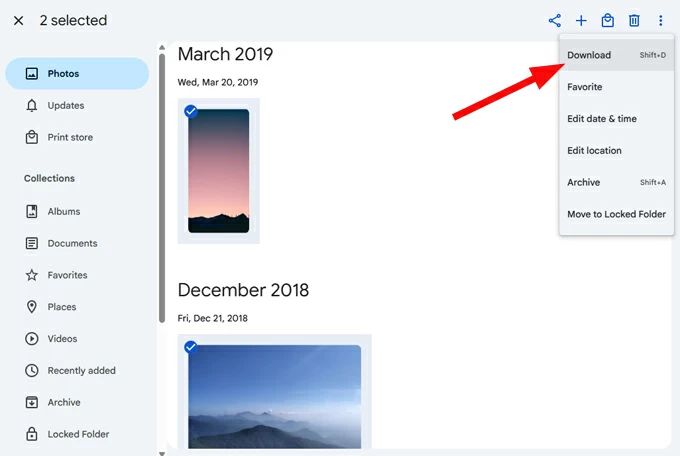
3. On your PC, open photos.google.com or install the desktop app
4. Sign in with the same Google account.
5. Download photos individually or in bulk on your PC Windows 11/ 10.
This approach is ideal for remote photos transfers and for users who want an automatic offsite backup in addition to a local copy.
Beware upload data usage on mobile plans—use Wi-Fi for large uploads.
Example two: How to copy photos from iPhone to PC via OneDrive
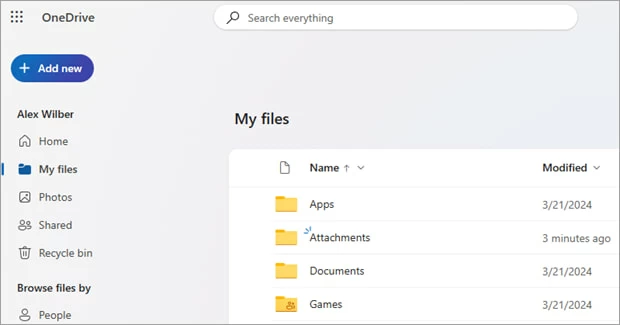
1. Install OneDrive on the iPhone and sign in. In app settings enable Camera Upload/Backup.
2. Wait for photos to upload to the cloud.
3. On Windows PC, open OneDrive app or visit the web portal and download photos to the local PC folder.
Email or Messaging Apps (Quick Transfers)
This method is perfect for getting a handful of photos from iPhone to PC quickly. You can send photos via email or apps like WhatsApp, Telegram, or Messenger.
1. Open the Photos app on your iPhone.
2. Select the photo(s).
3. Tap Share > Mail (or another app).
4. Send to your own email address.
5. Open the email on your PC and download the attachments.
Eventually, your iPhone photos should appear on your Windows 11/ 10 PC.
Related: iPad is disabled connect to iTunes
What's the Best Way to Transfer Photos from iPhone to PC?
Apple's official guidance highlights both wired imports and iCloud Photos as core choices; but you can pick the method that matches your priorities and environment.
- Need speed and full quality for many files? Use wired USB transfer (File Explorer or Photos app).
- Want automatic sync and minimal manual work? Use iCloud for Windows.
- Want selective transfer or manage with flexible options? Use a reputable third-party transfer tool like Higospot iPhone Data Transfer.
- Need cross-platform sharing and offsite backup? Use Google Photos, OneDrive, or Dropbox.
- Need a casual transfer of a few images without cables? Email or messaging app works fine.
Transferring photos from iPhone to PC Windows 11 or Windows 10 is straightforward when you pick the right tool for your needs.
FAQs
- Why isn't my iPhone not showing up in File Explorer?
- Ensure you've tapped Trust This Computer and enter correct passcode to unlock the phone. Also, update iTunes drivers to the latest version if needed.
- What's the easiest way to import photos from my iPhone to a PC?
- Apple recommends using the Windows Photos app, File Explorer, or iCloud to import your pictures to PC.
- Can I download my iPhone photos to PC wirelessly?
- Yes. Options include: iCloud, Google Photos, OneDrive, OneDrive.
- Will my photos lose quality during transfer?
- If you choose to use USB transfers, it preserves full resolution; cloud services may compress images unless you choose "Original quality.""
- Where do imported photos go on my PC?
- By default, the Windows Photos app saves them in the Pictures folder. If using File Explorer, you can copy them to any folder you choose.
- Can I transfer only selected photos from my iPhone?
- Yes. Both the Windows Photos app and File Explorer let you pick specific images. You can also use a more powerful tool like Higospot iPhone Data Transfer to select what you need in a friendly way.
About Katrin Gray
Katrin Gray is the Junior Editor at HigoSpot. With a bachelor's degree in Computer Applications, he has been covering Microsoft Windows, Apple macOS, iOS, Android, Social Media, Gaming, and more as a professional writer for over 5 years.
 iPhone UnlockerRemove iPhone & iPad lock screen
 iPhone Data TransferTransfer and manage your iPhone & iPad data
 Android UnlockerRemove Google FRP lock and bypass screen locks
 iPhone Data RecoveryRecover deleted files from iPhone, iPad
 Location ChangerFake a GPS location easily
 Video DownloaderDownload videos from 1000+ sites