How to Transfer Photos from iPhone to Mac - Top 6 Ways
If you want to move photos from iPhone to Mac for storage or editing, this article tells you how to transfer your photos from an iPhone to a Mac, complete with detailed steps.

Alice Estelle
Updated on Oct 20, 2025
High-pixel and high-resolution photos, especially HEIC images, always tend to occupy a lot of storage on your iPhone. Transferring these precious photos from your iPhone to a Mac isn't just about freeing up room—it's also about preserving the integrity of your cherished memories, enabling easier editing, and ensuring long-term security.
The beauty of the Apple ecosystem is the multitude of ways to achieve this transfer, each suited to a different user need, volume of photos, and connectivity scenario, ensuring a complete transfer of iPhone photos to your Mac computer.
This guide will walk you through six methods on how to transfer photos from iPhone to Mac. Whether you prefer using a data cable to import photos from an iPhone to a Mac or opting for flexible wireless iPhone-to-Mac photo transfer — you'll find the perfect solution here.
With an all-in-one Higospot iPhone Data Transfer tool, you can transfer large quantities of photos from your iPhone to your Mac in one go while preserving the original image quality.
How to transfer photos from iPhone to Mac using cable
How to transfer photos from iPhone to Mac wirelessly
Photos App: The built-in classic
The built-in Photos app on Mac is designed as the primary gateway for wired photo imports. It automatically detects the connected iPhone and treats it as an external camera storage device, allowing you to import photos and videos from your iPhone to Mac. This is the fastest method for a large, first-time, high-volume transfer where internet speed is a limiting factor.
Note: To use this method, you need to first turn off iCloud Photos. Also, to ensure all your iPhone photos are displayed on your Mac, make sure you have chosen to download and keep the originals of your iCloud Photos on your iPhone.
1. Use a certified Lightning to USB or USB-C cable to connect your iPhone directly to the port on your Mac, and allow accessory to connect on your computer.
2. Run the Photos app on Mac. If this is your first import, your iPhone will flash "Trust this computer?" — tap Trust and enter your passcode. (If you forgot your passcode, check How to Get into Your iPhone If You Forgot Your Passcode)
Tip
- It usually launches automatically when an iPhone is detected. If not, open it manually from the Applications folder.
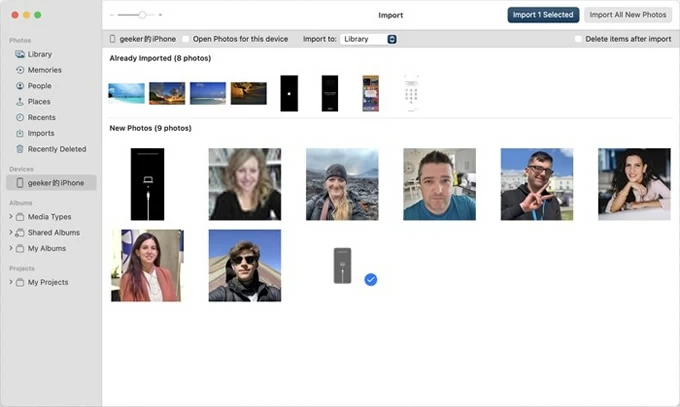
3. Click on your iPhone under Devices in the sidebar, and the Photos app's main window will display all images and videos that haven't been imported yet.
4. Targeted selection and import:
- To import everything new: Click the prominent Import All New Items button at the top-right corner.
- To select specific photos: Click on individual photos or hold the Command key to select multiple photos, then click the Import Selected button.
- To remove the photos from your iPhone after the transfer, check the Delete items after import option in the upper right corner.
5. After the transfer is complete, you'll be redirected to the Imports album to view the photos transferred to Mac. Once everything is fine, disconnect your iPhone from Mac.
Advantages
- Quick and direct — no need for an internet connection.
- Supports importing in full resolution.
- Ideal for large batches or offline backups.
Limitation
- Requires cable connection and manual management each time.
iPhone Data Transfer software: The optimized solution
If you frequently transfer large volumes of photos or videos and want greater flexibility, Higospot iPhone Data Transfer is a powerful option. It provides direct, cable-based transfers without relying on iCloud or Apple's built-in apps, offering more refined selection and management, while supporting various photo formats and destination locations.
Win Download Mac Download
It boasts fast transfer speeds, enabling you to quickly process large photo libraries and move all your photos from iPhone to the Mac at once without losing quality, saving you considerable time and hassle.
Here's how to transfer your photo collection from an iPhone to a Mac computer via iPhone Data Transfer:
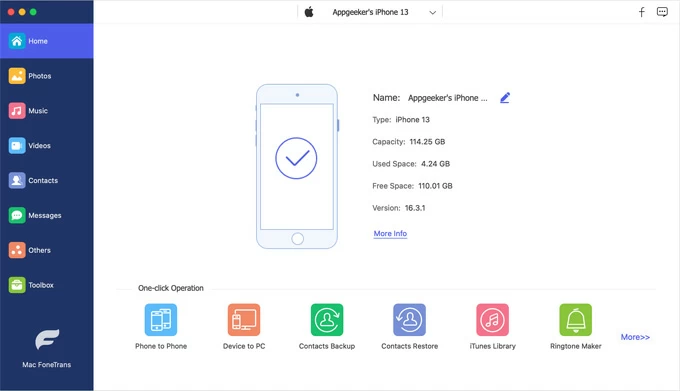
1. Install and launch the software on your Mac. Connect your iPhone using a USB cable and authorize the computer when prompted.
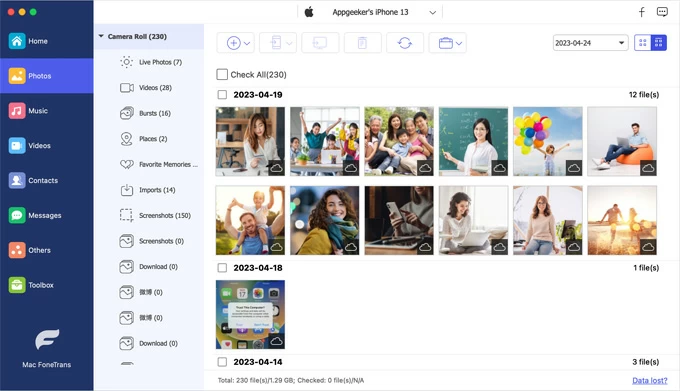
2. After detecting the iPhone, navigate to the Photos tab in the interface to browse your library — thumbnails will load automatically.
3. Select the photos you want to transfer. You can check the boxes next to specific files or albums, or check Select All to pick the entire photo gallery.
4. Once selected, click the computer icon in the top toolbar, then choose your preferred save path and confirm.
Key Advantages
- Transfers photos in original quality with no compression.
- Works without Apple ID login or iCloud sync.
- Enables two-way transfer: from iPhone to Mac and vice versa.
- Supports additional file types — videos, music, contacts, and more.
If you have a Windows 10 PC, you can see how to transfer photos from iPhone to Windows 10.
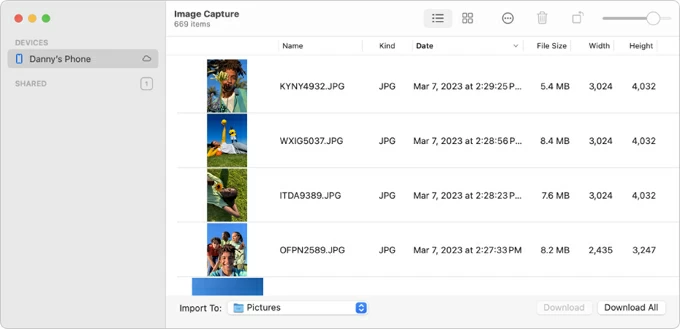
Image Capture: Fine-tune your transfer control
If you prefer more control over where your photos are stored, Image Capture is a lesser-known but powerful macOS utility. It's ideal for users who want to treat photos purely as files and save them to a specific folder outside of the Photos library (such as an external drive, desktop folder, or third-party photo management app), making it a more suitable choice for transferring your photos from iPhone to Mac in those scenarios.
1. Connect your iPhone via data cable and unlock it.
2. Search for and open Image Capture in Launchpad, or run it from Finder > Applications.
3. Select your iPhone under Devices in the left panel, and you'll be able to preview thumbnails of all videos and photos already saved locally on your iPhone.
4. At the bottom of the Image Capture window, use the Import To dropdown menu to designate the final destination folder on your Mac.
5. Select one or more images (holding the Command key for non-contiguous selection), then hit the Download button to copy only the selected files.
6. Alternatively, use the Download All button if you want to copy every single photo and video listed to the chosen destination folder.
Why Use Image Capture?
- Lets you store photos outside the Photos library, such as in external drives or project folders.
- Supports drag-and-drop transfers for custom workflows.
- Often used by professionals who manage large image sets.
Note
- Image Capture does not sync edits or metadata like the Photos app does — it simply moves the original files.
iCloud Photos: Sync photos seamlessly across devices
If you seek convenience and automation, iCloud Photos is Apple's smoothest solution. It keeps your entire photo library up-to-date across all devices connected to the same Apple account, meaning any pictures you take on your iPhone or save to your photo library will automatically appear on your Mac and can be downloaded in their original high resolution, as long as you've enabled iCloud Photos on both your iPhone and Mac.
The goal of this wireless method to transfer photos from iPhone to Mac is not a one-time transfer, but rather to set up continuous synchronization, eliminating the need to manually connect your devices for transfer every time.
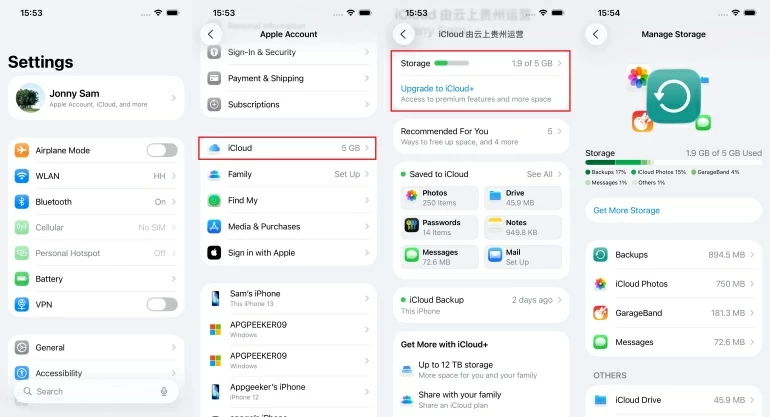
Note: This method heavily relies on your iCloud storage space, which only offers you 5GB of free space. If your photo library is large, consider upgrading your iCloud plan.
Step 1. Prerequisites check (iPhone & Mac):
- Ensure both your iPhone and Mac are logged into the identical Apple ID.
- Confirm your iCloud storage plan is sufficient for your entire photo library. Go to Settings > [Your Name] > iCloud > Storage / Manage Account Storage on your iPhone to verify.
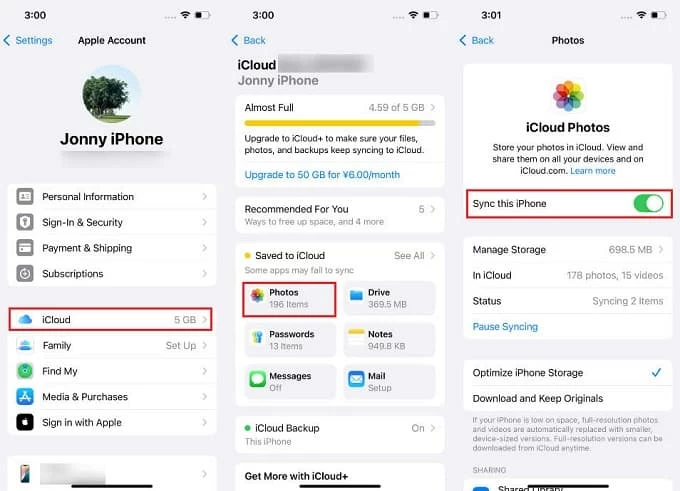
Step 2. On your iPhone (The source):
- Navigate to Settings > [Your Name] > iCloud > Photos.
- Toggle the switch of Sync this iPhone to the ON position.
- Crucially, select the "Optimize iPhone Storage" option if you have limited iPhone storage and want to store the full-resolution files only on the cloud. If storage isn't an issue, choose "Download and Keep Originals" to keep the originals on iPhone and iCloud.
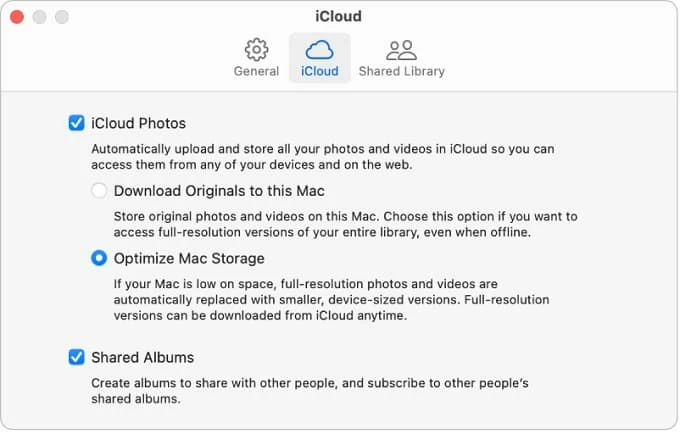
Step 3. On your Mac (The destination):
- Open the Photos application.
- From the Menu bar, select Photos > Settings (or Preferences on older macOS).
- Click the iCloud tab.
- Check the box for iCloud Photos.
- Finalizing the Sync: Choose the "Download Originals to this Mac" option. This guarantees your Mac stores a complete, full-resolution local copy, protecting your library even if you disconnect from the internet. The process will begin immediately and will require time based on the size of your library.
Tips & Notes
- Make sure there's enough iCloud storage.
- Changes made on one device — like deleting or editing photos — sync automatically to all others.
- Ideal for users who prefer ongoing, cloud-based backup rather than manual imports.
AirDrop: Instant wireless sharing
For quick, one-time transfers, AirDrop remains Apple's classic feature, allowing you to directly send photos to Mac from iPhone via Bluetooth and Wi-Fi. It's the ideal choice for instantly sharing a small number of photos without needing a cable.
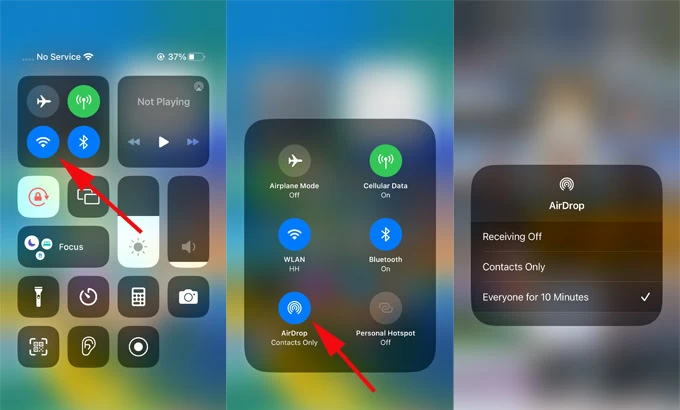
Ensure Wi-Fi and Bluetooth are enabled on both iPhone and Mac, and keep the devices close—ideally within 10 meters—then follow these steps to AirDrop iPhone photos to your Mac:
1. Turn on AirDrop on Mac. Open Finder > AirDrop, or click Control Center > AirDrop. Then set visibility to Contacts Only or Everyone.
2. Enable AirDrop on iPhone. Swipe down the screen to enter Control Center > long press the Wi-Fi box > tap AirDrop. Choose Contacts Only or Everyone for 10 Minutes.
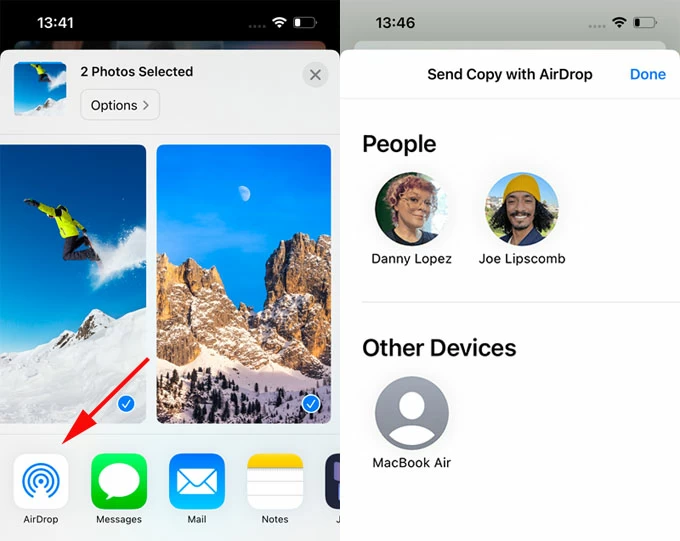
3. Send the photos. On iPhone, open Photos, pick your desired images, tap Share icon at the bottom-left corner, then choose your Mac from the list of available devices.
4. Locate the received photos. A small window will pop up on the Mac desktop; click Accept, and the received files will automatically save to the Downloads folder for immediate use.
Pros
- Fast and wireless — no setup or cables required.
- Perfect for quick, selective transfers.
Limitations
- Works only for Apple devices.
- Not ideal for large or frequent transfers due to slower speed compared to cable tools.
Read more: How to transfer MP3 to iPhone
Email: A simple, universal backup option
The Mail app offers a low-tech method to download photos from your iPhone to a Mac. While it's less efficient for large-volume transfers due to attachment size limits, it's the perfect solution for instantly sending one or two important photos, especially when you need to access them on your Mac right away to add to a document or share with non-Apple users.
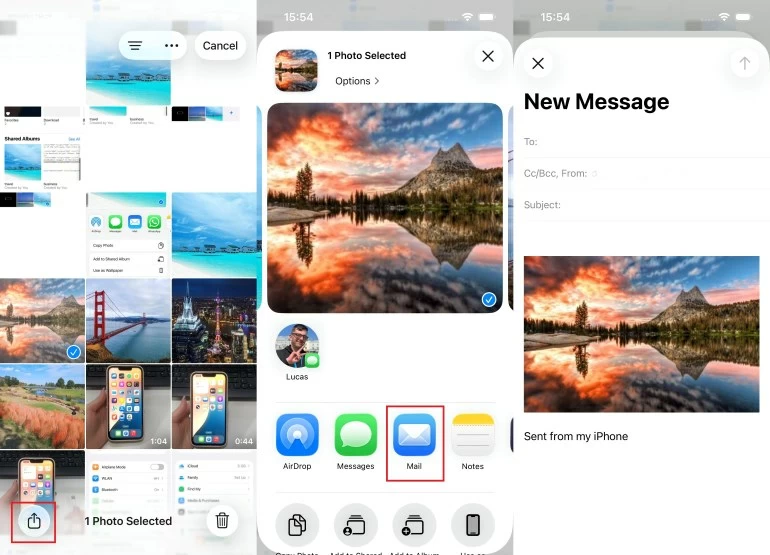
1. Open the Photos app on your iPhone.
2. Select 1-5 photos (depending on attachment size limits).
3. Tap the Share button and then Choose Mail.
4. Enter your own email address (or the recipient's email address).
5. Send the email and open it on your Mac.
6. Download the attachments to your specified folder.
Advantages
- Works without cables or third-party apps.
- Good for quick sharing when other tools are unavailable.
Limitations
- Attachment size limits (usually 20–25MB).
- Not efficient for bulk transfers or large media files.
Also see: How to recover deleted photos on iPhone
Bonus tips for smooth transfers
1. Keep your devices updated to the latest iOS and macOS versions for better compatibility.
2. If you face issues detecting your iPhone, reconnect the cable or reset the Trust This Computer prompt under Settings > General > Transfer or Reset iPhone.
3. Optimize storage: after successful import, review and remove unnecessary duplicates.
4. For professional workflows, combine methods — e.g., use Image Capture for originals and iCloud for continuous sync.
Conclusion
Transferring photos from an iPhone to a Mac computer can be effortless once you choose the method that fits your needs. For automatic cloud syncing, iCloud Photos is unmatched. For manual precision, Photos app and Image Capture give you direct control. When speed and flexibility are essential, Higospot iPhone Data Transfer stands out as the all-in-one powerhouse.
Whether you favor wireless ease or cable-based reliability, these six methods ensure that your treasured photos are always safe, organized, and right where you need them — on your Mac.
FAQs
- Why can't I see my iPhone photos on my Mac after connecting with a cable?
- This usually happens if your iPhone is locked or you haven't tapped "Trust This Computer" when prompted. Try reconnecting your device, unlocking it, and ensuring you use the original Apple USB cable. If the Photos app still doesn't recognize it, restart both devices and reopen the app.
- How do I transfer photos from iPhone to Mac without iCloud?
- You can use several offline methods such as the Photos app, Image Capture, or Higospot iPhone Data Transfer software. These options rely on a physical USB connection and let you move iPhone photos directly to your Mac without needing internet access or iCloud storage.
- What's the fastest way to transfer thousands of photos at once?
- The fastest and most stable method is using Higospot iPhone Data Transfer via USB. It supports bulk transfer in original quality without depending on internet speed, unlike iCloud or AirDrop.
- Which method is the safest for preserving photo quality?
- All official Apple methods — iCloud Photos, Photos app, and Image Capture — preserve original quality. However, iPhone Data Transfer guarantees lossless transfers without compression or conversion, making it best for high-resolution photos and RAW files.
About Alice Estelle
Alice Estelle has been a newspaper editor and a book editor with extensive writing experience. She also has deep research in the field of mobile software and is keen on exploring and solving various problems of iOS and Android systems.
 iPhone UnlockerRemove iPhone & iPad lock screen
 iPhone Data TransferTransfer and manage your iPhone & iPad data
 Android UnlockerRemove Google FRP lock and bypass screen locks
 iPhone Data RecoveryRecover deleted files from iPhone, iPad
 Location ChangerFake a GPS location easily
 Video DownloaderDownload videos from 1000+ sites