iPad Is Disabled and Won't Connect to iTunes: Guide to Unlocking and Recovery
If you see "iPad is disabled connect to iTunes" message on the iPad screen, restarting it won't be enough. Here's how to fix an iPad that says disabled, even it won't connect to iTunes.

Katrin Gray
Updated on Jan 5, 2026
You can restore a disabled iPad by connecting to iTunes, and unlock it with other options.
Chances are, you haven't used your iPad and try to enter a passcode to unlock it, but it refuses. You repeatedly type in the passcodes you think they are right until the screen shows "iPad is disabled connect to iTunes." No more tries. Opps.
Discovering that your iPad is disabled and locked with a passcode can be annoying, especially when the iPad won't connect to iTunes or a computer as instructed. Luckily, there are easy ways, both official and alternative, that can help you unlock a disabled iPad without passcode. This article will walk you through why your iPad gets disabled, how to unlock it with iTunes, what to do when that connection fails, and how to recover your data afterward.
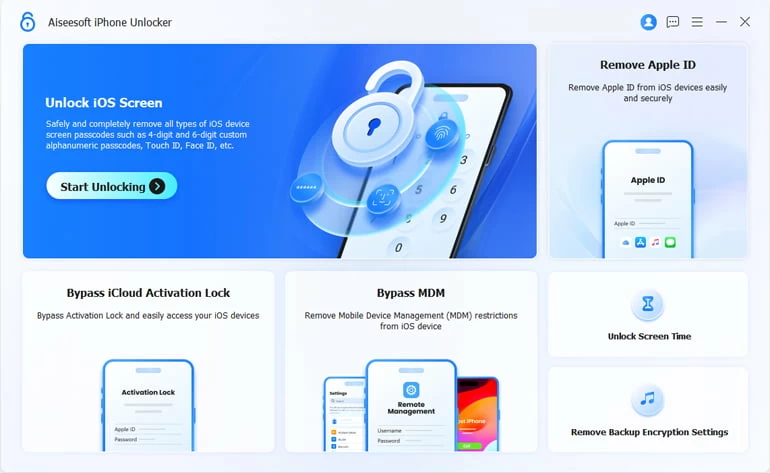
For those who need a quick way to unlock their disabled iPads without passcode when iTunes won't connect, go with Higospot iPhone Unlocker, an extremely helpful tool in unlocking both iPhones and iPads when you forgot passcode, or it says disabled, unavailable, or security lockout.
Table of Contents
Why Your iPad is Disabled
Why does my iPad say connect to iTunes? The most frequent reason for the iPad is disabled message is a series of incorrect passcode attempts. This feature is designed to prevent a thief or an unauthorized person from guessing your passcode and accessing your personal information. The more failed attempts, the longer the lockout period becomes.
The lockout timeline is as follows:
- 6 failed attempts: iPad is disabled for 1 minute.
- 7 failed attempts: iPad is disabled for 5 minutes.
- 8 failed attempts: iPad is disabled for 15 minutes.
- 9 failed attempts: iPad is disabled for 60 minutes.
- 10 or more failed attempts: The iPad is permanently disabled and will display the "iPad is disabled connect to iTunes" message.
This final message is a clear signal that the iPad requires a full factory reset to be unlocked. You can't get into a disabled iPad without erasing all of its content, a process that is also referred to as restoring the device in recovery mode. This is a necessary step to remove the passcode.
Related: iPhone security lockout
How Can You Unlock an iPad with iTunes When It Says Disabled?
When your iPad says disabled connect to iTunes, the official Apple solution is, as the screen indicates, to put the device into recovery mode and restore it with a computer that has iTunes installed. This process involves erasing your iPad data, downloading and installing a fresh copy of iPadOS, and then allowing you to set it up again.
Before you start:
- You will need a Mac or a PC.
- If you have a Mac running macOS Catalina (10.15) or newer, you will use Finder. If you have a PC or a Mac with an older OS, you will use iTunes. Make sure you have a PC with the latest version of iTunes
- Have a Lightning or USB-C cable to connect your iPad to the computer.
- The process will erase all data and settings from your iPad, so having a recent backup is critical to restoring your information later.
Steps to connect iPad to iTunes when disabled:
1. Before restoring your iPad with a computer, make sure your iPad is unplugged from the computer.
2. Turn off the iPad completely.
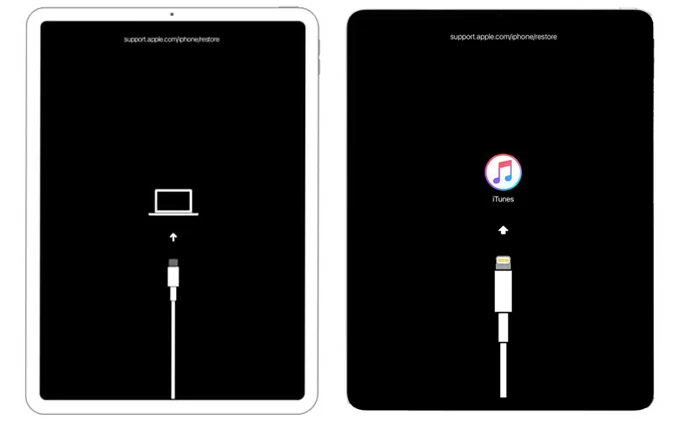
3. Enter Recovery Mode. This is the key to getting your computer to recognize the disabled iPad. The method varies based on your iPad model.
For iPads with a Home button: Press and hold the Home and Top (or Side) buttons at the same time. While holding these buttons, connect the iPad to your computer. Keep holding the buttons until you see the recovery mode screen, which shows a computer and cable icon.
For iPads without a Home button (Face ID models): Press and quickly release the volume button closest to the Top button. Then press and quickly release the volume button farthest from the Top button. Finally, press and hold the Top button. Continue holding the Top button until the recovery mode screen appears and you connect the iPad to your computer.
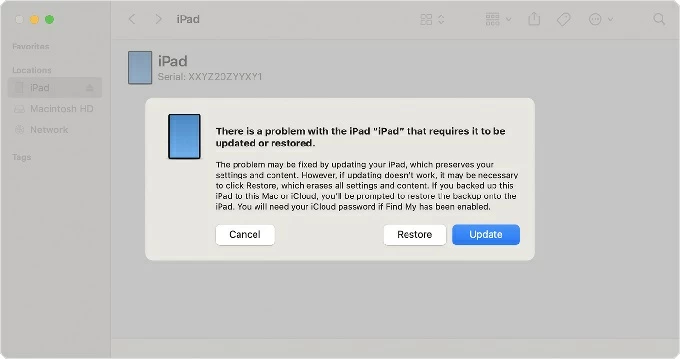
4. Once your iPad is in recovery mode, your computer should display a message in Finder or iTunes prompting you to "Restore" or "Update" the device. Choose Restore.
5. Your computer will then download the necessary iPadOS software and erase the device. If the download takes more than 15 minutes, the iPad will exit recovery mode, and you will have to repeat the process from the beginning.
Once the process is complete, you can disconnect your iPad. If you don't have a recent backup you may have created with iCloud or a computer, you have to set it up as a new device.
Related: How to unlock iPhone without iTunes
When iTunes Won't Connect or Recognize the Disabled iPad
Sometimes, your disabled iPad says "connect to iTunes," but nothing happens when you plug it in, , or iTunes doesn't recognize the device. This is a common issue that can be caused by a variety of factors, from a simple cable problem to a software glitch. iTunes is designed to not interact with a locked device unless it's in recovery mode.
Here is how you can get rid of the "won't connect to iTunes when iPad is disabled" issue:
- Check Your Cable and USB Port: A damaged or non-Apple-certified cable, or a faulty USB port on your computer, can prevent a proper connection. Try a different cable or plug into another USB port.
- Force Restart Your iPad: Even though the iPad is disabled, a force restart can sometimes help. Once it restarts, try connecting to the computer again.
- Update Your Computer's Software: Ensure your Mac or PC is running the latest operating system. Make sure iTunes or the Apple Devices app is fully updated. An outdated version of the software may not have the necessary drivers to recognize a disabled iPad.
- Try a Different Computer: If the connection still fails, the issue might be with your computer, not the iPad. Trying another computer can help you determine if the problem is with the device or the computer itself.
How to Unlock a Disabled iPad Without iTunes or a Computer
If these troubleshooting steps don't work, you may need to consider other options beyond a simple iTunes connection. Fortunately, there are a few alternative methods for how you can fix "my iPad is disabled and says connect to iTunes" problem. All of these methods will result in data loss unless you have a backup to restore from, though.
Using iPad unlocking app
If you can't unlock your iPad with iTunes, there are numerous third-party software tools available. These programs claim to be able to unlock a disabled iPad, even if it won't connect to iTunes. However, like the other methods, they still rely on a full factory reset, meaning you will lose all data on the device.
One of the most popular is Higospot iPhone Unlocker. Despite the name, the app is packed full of features including the ability to reset lock screen passcode, removing inactive Apple ID, unlocking SIM card lock, getting rid of remote management lock and much more on both iPads and iPhones. In a word, Higospot iPhone unlocker supports removal of various locks.
Win Download Mac Download
To reset a disabled iPad that won't connect to iTunes, Download the iPhone Unlocker and then install it on your computer.
Run the app, then select "Unlock iOS Screen" from its main interface.
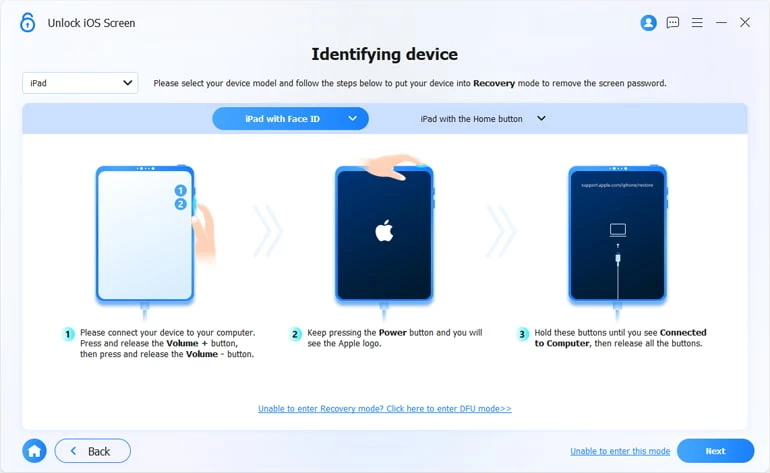
Next, connect to your computer. If it isn't recognized, follow the onscreen instructions to boot it from recovery mode.
In the next step, confirm your iPad model.
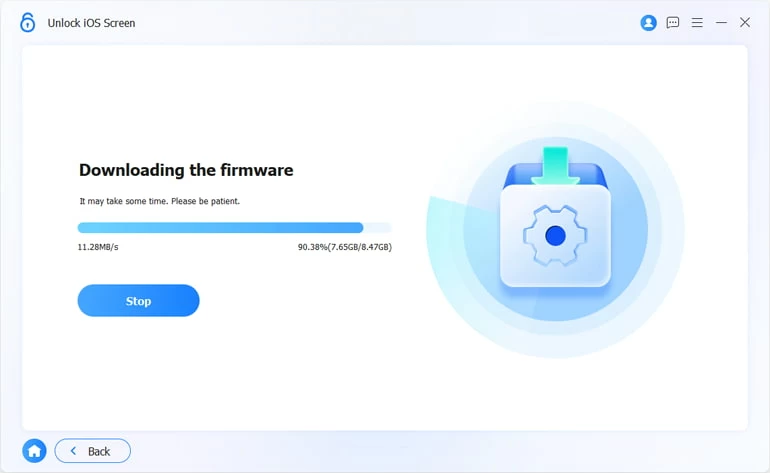
When you're ready, click "Start Now" button to begin download necessary software for your iPad.
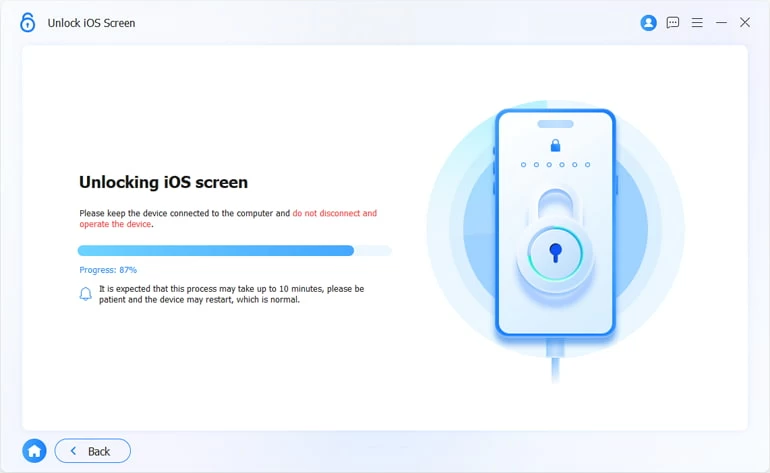
Once it finishes, a unlocking confirmation message pops up. Review it carefully and then click the "OK" button again to initial the unlock process.
Wait until the progress bar reaches to 100%. Disconnect your iPad from your computer, and you're ready to set it up again and use it.
Using iCloud's Find My Feature
If you previously enabled "Find My iPad," you can use this feature to remotely erase your device.
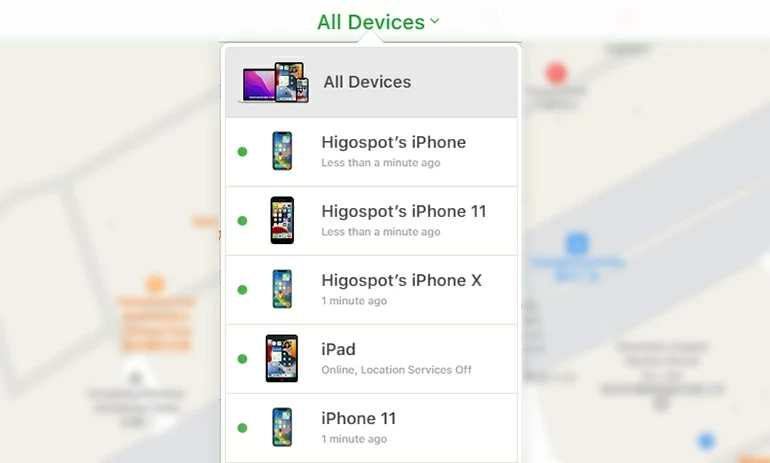
1. Go to icloud.com/find on any web browser.
2. Sign in with the same Apple ID used on the disabled iPad.
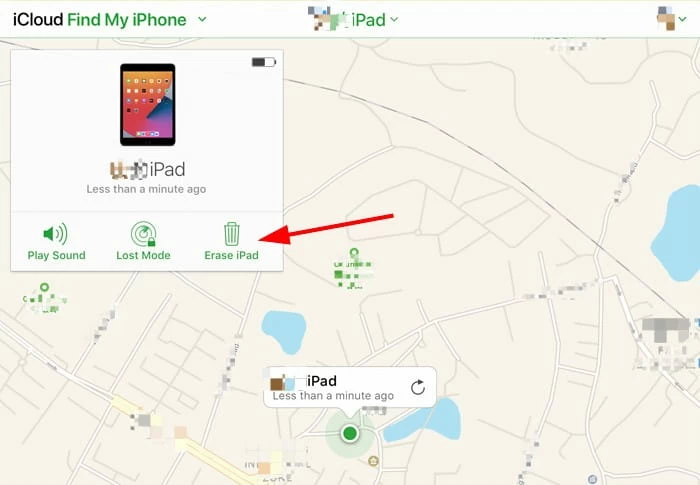
3. Click on "All Devices" and select your disabled iPad from the list.
4. Click "Erase iPad" and confirm the action. The device will be remotely erased, and the passcode will be removed.
5. After the device restarts, you can set it up as a new iPad and restore your data from a recent iCloud backup.
Related: Pictures disappeared from iPhone
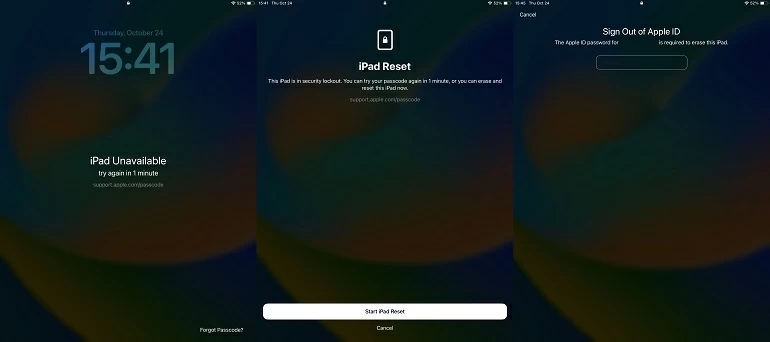
Using the Security Lockout Screen
For iPads running iPadOS 15.2 or later, Apple introduced a new feature that simplifies the unlocking process.
Here's how to unlocked a locked iPad in iPadOS 15.2 or later.
After a number of failed passcode attempts, the Security Lockout or iPad Unavailable screen may display a "Forgot iPad?" at the bottom. Tapping this button will initiate a remote erase of the device without needing a computer. You will be prompted to enter your Apple ID and password to confirm the process, which will result in data loss.
Avoiding a Disabled iPad in the Future
The most effective way to deal with "a disabled iPad connect to iTunes" issue is to prevent it from happening at all.
First, create a passcode that is both secure and memorable to you. The use of biometric authentication, such as Touch ID or Face ID, is also a highly effective way to avoid passcode attempts. These features provide a quick and secure way to unlock your iPad without the need for manual entry, significantly reducing the chances of an iPad security lockout.
Secondly, you should always maintain a consistent and up-to-date backup of your iPad. You can back up your device to iCloud or a computer. Having a recent backup is the only way to ensure that your data—photos, contacts, texts, documents, apps data, and settings—is safe from a permanent loss when iPad displays iPad disabled connect to iTunes screen. You can't get into a disabled iPad without resorting to its factory settings. A backup ensures you can restore all of your data, even after a full factory reset.
About Katrin Gray
Katrin Gray is the Junior Editor at HigoSpot. With a bachelor's degree in Computer Applications, he has been covering Microsoft Windows, Apple macOS, iOS, Android, Social Media, Gaming, and more as a professional writer for over 5 years.
 iPhone UnlockerRemove iPhone & iPad lock screen
 iPhone Data TransferTransfer and manage your iPhone & iPad data
 Android UnlockerRemove Google FRP lock and bypass screen locks
 iPhone Data RecoveryRecover deleted files from iPhone, iPad
 Location ChangerFake a GPS location easily
 Video DownloaderDownload videos from 1000+ sites