How to Transfer Photos from iPhone to Windows 10: The Ultimate Guide
There are a few different ways to copy your photos and videos to Windows 10 depending on the situation you're on. Here's how to do it wired and wirelessly.

Katrin Gray
Updated on Oct 15, 2025
Your iPhone has accumulated a huge number of photos and videos in library. Are you worried that your phone storage will soon run out? You can easily transfer your photos from an iPhone to a Windows 10 PC.
Whether you prefer a direct USB transfer using File Explorer or the Photos app, a wireless sync via iCloud, or a third-party tool, this guide walks you through the different methods step by step so you can copy your iPhone photos to Windows 10 reliably and avoid common pitfalls like locked devices, missing permissions, or duplicate files.
If you need an easy way with flexible controls, give Higospot iPhone Data Transfer a try. It is a desktop application for Mac and Windows that gives users advanced control over iPhone and iPad media library, offering features beyond iTunes such as selective and incremental backups, sorting the photos by date, transferring photos, videos and music between iPhone and computer, and media management (preview, delete, move, check info).
Table of Contents
USB Cable Transfer (File Explorer / Photos App)
Let's begin with the simplest: the cable. You just connect your iPhone to a Windows 10 PC with a USB cable and import photos with File Explorer or the built-in Photos app. This way, you can quickly download photos from iPhone to Windows 10 and free phone storage.
How to copy Photos from an iPhone to Windows 10 PC with cable:
First of all, use a working USB cable and plug the iPhone into a USB port on the PC, then unlock the iPhone and tap "Trust This Computer" if prompted.
Use File Explorer
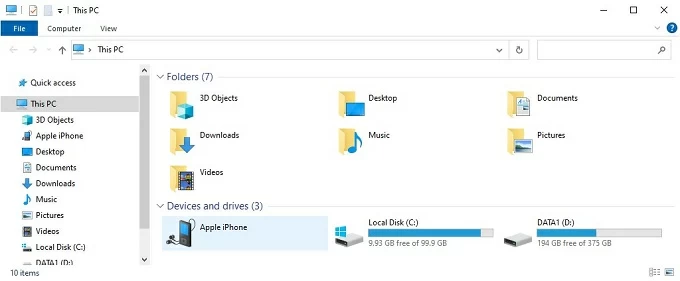
1. Open File Explorer and find the iPhone listed as Apple iPhone under This PC.
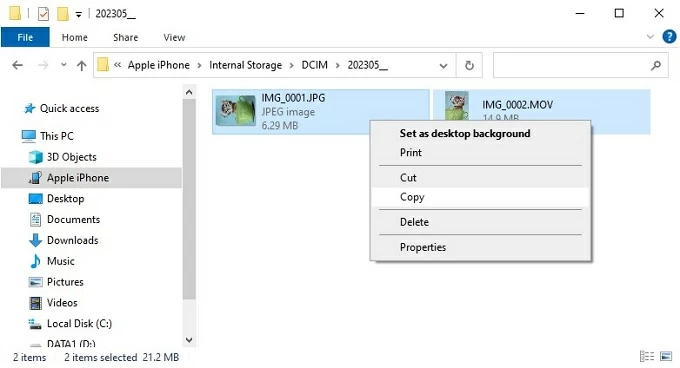
2. Navigate to Internal Storage > DCIM; you'll see subfolders—oddly named like 100APPLE, 101APPLE containing images and videos.
3. Select pictures (and videos) , then copy and paste them into a folder on your PC.
4. If some photos don't appear, check that iCloud Photos is disabled on the iPhone.
Related: How to recover permanently deleted photos on iPhone without backup
Use Windows 10 Photos app
1. Open the Photos app from the desktop on your Windows 10 PC. You can also type Photos in the Start menu to launch it.
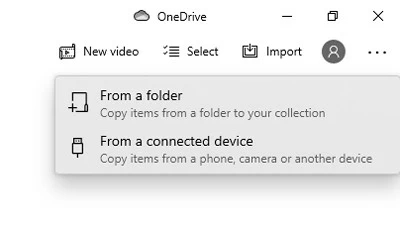
2. Click Import in the top-right corner and choose From a connected device.
3. Wait while Photos scans the iPhone, then select the photos and videos you want to import or choose Select all.
4. Choose a new folder on your PC or accept the default, then click Import.
5. After import, safely eject the iPhone from File Explorer before unplugging.
Pros:
- Fast for large libraries and videos.
- No internet required.
- Preserves original file metadata and quality when copying photos from DCIM folders.
Cons:
- Sometimes, transfers fail if I select too many at once, especially videos or Live Photos.
- You can't see photos neatly by date
- Sometimes the iPhone just won't appear unless reconnecting or toggling trust again.
Here, we'll use a reputable third-party app named Higospot iPhone Data Transfer to handle the transfer task. It offers more flexible controls than Windows 10 built-in tools: it sorts the photos by date automatically, making it very easy to find the items you need; it supports selective album export; and it even supports HEIC conversion for Windows compatibility.
As a versatile suite, iPhone Data Transfer also includes the ability to transfer and manage your music, videos, contacts, messages and other files.
Win Download Mac Download
No matter you want to get photos off iPhone to Windows 10 computer or vice versa, you can accomplish it quickly with Higospot iPhone Data Transfer. Here's how.
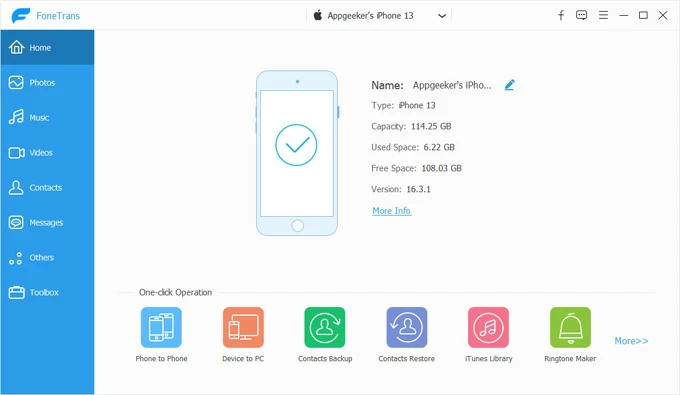
1. Launch the tool on your Windows 10, and then connect your iPhone; the device name and basic info should appear on the screen.
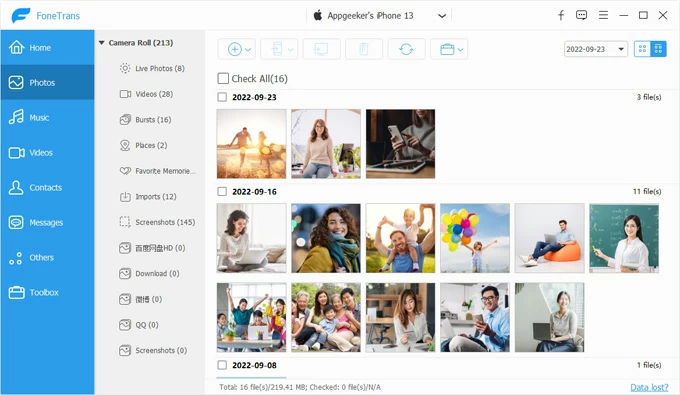
2. Choose Photos from the categories list in the left side.
3. Browse the photo libraries shown such as Camera Roll, Live Photos, Videos, Bursts, Places, Screenshots, Albums, or others.
4. Select the photos to transfer. You can select individual photos by clicking their thumbnails or tick the "Check All" option to transfer everything in the chosen folder.
5. Click the Export To PC button icon. In the folder dialog, pick or create the destination folder on your Windows 10 PC. Finally, click Open or OK to begin the transfer.
After the process, open the destination folder in File Explorer and confirm photos and subfolders are present and viewable.
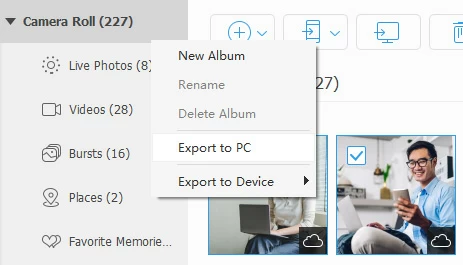
Alternatively, right-click the name of album, from the context menu, select Export to PC to finish transferring iPhone photos to Windows 10.
Don't forget to safely eject the iPhone, then unplug the cable.
Pros:
- Selective transfer and precise control
- Fast, reliable bulk transfers
- Format handling and HEIC conversion
Cons:
- Learning curve for new users who only need simple drag-n-drop transfers.
Related: How to reset iPhone without passcode and computer
iCloud for Windows (Wireless Sync)
Let us step toward iCloud, Apple's own cloud storage service. You will want to install iCloud for Windows on your PC, sign in with your Apple Account, enable Photos syncing. Then, like a river, photos flow from iCloud to a folder on Windows 10—no plugging needed. New photos appear as they sync.
The bad news? Apple only gives 5 GB free storage, which can be quickly filled up with your photos, videos, and other files, forcing upgrades to paid plans. Also, downloading large libraries depends on internet speed and can be slow or stall on unstable connections.
If you don't mind those, follow these steps to sync photos wirelessly to a folder on your PC Windows 10.
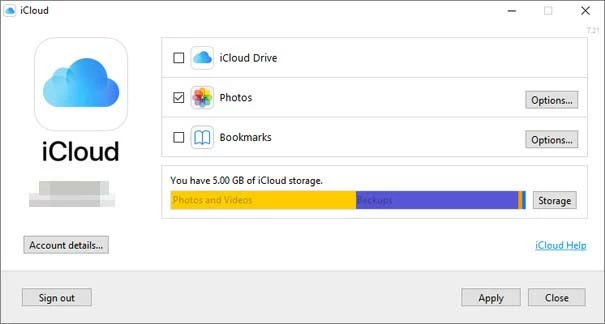
1. Install and sign in to iCloud for Windows on your PC.
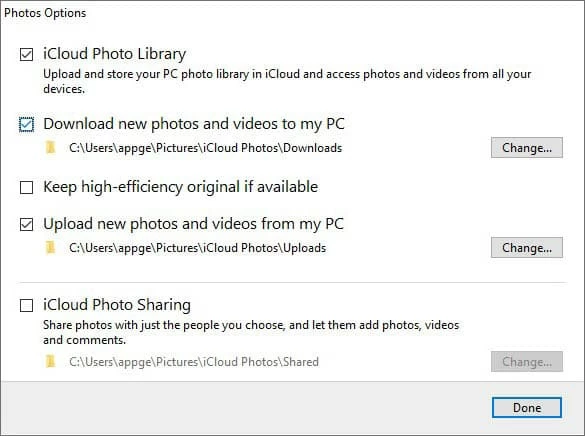
2. check the Photos option and click Options next to Photos to enable iCloud Photos.
3. Choose whether to use Download new photos and videos to my PC. Confirm or change the local folder where iCloud places downloaded photos in File Explorer
4. After enabling Photos in iCloud for Windows, open File Explorer and go to the iCloud Photos folder on the left sidebar.
5. Use the Downloads or Photos folders there to find and save copies of photos you need.
6. Copy or moving them to another Windows 10 PC folder.
To get full-resolution originals instead of optimized thumbnails, be sure to check "Keep high-efficiency original if available" option in iCloud for Windows to download original photos to the PC Windows 10.
Pros:
- Automatic and continuous syncing keeps a copy of new photos on your PC without manual imports.
- Works across Apple devices and provides easy access to originals
- No direct cable connection needed each time.
Cons:
- Storage limits and cost
- Sync delays and reliance on internet
Related: How to unlock iPad passcode
Cloud Services (OneDrive, Google Photos, Dropbox)
Similar to iCloud, non-Apple cloud services like enables access or download iPhone Photos on your Windows 10 PC via the desktop client or web.
Basic steps for those services: install the cloud service on your iPhone and enable camera upload or backup, On Windows 10, install the corresponding desktop app or open the web interface to view and download photos to your PC.
Here we will take Google Photos as example to show you how to import photos from iPhone to Windows 10 PC.
1. On the iPhone: install and open the Google Photos app and sign in with your Google account.
2. Tap your profile icon (top-right), go to Photos settings, and enable Back up & sync. Wait for your photos and videos to be uploaded to Google Photos.
3. On the Windows 10 PC open a web browser and go to https://photos.google.com and sign in with the same Google account.
4. Browse or search to find the photos you uploaded. Use the Select checkbox on thumbnails to choose single or multiple items.
5. Click the three-dot menu or the vertical ellipsis and choose Download to save selected photos to your PC.
The downloaded items should appear in browser's Downloads folder unless you choose another folder.
Using cloud services is great for remote workflows or when you need to send photos from iPhone to Windows 10 laptop while traveling.
Pros:
- Cross-platform access
- Many services offer automatic camera uploads to streamline backup.
Cons:
- Cloud storage is shared across services and large photo libraries may require paid plans.
- Newly uploaded photos may take time to appear on the web or in Drive for desktop, delaying downloads.
Related: How to transfer music from laptop to iPhone
Comparison and When to Use Each Method
It's hard to say which is the best way to transfer your iPhone photos locally to your laptop Windows 10. You would know what matters most.
1. If you want privacy and local control, use the cable with File Explorer + Photos app when transferring large libraries, videos, or when speed is critical.
2. If you want to get more control over your entire media library, no just photos, use third-party data management solution, like Higospot iPhone Data Transfer. It transfers your photos and videos by date, and can copy your music to and from iPhone.
3. If you want ease and low maintenance: use iCloud for Windows; pay for storage if needed; let syncing handle the rest; accept the cloud's pace.
4. If you're in Microsoft's world already, turn on OneDrive camera uploads in iPhone and enjoy Windows integration. Google Photos, Dropbox are all great cloud storage services.
5. If you just need occasional transfers, email or message a handful of photos to yourself. It may go through a compression process but you get immediacy.
FAQs
- Why doesn't my iPhone appear on my Windows 10 laptop?
- If the PC doesn't recognize the iPhone, try a different USB cable, another USB port, or restart both devices
- Do I need iTunes to transfer photos over USB?
- No, you do not need iTunes to copy photos over USB; Windows recognizes the iPhone as a camera device and you can import via File Explorer or the Photos app without iTunes
- How do I get full-resolution originals instead of optimized photos thumbnails?
- If your iPhone uses Optimize iPhone Storage, originals may be in iCloud only; enable iCloud Photos and choose to download originals to the iPhone before transferring, or use iCloud for Windows to download originals directly to the PC
- Will transferring photos delete them from my iPhone?
- No, copying or importing photos to Windows does not delete originals by default; however, some import tools offer an option to delete after import
- What's the fastest method for bulk transfers?
- A direct USB copy via File Explorer, the Photos app, or popular third-party tool like Higospot iPhone Data Transfer is typically fastest for large batches because it transfers over the cable instead of relying on internet upload/download.
- What should I do if some photos are missing from DCIM in File Explorer?
- Ensure iCloud Photos isn't storing originals only, check the Photos app on the iPhone to confirm uploads completed, and try importing via the Windows Photos app which can sometimes surface items the DCIM view does not.
Conclusion
Transferring photos from an iPhone to a Windows 10 PC is straightforward when you match the method to your priorities. The features described—USB import, Photos app, iCloud for Windows, cloud services, third-party tool, and wireless transfers—each provide distinct advantages and deliver concrete benefits: faster transfers, automatic syncing, and flexible organization. Whether you need to copy iPhone photos to PC Windows 10 once or set up a recurring workflow to get photos off iPhone to Windows 10 computer, this guide helps you pick the right path and get it done reliably.
About Katrin Gray
Katrin Gray is the Junior Editor at HigoSpot. With a bachelor's degree in Computer Applications, he has been covering Microsoft Windows, Apple macOS, iOS, Android, Social Media, Gaming, and more as a professional writer for over 5 years.
 iPhone UnlockerRemove iPhone & iPad lock screen
 iPhone Data TransferTransfer and manage your iPhone & iPad data
 Android UnlockerRemove Google FRP lock and bypass screen locks
 iPhone Data RecoveryRecover deleted files from iPhone, iPad
 Location ChangerFake a GPS location easily
 Video DownloaderDownload videos from 1000+ sites