How to Transfer Photos from iPhone to External Hard Drive: A Complete Guide
Is Your iPhone full of photos and eats too much storage space? Looking to save your memories onto an external hard drive? Here's how to import your iPhone pictures to your external hard drive disk.

Katrin Gray
Updated on Oct 28, 2025
Your iPhone is a powerful camera, but its storage fills up quickly. With every photo and video you capture, storage space shrinks. Suddenly, you're faced with the dreaded "Storage Almost Full" alert.
That's when many users start searching for solutions like "how to transfer photos from iPhone to external hard drive" or "how to backup my iPhone photos to external hard drive."
Transferring photos isn't always straightforward. You may need a computer, the right cables, or even adapters. And if you're not careful, you could waste hours troubleshooting. In this article, we'll walk you through why you should transfer, how to do it on both Mac and PC, and even how to move photos without a computer. By the end, you'll know exactly how to save iPhone photos to an external hard drive—with confidence.
For a quick and easy photos transfer between your iPhone, iPad, computer, and external hard drive, go with Higospot iPhone Data Transfer, which lets you transfer and manage your media library with the desired flexibility.
Table of Contents
Why Transfer Photos to an External Hard Drive?
Before diving into the actual transfer, let's clarify the motivation:
1. You will want to free up iPhone storage for new photos, apps, and updates.
2. After export your iPhone photos to external HDD, you can create a secure backup of irreplaceable memories.
3. You can organize photos and videos outside of iCloud or subscription services.
4. Moving your photos locally enables editing on desktop software in your computer without clogging your phone.
5. Finally, it can archives long-term collections safely offline.
Related: How to transfer music from laptop to iPhone
Transfer Photos from iPhone to External Hard Drive Using a PC (Windows 10/11)
By connecting your iPhone via USB to a computer, you can use Windows built-in File Explorer or Photos app to import photos, then drag them to the external hard drive. It doesn't require internet, and works with any external hard drive, including Seagate, WD, Toshiba, and SSDs. Best of all, it handles large batches of photos quickly.
Here's how to import iPhone photos to external hard drive using a PC Windows 11 or 10.
1. Connect iPhone and external hard drive to PC.
2. Unlock iPhone with Face ID, Touch ID, or your passcode, and then tap Trust This Computer if prompted.
3. Open Photos app.
4. In the Photos app, click the Import button (usually in the top-right corner)
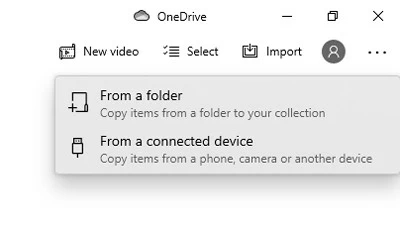
5. Select From a connected device.
6. The Photos app will detect your iPhone. Select it from the list.
7. The app will scan your iPhone and show available photos and videos.
8. Manually select specific photos/videos you want, or choose Import All.
9. Select a temporary folder on your PC where the photos will be saved.
10. Drag/copy them to the external hard drive. Ensure the external drive is formatted to exFAT/FAT32 for cross‑compatibility.
Benefits: You can download photos from iPhone to external hard drive in minutes, freeing up space instantly and ensuring your memories are safe.
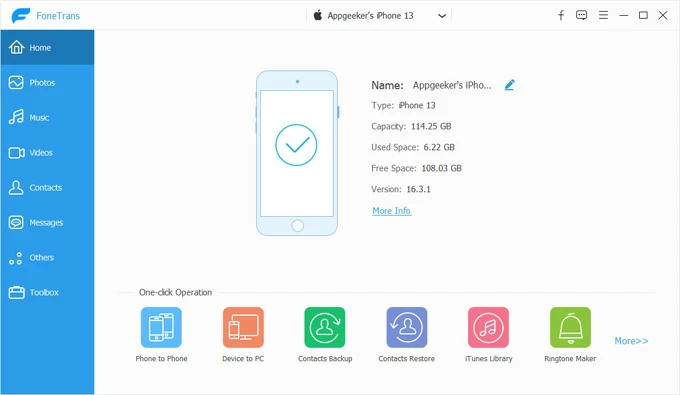
Higospot iPhone Data Transfer is a desktop application for Windows and macOS that allows users to manage their iPhones and iPads more flexibly than iTunes or Finder. It supports media files transfer (bidirectional), backup, organization, and includes the ability to edit personal information (contacts, messages, podcasts), and even make custom ringtones. It's ideal for users who want full control over data on the device.
Specifically regarding the transfer of photos from iPhone to external hard drive, you can use filter to view your photos in iPhone library by date, and select what you want to quickly export them.
Win Download Mac Download
Here's how it works.
1. Download, install, and run the software on your either PC or Mac machine. Then connect your iPhone.
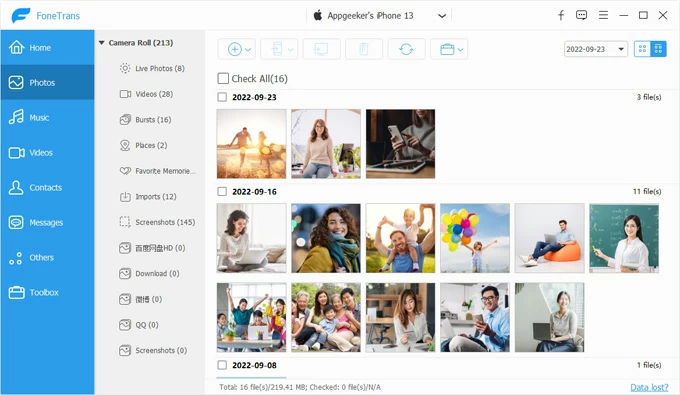
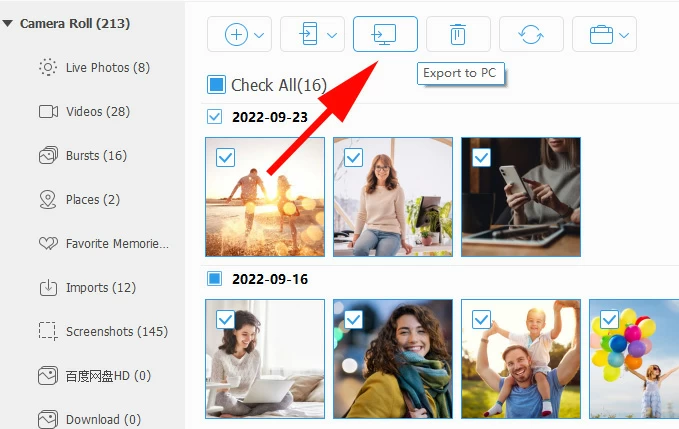
2. Click Photos on the side bar to open your photo library. It will load your albums, videos, screen shots, and media types (e.g., selfies, panoramas).
Click the 4 small squares at the upper right corner to sort your photos by date.
3. Preview and select the photos and videos you want to move to external hard drive, then click the "computer" icon (see below).
When a dialog opens, create a new folder (recommended) on your computer to save them.
4. Plug your external hard drive to your computer.
5. Drag/ copy the full folder to your external drive.
More features of photos transfer and organization:
- Create album on your iPhone to organize photos into custom folders.
- Drag and drop photos from computer into iPhone's albums.
- Rename albums or delete unwanted ones.
- Move pictures from one album to another
- Select unwanted photos and click Delete to remove them from your iPhone.
- Preview photos and videos directly before exporting.
- Transfer between iPhone, iPad, computer, and external drives.
Benefit: You can save iPhone photos to external hard drive quickly and easily, while managing your media library. There are also options to take cares of your music, including transferring songs to and from iPhone, making ringtones, de-duplicate, and even editing ID3 tags.
Related: Why see support.apple.com/passcode error
Copy Photos from iPhone to External Hard Drive Using a Mac
In Mac, Apple also comes with a Photos app or Image Capture to import your photos from iPhone. You then can move them to an external hard drive connected. One big benefit of using a Mac is that the process supports HEIC/HEVC formats natively.
To move iPhone photos to external hard drive, follow these steps:
1. Plug your iPhone and external HDD into your Mac.
2. Unlock your iPhone and trust the machine.
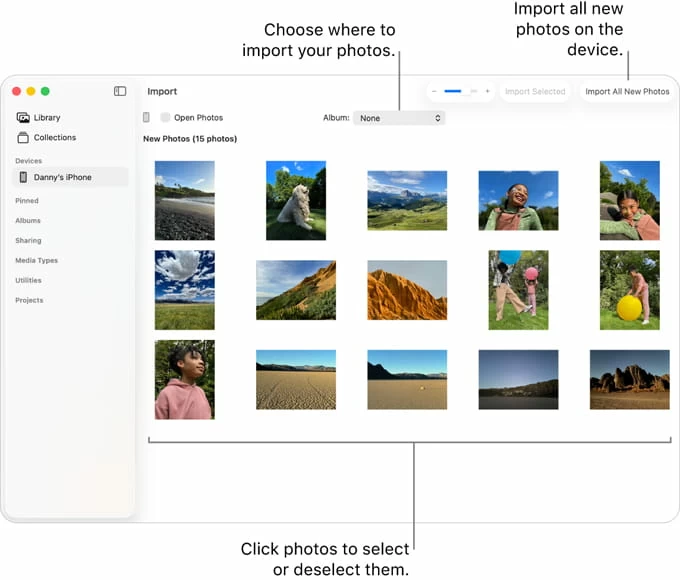
3. On your Mac, open the Photos app. You should find it in Applications or via Spotlight search.
4. After it detects your phone, click your iPhone under Devices in the sidebar.
5. An Import screen will appear showing all photos and videos on your iPhone.
6. Browse through the thumbnails of your iPhone photos.
7. Choose Import All New Photos to transfer everything not yet imported, or select specific photos/videos and click Import Selected.
8. Next to "Import to," you can select an existing album or create a new one.
9. The Photos app will copy the selected photos (and videos) into your Mac's Photos Library.
10. Drag them to the external hard drive in Finder.
Benefit: You can export iPhone photos to external hard drive without worrying about compatibility, keeping your Mac and iPhone in sync.
Related: How to transfer photos from PC to iPhone
Direct Transfer Without a Computer
Another feasible approach is connect external hard drive directly to your iPhone using a Lightning to USB adapter or USB-C cable (for iPhone 15 and above), then use Files app to copy your photos and videos. No PC or Mac required, making it a portable solution for travel.
What You'll Need:
- iPhone (iOS 13+)
- External hard drive / SSD (formatted as exFAT, FAT32, APFS, or HFS+ — NTFS is not supported on iPhone)
- Adapter 1: For Lightning iPhones: Lightning to USB 3 Camera Adapter (with power passthrough recommended, since many drives need extra power)
- Adapter 2: For USB‑C iPhones (iPhone 15 series): USB‑C to USB adapter or direct USB‑C cable
Here's how to do.
1. Connect external drive to iPhone with adapter.
2. Open the Files app on your device, then tap Browse, under Locations, you should see your external drive listed.
3. Open Photos app.
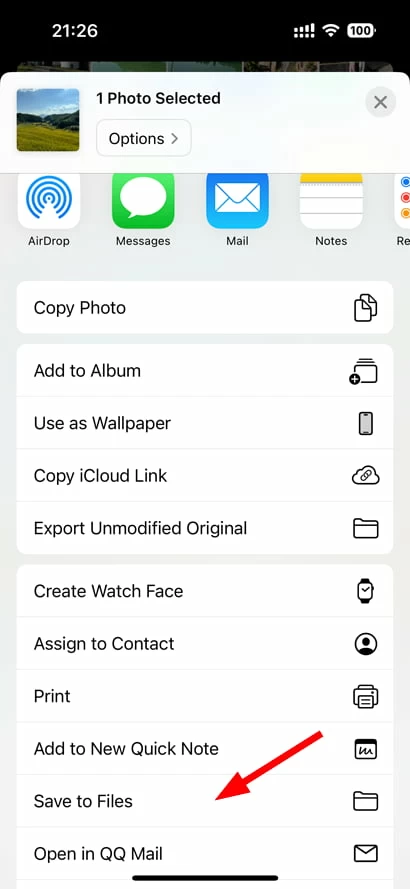
4. Select photos and videos you want to move.
5. Tap Share.
6. In the Share Sheet, choose Save to Files.
7. Choose external drive as destination under Locations.
8. Select or create a folder where you want the photos stored.
9. Tap Save.
Benefit: You can transfer photos from iPhone to external hard drive without computer, perfect for vacations or when you're offline.
Related: iPad Unavailable message
Backup iPhone Photos to External Hard Drive
Apple's iTunes (Windows) or Finder (Mac) can be used to create a full iPhone backup, then copy the backup folder to an external drive. However, this backs up not just photos but also apps, settings, and messages.
If the way iTunes or Finder does is suitable for you, do the following:
1. Connect iPhone and external hard drive to your PC/ Mac.
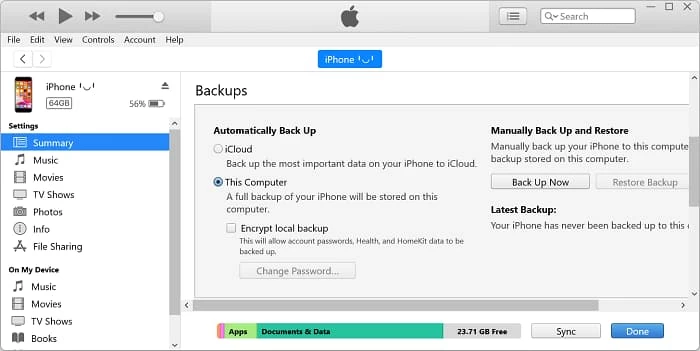
2. Open iTunes/Finder, then select the device after detection.
3. In Summary or General tab, click Back Up Now.
4. Locate backup folder.
macOS: ~/Library/Application Support/MobileSync/Backup/
To get there quickly: In Finder, click Go > Go to Folder…, then paste the path above.
Windows: \[YourUsername]\AppData\Roaming\Apple Computer\MobileSync\Backup\
5. Copy the backup folder to external hard drive.
Benefit: You can backup iPhone photos to external hard drive as part of a complete device backup, ensuring nothing is lost.
Cloud storage services
The last way we'll use is sync your iPhone photos to iCloud, Google Photos, or OneDrive, then download them to your PC/Mac and move to external drive that's connected.
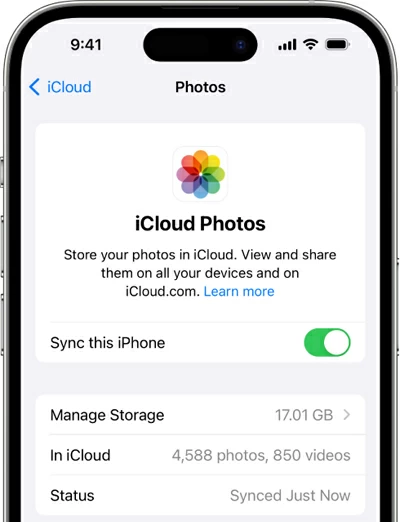
1. On your iPhone, open Settings.
2. Tap your Apple ID name at the top, then go to iCloud > Photos.
3. Toggle on Sync this iPhone. This will automatically upload and store your entire photo library in iCloud.
4. For other cloud storage services, find the similar sync option, turn it on.
5. Open a browser on your PC/ Mac and go to iCloud.com (or another cloud service you selected) webpage.
6. Sign in with your credentials.
7. Click Photos.
8. Browse and select the photos or albums you want.
9. Click the Download icon or similar icon.
10. The photos will be saved to your Downloads folder (or wherever your browser saves files).
11. Copy all your downloaded iPhone photos to external hard drive that's connected.
Benefit: You can export iPhone photos to external hard drive while also keeping a cloud copy, doubling your protection.
Related: iPhone unavailable try again
Troubleshooting Tips
- iPhone not recognized? Unlock device, tap Trust This Computer, update iTunes/Windows drivers.
- External drive not showing? Ensure it's formatted to exFAT/FAT32 (compatible with both Mac and Windows).
- HEIC format issues? Before transferring to external drive, make sure convert to JPEG in iPhone settings: go to Photos > Automatic under Transfer to Mac/PC. (You can also use Higospot iPhone Data Transfer's HEIC converter to handle it.)
- Not enough space? Ensure external drive has sufficient capacity.
Conclusion
Transferring photos from iPhone to an external hard drive doesn't have to be overwhelming. By learning the options outlined in this article, you gain control over your memories. On Windows, you can use File Explorer or Photos app; on Mac, there is also Photos or Image Capture to take care of the transfer. If you're travelling, connect directly without a computer through an adapter. For full protection, back up via iTunes/Finder or combine with cloud storage. If you need to full control over the entire transfer process, third-party tool, something like Higospot iPhone Data Transfer, is also available.
Your iPhone stays clutter-free, your memories stay safe, and you stay in control.
FAQs
- Can you transfer photos from iPhone to external hard drive directly?
- Yes, with the right adapter and iOS 13 or later, you can directly connect your iPhone and external hard drive, and then use the Files app to transfer your photos. More details, refer to the method in the article.
- What's the fastest way to move iPhone photos to external hard drive?
- Using a USB 3.0 cable with a PC/Mac is fastest for large libraries.
- Will transferring delete photos from iPhone?
- No, unless you manually confirm that you will want to delete them after transfer.
- Can I save videos too?
- Yes, when you choose to transfer iPhone photos to an external hard drive, you can also select videos in the album.
About Katrin Gray
Katrin Gray is the Junior Editor at HigoSpot. With a bachelor's degree in Computer Applications, he has been covering Microsoft Windows, Apple macOS, iOS, Android, Social Media, Gaming, and more as a professional writer for over 5 years.
 iPhone UnlockerRemove iPhone & iPad lock screen
 iPhone Data TransferTransfer and manage your iPhone & iPad data
 Android UnlockerRemove Google FRP lock and bypass screen locks
 iPhone Data RecoveryRecover deleted files from iPhone, iPad
 Location ChangerFake a GPS location easily
 Video DownloaderDownload videos from 1000+ sites