How to Transfer Videos from iPhone to Mac: A Full Guide
Your iPhone storage is almost full and want to export all of your large videos locally to your Mac? Here's how to move videos (and photos) to Mac machine different ways to free space.

Katrin Gray
Updated on Dec 22, 2025
iPhones have great performance for capturing high-quality videos—4K, 60fps, HDR, Cinematic mode, slow-motion, and time-lapse. As video quality improves, file sizes grow dramatically. A one-minute 4K HDR clip can easily exceed 400MB, and longer recordings can reach several gigabytes. Whether you're a content creator, a student, or someone documenting family moments, sometimes you will want to transfer videos from iPhone to your Mac for editing, storage, or backup.
Apple provides several ways to move videos between its ecosystem — Photos app, AirDrop, iCloud Photos, Image Capture. And there are many of excellent third-party file transfer tools to choose from.
If you don't like the way Apple does, or want a more flexible route to handle transfer tasks, check out Higospot iPhone Data Transfer. It allows for the seamless transfer of files — including photos, music, videos, podcasts — to and from iPhone. Beyond that, the software includes a set of tools to manage your personal files on the device, giving users more granular control over their individual files.
Table of Contents
Things to know
Sending a video on iPhone to a Mac seems simple, but real-world complications often get in the way:
Large and long videos fail to import
High-resolution videos (especially 4K/60fps or HDR) can be huge. When transferring, users may encounter "Some items were not imported" errors, videos not showing up in the import window, or import freezes.
HEVC/H.265 compatibility issues
Newer iPhones record in HEVC by default. Older Macs or outdated macOS versions may struggle to decode or import these files.
Videos not appearing in the import window
This is extremely common. Causes include iCloud Photos optimization, or videos stored only in iCloud, not on the device.
Slow transfer speeds
Even with a USB-C or Lightning cable, transfer speeds can drop due to USB 2.0 cables, background iCloud syncing, or low battery mode.
Related: How to Erase iPhone Without Passcode
Use Photos app
Built into macOS, preserves metadata
For most Mac users, the Photos app remains the most dependable way and intuitive. It's built into macOS and designed specifically for importing photos and videos from an iPhone to a Mac—especially large or long videos. It preserves metadata, and integrates with the Mac's media library.
Here's how to transfer Video from iPhone to Mac using the Photos app.
Preparation:
- Update both your iPhone and Mac to ensure compatibility with HEVC, HDR, and new video formats.
- Use a high-quality USB-C to USB‑C or USB-C to Lightning cable
- Unlock your iPhone. The Photos app cannot read your device if it's locked.
- Ensure enough storage on your Mac. Large videos can quickly fill your Photos Library.
Detailed Steps:
1. Connect your iPhone to your Mac. If prompted, tap "Trust This Computer" and enter your passcode.
2. Open the Photos app on your Mac if it doesn't open automatically.
3. In the sidebar, select your iPhone under Devices. Wait a few seconds for the media to load.
If you have many videos, loading may take longer.
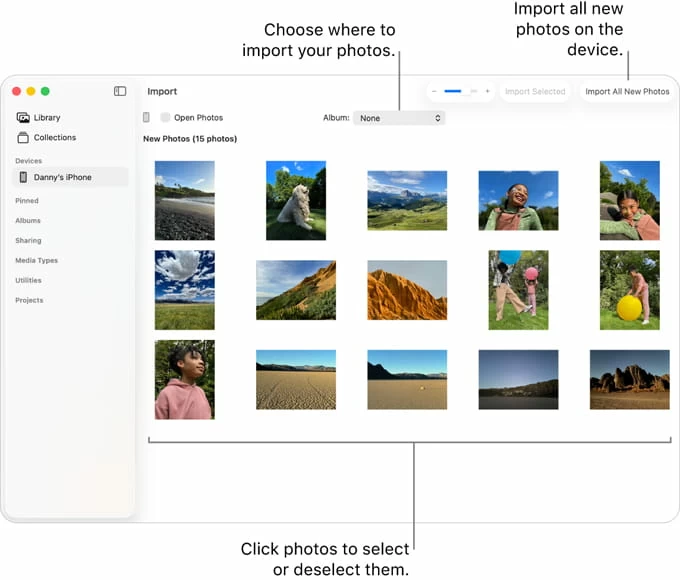
4. Select the videos (and photos) you want to transfer. you can press Command + A to select all or click to select individual videos.
For large videos, selecting them individually is safer to avoid transfer interruptions.
5. When you're ready, click Import Selected or Import All New Items.
The Photos app will begin getting the videos from iPhone to your Mac's Photos Library. They are stored inside the Photos Library package, organized by date and metadata.
6. When the import finishes, you'll see the videos in the Imports album.
Precautions when using the Photos App to transfer videos
Disable "Optimize iPhone Storage": If you have iCloud Photos enabled with Optimize iPhone Storage, some videos may exist only in iCloud—not on the device. To fix it, go to Settings > Photos > Download and Keep Originals.
Avoid HEVC/HDR compatibility issues: Newer iPhones record in HEVC (H.265). Older Macs may not support it. To fix it, go to Settings > Camera > Formats > Most Compatible.
Avoid low battery mode: Low Power Mode throttles performance and can slow transfers.
Don't interrupt the import: Unplugging the cable mid‑transfer can corrupt files.
Related: How to Recover Deleted Contacts on iPhone
Use Third-party tools
Useful for bulk transfers
Importing high-resolution videos from an iPhone to a Mac can often feel like a hurdle, especially when dealing with large 4K files or specific formats that don't always play nice with standard Apple's native tools. Higospot iPhone Data Transfer simplifies this by acting as a powerful bridge, giving you more granular control.
While the Photos app is great for normal video transfer, the tool is better for:
- Bulk Transfers: Moving dozens of large video files at once without interruption.
- Browsing videos by specific categories (Movies, TV Shows, Home Videos) rather than one giant camera roll.
- Choose to export all videos, or specific items from a specific album
- Move photos, videos, music freely between your computer and your mobile device without erasing existing data.
- Manages everything from photos and music to specialized data like messages, notes, and contacts.
- Ringtone Maker integration: Turns any song into a custom ringtone and trims it to the exact duration you want.
If you're looking for a reliable and comprehensive tool to manage, back up, and transfer data across iOS, iTunes, Finder, and computer (Mac, PC), it's highly recommend adding Higospot iPhone Data Transfer to your arsenal as it can do a lot of things.
Win Download Mac Download
Follow these steps to transfer videos from iPhone to Mac.
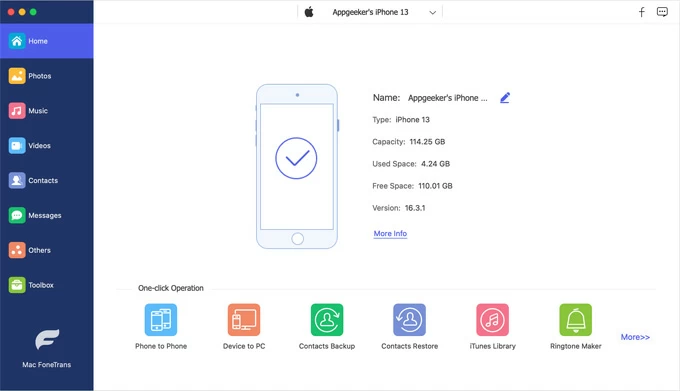
Step 1. Launch the tool on your Mac and connect your iPhone using a USB or Lightning cable. Once the software recognizes your device, you'll see a dashboard showing basic information of storage.
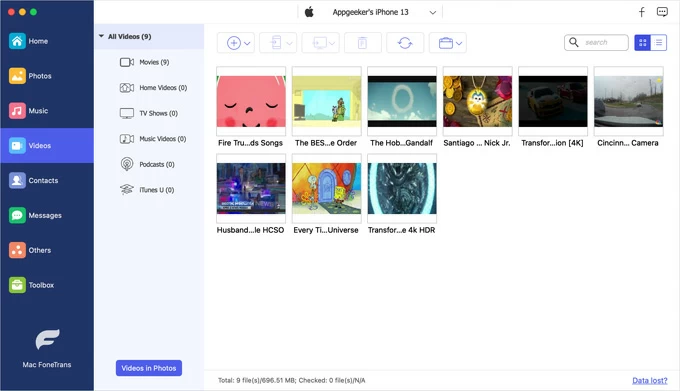
Step 2. Click on the Videos icon in the sidebar. The tool will load thumbnails of your videos, sorted by different albums such as Movie, Home Videos, TV Shows, Music Videos, etc.
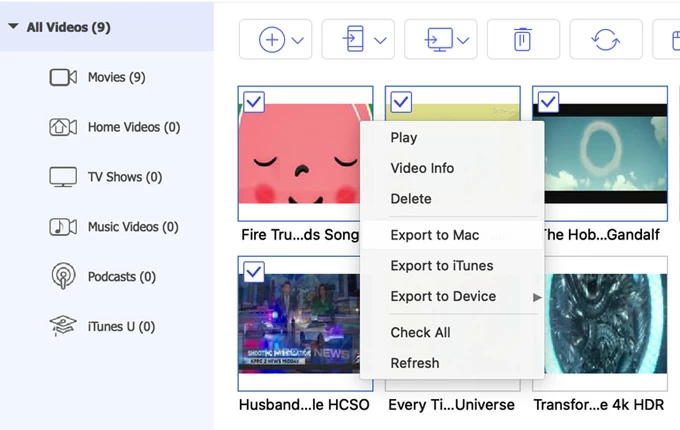
Step 3. To move videos from iPhone to Mac, open a specific where contains the videos you want to save locally, select specific videos, then click Computer icon on the top menu. From there, select Export to Mac.
Step 4. A window will pop up asking you to choose a destination folder on your Mac. Select your folder and click Open. The transfer will begin immediately, and a progress bar will show you exactly how much time is remaining.
You can also use the right-click context menu to send videos from iPhone to Mac. You have two main ways to export your videos:
- Right-click on the name of a specific album, then select Export to Mac to save all videos of the album.
- After selecting specific videos, right-click and select Export to Mac from the opening menu.
If you simply want to import every video on your iPhone into your Mac computer without picking through them from library, use the Device to Mac shortcut on the bottom of home screen. Just check the Videos box and hit Next—the tool will handle the rest in one click.
Whether you are performing a surgical transfer of specific clips or a bulk backup of your entire library, the software provides a streamlined, one-click solution that ensures your high-quality footage is safely stored and organized on your computer.
Related: How to Transfer Music from Laptop to iPhone
Use AirDrop
Fast and wireless, but unreliable for very large videos.
While third-party tools offer extensive management features, AirDrop remains the fastest and most convenient native way to transfer small video from an iPhone to a Mac. Because it uses a combination of Bluetooth and Wi-Fi to create a secure, peer-to-peer connection, it doesn't require a cable or even a shared Wi-Fi network to work.
Preparation:
- Both Bluetooth and Wi-Fi must be turned ON for both the iPhone and the Mac.
- Keep the devices within about 30 feet (10 meters) of each other.
- Ensure Personal Hotspot is turned OFF on your iPhone
How to import video from iPhone to Mac via AirDrop:
1. Open a Finder window, then select AirDrop from the left-hand sidebar.
2. At the bottom, look for "Allow me to be discovered by:" and set it to Everyone (you can change it back to "Contacts Only" later for privacy)
3. Open the Photos app on your iPhone.
4. Tap the video you want to move to Mac.
5. Tap the Share icon > AirDrop. Wait for your Mac's name to appear in the list and tap it.
6. Accept and save on Mac.
If you use the same Apple ID, the video will usually transfer and save automatically to your Downloads folder without a prompt; If you are sending to a different account, a notification will appear in the top-right corner of your Mac. Click Accept. You can then choose to save the video to your Photos app or your Downloads folder.
Related: How to Factory Reset iPad
Use iCloud Photos
Automatic syncing, but slow and requires large iCloud storage.
Without manual sending or cables, iCloud Photos gives you a seamless way to upload videos from an iPhone to a Mac. It relies on a continuous background sync that keeps your entire media library identical across all your Apple devices.
Here is how to set up and use iCloud Photos for an effortless video transfer workflow. It works well when transferring large videos from iPhone to Mac if you have a strong network access.
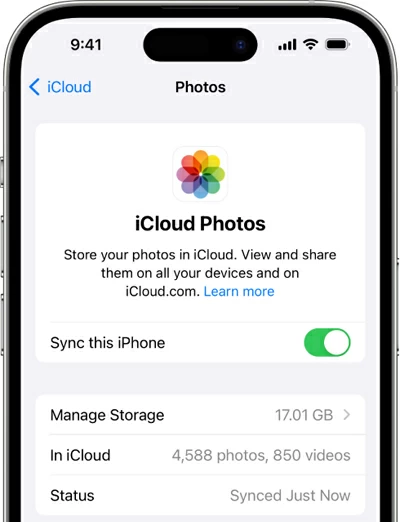
1. Enable iCloud Photos on iPhone
Settings > [Your Name] > iCloud > Photos, and toggle on Sync this iPhone.
Important! Select Optimize iPhone Storage if you want to save space on your phone while keeping the full-resolution videos in the cloud. You will also want to check that you have enough cloud storage.
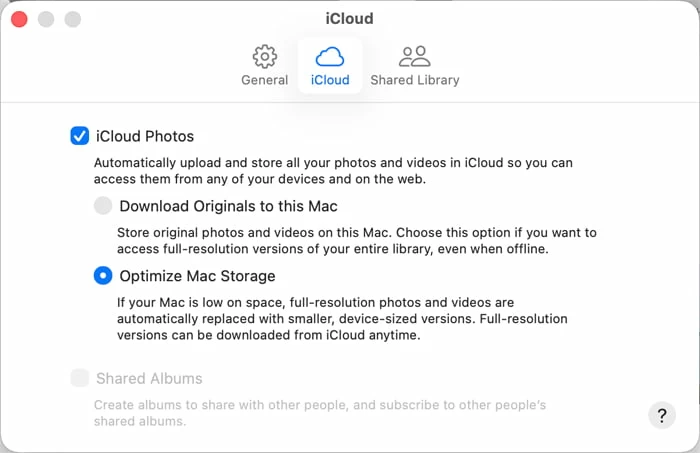
2. Enable iCloud Photos on Mac
Open Photos app on Mac, in the menu bar, go to Photos > Settings (or Preferences). Click the iCloud tab, then check the box for iCloud Photos.
Important! Select Download Originals to this Mac if you want the full-quality video files saved directly to your hard drive.
Related: Fix iPhone Security Lockout
Use Image Capture
Good for advanced users; allows saving directly to folders.
macOS also includes an Image Capture application designed for moving media from a camera or mobile device to your computer as quickly and cleanly as possible. It allows for direct file management without the overhead of the Photos app library.
Here is how to get a large video from iPhone to Mac using Image Capture:
1. Plug your iPhone into Mac.
2. Open Image Capture. You can find it in your Applications folder.
3. On the left-hand sidebar, you will see a Devices or Shared section. Click on your iPhone.
4. After a moment, a list of every photo and video on your device will appear in the main window.
5. At the bottom of the Image Capture's window, click Import To, choose a specific project folder or an external drive.
6. Highlight the videos you want and click the Download button.
If you are trying to clear space on your iPhone, click the three dot at the bottom-left corner of the app window and then select Delete after import. This will automatically remove the video from your iPhone once it is safely copied to your Mac.
FAQs
- Why don't my videos show up after connecting my iPhone to Mac?
- This usually happens when iCloud Photos is enabled with Optimize iPhone Storage, meaning the originals are stored in iCloud—not on your device. Make sure your iPhone is unlocked, trusted, and set to Download and Keep Originals in Settings > Photos.
- How do I transfer only videos (not photos) from my iPhone to my Mac?
- In the Photos app, use the Search bar and type "video" or enable View > Metadata > File Type to filter by video. Then select only the videos you want to import.
- What's the best way to transfer large videos from iPhone to Mac?
- For multi‑gigabyte files, the Photos app or dedicated file transfer tool like Higospot iPhone Data Transfer with USB cable is the most reliable. Avoid wireless methods like AirDrop for files over 2GB, as they may fail or take too long.
- Can I transfer iPhone videos to Mac without using the Photos app?
- To copy videos from iPhone to Mac, instead of using the preinstalled Photos app, you can also use AirDrop, Finder, Image Capture, iCloud Photos, and reputable third‑party transfer tools like Higospot iPhone Data Transfer.
- Do videos lose quality when transferred from iPhone to Mac?
- No. When using the Photos app or Finder, videos transfer in their original resolution and format, including 4K, HDR, and HEVC. AirDrop also preserves quality.
- What should I do if my iPhone disconnects during video transfer?
- While downloading videos from iPhone to Mac, check the cable, avoid moving the devices, and keep the iPhone unlocked if you find that device disconnected from the Mac. If the issue persists, restart both devices and try importing one video at a time.
About Katrin Gray
Katrin Gray is the Junior Editor at HigoSpot. With a bachelor's degree in Computer Applications, he has been covering Microsoft Windows, Apple macOS, iOS, Android, Social Media, Gaming, and more as a professional writer for over 5 years.
 iPhone UnlockerRemove iPhone & iPad lock screen
 iPhone Data TransferTransfer and manage your iPhone & iPad data
 Android UnlockerRemove Google FRP lock and bypass screen locks
 iPhone Data RecoveryRecover deleted files from iPhone, iPad
 Location ChangerFake a GPS location easily
 Video DownloaderDownload videos from 1000+ sites