How to Change Ringtone on iPhone: Everything to Know
Here's everything to know about how to change your ringtone on iPhone in every common situation — default ringtone, per-contact ringtone, ringtone from a song, custom ringtone, and alarm ringtone.

Katrin Gray
Updated on Feb 3, 2026
Most iPhone users want their device to reflect their personality and to signal incoming calls in a way that's instantly recognizable. Apple provides a straightforward, built-in way to change ringtone on iPhone so the sound you hear for every incoming call (unless a contact has a custom tone) matches your preference.
The Settings app consolidates ringtone, alert volume, and vibration controls in one place, making it the right starting point for anyone who wants to quickly change how their iPhone notifies them of calls.
Need to change ringtone on iPhone for one person, use a song as your ringtone, or change the alarm sound? It's all very simple. You can even create custom ringtones from sound tracks on your computer and then transfer to your iPhone as ringtone through the dedicated tool, something like Higospot iPhone Data Transfer.
This guide walks through every common scenario and the best methods so you can change your ringtone on iPhone quickly and confidently.
Table of Contents
How to Change Ringtone on iPhone Using Settings
Apple offers the path through Settings app to change ringtone iPhone settings. the default ringtone and the global volume and vibration behaviors for calls and alerts.
Change iPhone ringtone
1. Unlock your iPhone and open the Settings app.
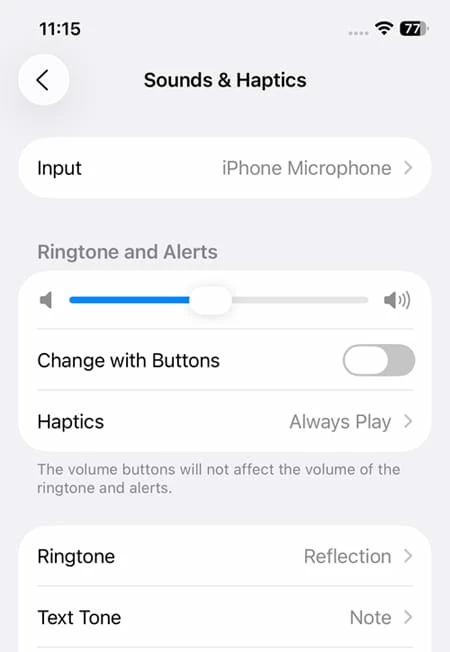
2. Scroll to and tap Sounds & Haptics. This screen shows the Ringtone and Alerts slider, Haptics options, and a list of alert types such as Ringtone, Text Tone, and New Mail.
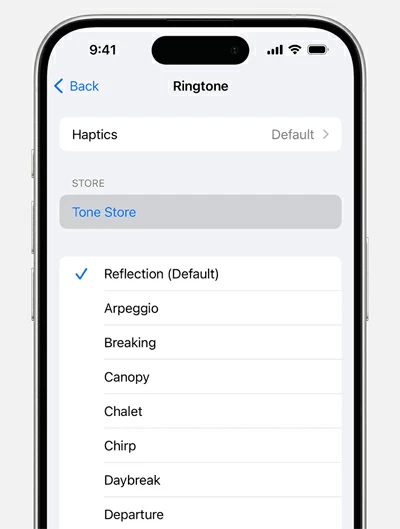
3. Tap Ringtone.
4. The Ringtone list displays built-in tones first, followed by any ringtones you purchased or synced.
5. Tap any tone once to hear a preview; tapping a tone automatically selects it and returns it to the Ringtone list with a checkmark.
Tip: If you don't hear previews, ensure the ringer switch on the side of the iPhone is not set to silent and the Ringtone and Alerts volume slider is up.
Adjust Ringtone and Alerts volume
1. From the Sounds & Haptics screen, use the Ringtone and Alerts slider to set the volume for incoming calls and alerts.
2. Optionally, enable Change with Buttons to allow the physical volume buttons to change ringtone and alert volume when you're not on a call
Note: Ringtone volume is separate from media volume. You can have low music volume but loud ringer volume, or vice versa.
Related: How to Unlock iPhone without iTunes
Set vibration behavior
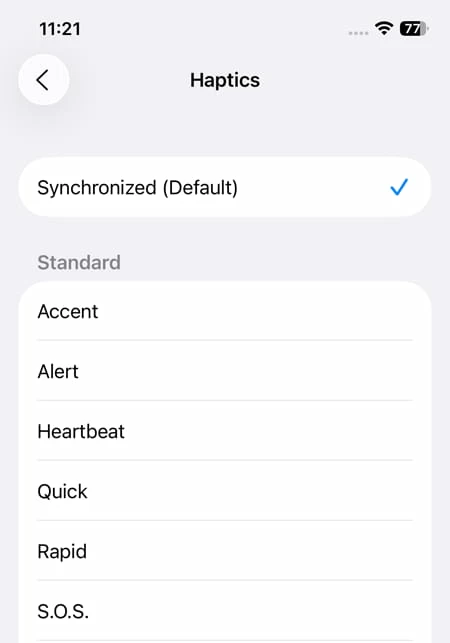
1. Still in the Ringtone screen, tap Haptics at the top to pick a vibration pattern or create a custom one.
2. Choose a subtle vibration for meeting environments or a strong one for noisy places. You can also turn vibrations off entirely from the Haptics settings on the main Sounds & Haptics screen
How to Change Ringtone on iPhone to a Song (5 Options)
There are five reliable ways to change iPhone ringtone to song:
- Buy a ringtone from the iTunes Store
- Create and transfer a custom ringtone on computer via third-party tool
- Make a ringtone with GarageBand on iPhone (complicated)
- Create and sync ringtone to iPhone via iTunes
- Use tracks downloaded on iPhone as ringtone (iOS 26+ required)
Now, let's take a look at how to use a song as ringtone on your iPhone. Keep in mind that, regardless of the way you adopt, the length of the new ringtone should still be less than 30 seconds.
Buy a ringtone from iTunes Store
If you want to change the ringtone on iPhone and don't like the one from preset list, one quick way is to purchase from Tone Store or iTunes Store where sells ready-made ringtones.
1. Open the iTunes Store app on your iPhone.
2. Tap More, then Tones (or search for "ringtones").
3. Preview tones and tap the price to buy one.
Alternatively, open Settings app on your iPhone, go to Sounds & Haptics > Ringtone > Tone Store.
4. After purchase, go to Settings > Sounds & Haptics > Ringtone and select your purchased tone.
This is the simplest option if you prefer not to edit audio yourself, though it may cost money per tone.
Create and transfer a custom ringtone on computer via third-party tool
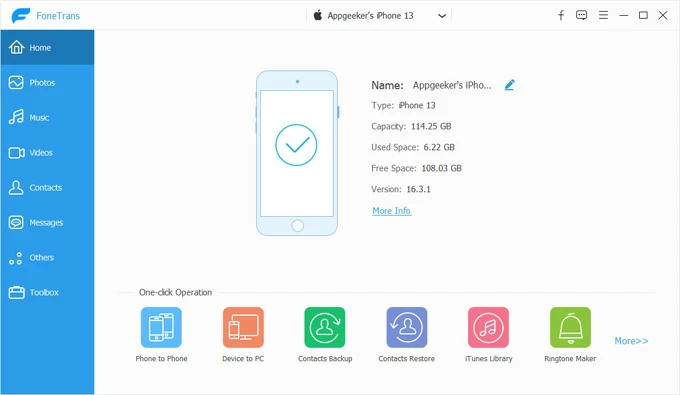
How does the computer method work if your songs/ ringtones are stored in your media library locally? If you prefer a simpler route, check Higospot iPhone Data Transfer, a reliable device management suite that enables you to create .m4r ringtone file for you to import into iPhone by offering direct transfer via its own device manager. It also includes a set of tools to transfer music, photos, and videos to and from iPhone, back up your contacts and messages, manage iCloud files, and do other tasks.
Win Download Mac Download
Scenario 1: If you have a ringtone already stored on your computer
1. Launch the software on your computer, and plug your iPhone with a cable.
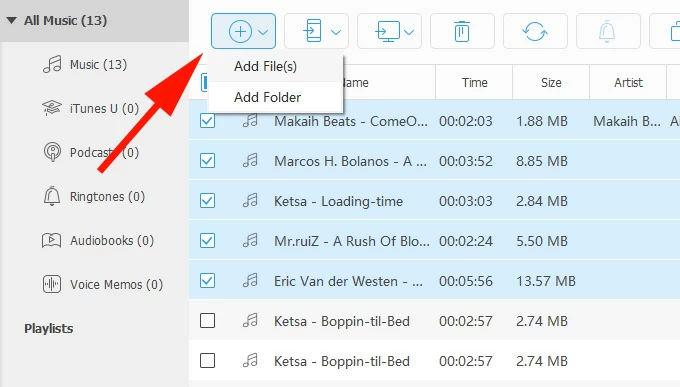
2. Select Music category from the left sidebar. It will display all album in your music library on your iPhone. Switch to Ringtones album.
3. To add ringtones to iPhone, drag and drop your ringtone files (.m4r*) into the software window, or click the Add icon at the top menu to browse for it. The software will automatically transfer them to your iPhone.
Once done, open your iPhone, head to Settings > Sounds & Haptics > Ringtone and change the ringtone you want.
Scenario 2: If you want to create a custom ringtone and add to iPhone
1. Open the software on your PC, and select Ringtone Maker tool located in the bottom right under "One-click Operation" section.
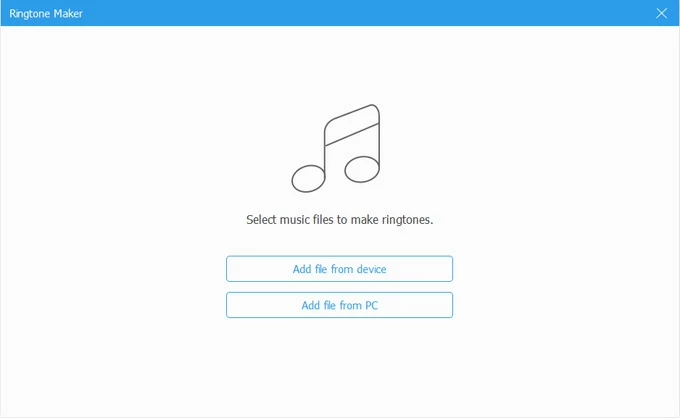
2. Choose music files to make ringtones.
Add file from device: Allows you to import any MP3, FLAC, or any other audio file you created or downloaded off the Internet on the iPhone.
Add file from PC: Import your source songs from a local folder on the PC.
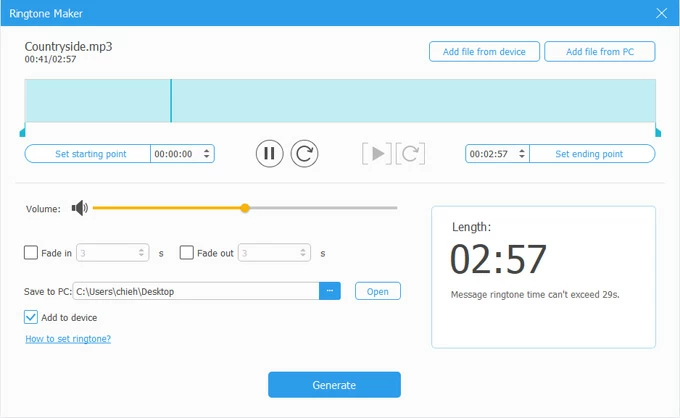
3. Once imported, drag the handles to trim the section you want to use (30 seconds or less), adjust volume, as well as apply in Fade in/out effects.
To simplify the transfer process, make sure you tick the checkbox next to Add to device and connect your iPhone. Enabling this will add the newly made ringtone to your device automatically.
After that, open your Ringtone list in Settings app to change what you need.
Related: How to Transfer Videos from PC to iPhone
Make a ringtone with GarageBand on iPhone (Complicated)
Even if you have a song stored on your iPhone, you can't directly change your ringtone by simply selecting the song. Instead, you will want to use Higospot iPhone Data Transfer mentioned above, or use Apple's GarageBand to import the song, trim it to the clip you want, export it as a ringtone, then set it as the ringtone in Settings.
GarageBand is the built-in route on iPhone for creating and changing ringtone without a computer.
Here're steps on how to change ringtone on iPhone via Garageband.
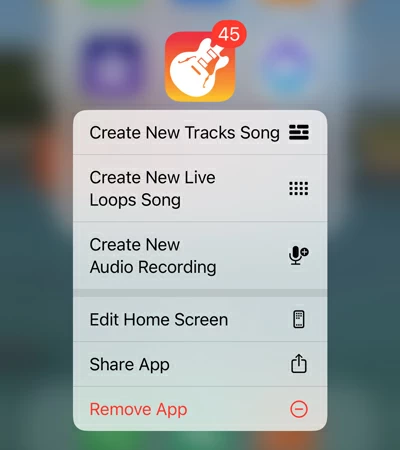
1. Install and open GarageBand (free from App Store if not installed).
1. Create a new Audio Recorder or Keyboard project.
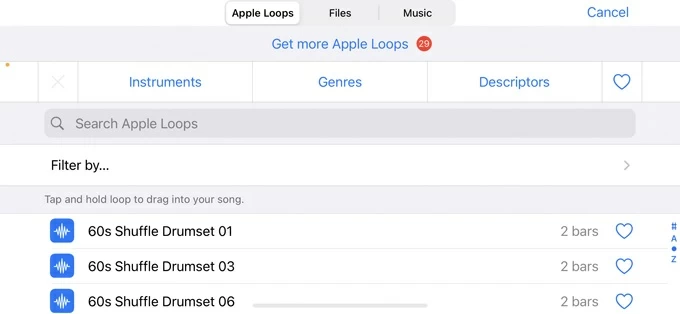
3. Tap the project's loop icon, choose Files, and add the song (must be DRM-free) or recording into an audio track.
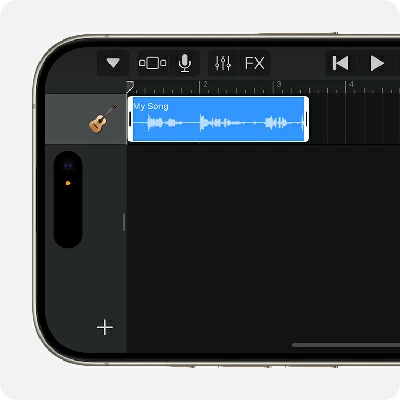
4. Trim the clip to 30 seconds or less, add fades and any edits to make the clip sound natural when a call arrives.
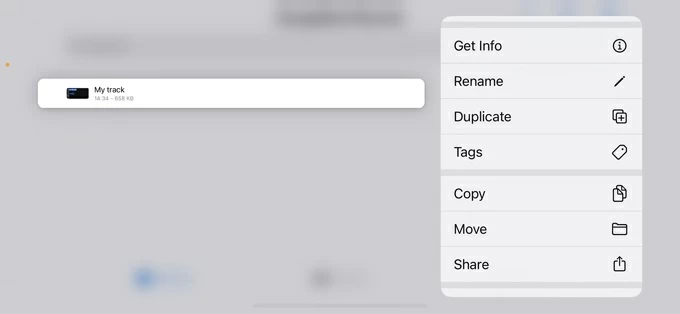
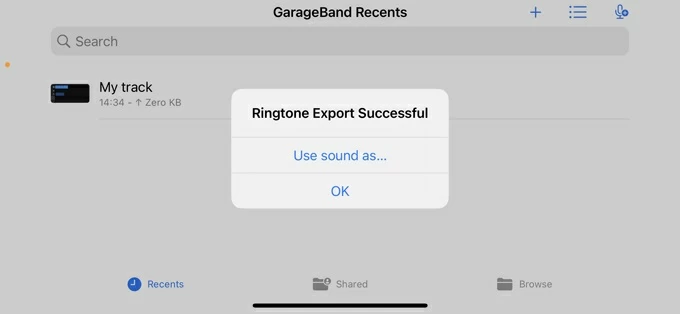
5. Tap the arrow icon, choose My Songs, long-press the project, then tap Share.
6. Select Ringtone, name it, and export. Choose Use sound as to set as standard ringtone or set it later in Settings.
This sequence creates and changes a ringtone entirely on-device.
Please note that songs bought through Apple Music are usually DRM-protected and cannot be imported into GarageBand unless DRM-free.
Create and sync Ringtone via Finder or iTunes
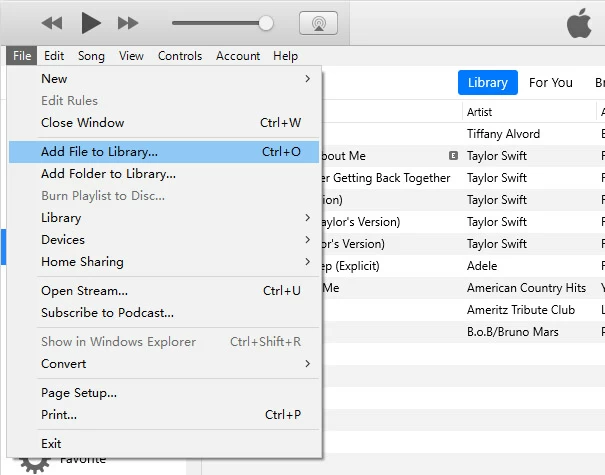
1. On Mac with macOS Catalina or later use Finder; on older macOS or Windows use iTunes.
2. Import your songs to iTunes or Finder library.
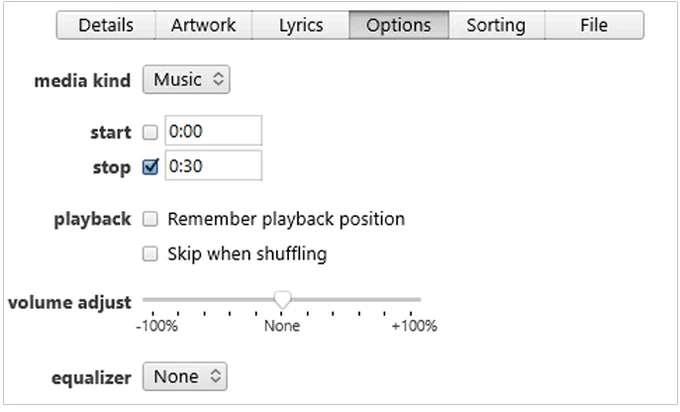
3. Convert your song to AAC and trim to 30 seconds: In iTunes/Finder, right-click the song, choose Song Info > Options, set start and stop times (less than 30 seconds), then create an AAC version.
3. Locate the new .m4a file in Finder, change extension to .m4r (ringtones use .m4r).
4. Connect iPhone via USB on computer.
5. In iTunes or Finder, find the Tones section under On My Device or Settings in the sidebar. Drag and drop your .m4r ringtone file into this section.
6. Click the Sync button in the bottom-right corner of the window.
On iPhone go to Settings > Sounds & Haptics > Ringtone to select your new ringtone.
Related: iPad Disabled Won't Connect to iTunes
Use tracks downloaded on iPhone as ringtone (iOS 26+ required)
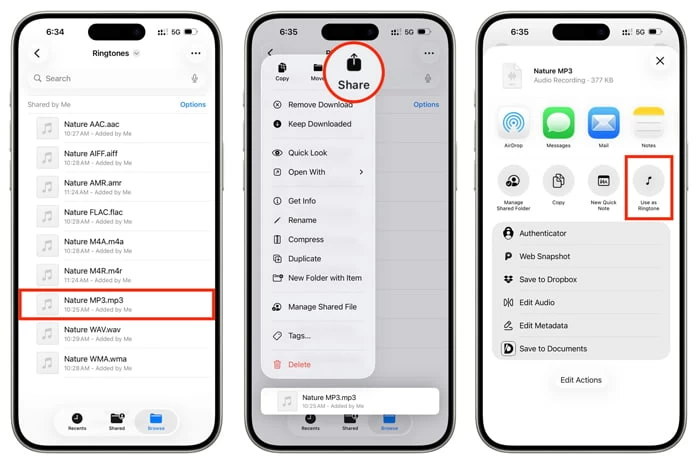
Now, Apple iPhone with iOS 26+ adds more support of audio files, including MP3, FLAC, WAV, M4A, AIFF, AAC, M4R, and AMR. (except for WMA), and you can change ringtone on iPhone directly via Files app.
1. Open Files app on your device.
2. Touch and hold the audio file you want to change into a new ringtone.
3. Tap Share option.
4. Select Use as Ringtone from the Share Sheet.
5. Go back to Ringtone pane in the Settings app, set it as your new iPhone ringtone.
How to Change Ringtone for One Person on iPhone
1. Open the Phone app or Contacts app.
2. Find and tap the contact you want to customize.
3. Tap Edit in the top-right corner.
4. Scroll to Ringtone and tap it.
5. Choose a ringtone from the list or any custom tone you added.
6. Tap Done to save, then Done again to exit edit mode.
That assigns the ringtone to that contact so only they trigger that sound.
How to Change Alarm Ringtone on iPhone
1. Open the Clock app, and tap Alarm at the bottom.
2. Tap Edit, then select the alarm you want to change.
3. Tap Sound.
4. Choose from Apple-provided alarm tones or select the custom ringtone you created (custom ringtones appear in the list).
5. Tap Back, then Save.
Note: Alarm sounds respect Do Not Disturb and volume settings set by Ringer and Alerts in Settings.
What's the Simplest and Safest Path to Change iPhone Ringtone?
For most people, either buy a tone from the iTunes Store if you want simplicity and legal clarity, or use a third-party tool like Higospot iPhone Data Transfer to make a custom ringtone from a song or recording you already own. Those two approaches avoid tedious steps. If you need precise trimming and prefer traditional route, use Finder/iTunes with the .m4r method for full control. Users who have newer iOS 26 can directly set many of audio files as ringtone in Files app.
Related: How to Recover Deleted Call History on iPhone
Troubleshooting and Common Pitfalls
Ringtone not appearing after sync?
Ensure the file extension is .m4r, and the ringtone length is less than 30 seconds. Reconnect and sync again.
Can't use Apple Music song?
Songs from Apple Music are DRM-protected. Use DRM-free files or buy the song from iTunes.
Custom ringtone won't play for a contact?
Check if the caller has a custom ringtone set in their contact card; individual contact tones override the default ringtone. Also verify the Ringer switch is not on silent and that Do Not Disturb/Focus mode isn't silencing calls.
Can't find a ringtone I purchased?
Sign in with the same Apple ID used to purchase the tone; purchased tones show in the Ringtone list automatically once downloaded.
FAQs
- How do I change my ringtone on iPhone?
- To change your iPhone ringtone, go to Settings > Sounds & Haptics (or just Sounds on older models), then tap Ringtone. You'll see a list of available tones—just tap one to preview and select it. If you want a custom ringtone, you can purchase one from the Tone Store or sync one using iTunes, or the reputable tool like Higospot iPhone Data Transfer on your computer.
- How do I change my ringtone on my iPhone from a song purchased in iTunes?
- Purchased songs used to carry protection, but most music bought in recent years from Apple is DRM-free, and you can use import them into Garageband to make custom ringtone. However, if you run into a protected file or an unsupported format, GarageBand may not accept it directly. One workaround is to re-purchase the track from Tone Store where possible.
- How can I change iPhone ringtone to song?
- To change your ringtone to a song on iPhone, you'll need to use the GarageBand app, iTunes, or other options mentioned in this article to make your own ringtone, and then move them to your iPhone.
- How do I change ringtone for alarm on iPhone?
- To change clock ringtone on iPhone, open the Clock app and tap the Alarm tab. Select the alarm you want to edit, then tap Sound. From there, choose a new tone or song from the list—tap to preview and select your preferred option.
About Katrin Gray
Katrin Gray is the Junior Editor at HigoSpot. With a bachelor's degree in Computer Applications, he has been covering Microsoft Windows, Apple macOS, iOS, Android, Social Media, Gaming, and more as a professional writer for over 5 years.
 iPhone UnlockerRemove iPhone & iPad lock screen
 iPhone Data TransferTransfer and manage your iPhone & iPad data
 Android UnlockerRemove Google FRP lock and bypass screen locks
 iPhone Data RecoveryRecover deleted files from iPhone, iPad
 Location ChangerFake a GPS location easily
 Video DownloaderDownload videos from 1000+ sites