How to Transfer Photos from PC to iPhone — All Proven Ways
Explore various ways to transfer photos from PC to iPhone using cable or wireless methods, with or without iTunes. Supports selective or full transfers for all Windows and iOS versions.

Mark Anderson
Updated on Nov 14, 2025
Many users store photos on their Windows PC but want to transfer them to their iPhone for easy viewing, editing, or sharing. These might be pictures from a dedicated camera, old family archives you've digitized, or simply images you've saved over the years. While the Apple ecosystem is known for its seamless integration, transferring photos from a PC to an iPhone can sometimes feel less than straightforward.
In this guide, we've gathered all proven ways and will show you how to transfer photos from PC to iPhone efficiently. Depending on your preferences — using a cable or wirelessly, selective or full transfer, with iTunes or not — you have multiple methods to choose from.
Whether you want to transfer all your photos at once or just a few selected images, Higospot iPhone Data Transfer enables quick photo transfer from PC to iPhone without losing any quality.
Why You Might Want to Transfer Photos from PC to iPhone
Many people keep their photo libraries on Windows PCs because of larger storage and easier organization. However, the iPhone offers convenience, portability, and excellent photo display options. Transferring PC photos to iPhone allows you to:
- View and share your photos and videos on the go.
- Share your PC photos with iPhone apps like Instagram, WhatsApp, or iMovie.
- Back up important memories to iCloud for secure storage.
Since iPhone and Windows are different systems, transferring photos isn't as simple as dragging and dropping files into a folder. Apple devices rely on specific tools and software, making it important to know the best method for your situation.
Challenges When Transferring Photos from PC to iPhone
There are several factors that may complicate the photo transfer from a Windows PC to an iPhone:
File Format Compatibility: iPhones support JPEG, HEIC, PNG, TIFF, and some RAW formats. Other formats like BMP or GIF may require conversion.
Selective vs. Full Sync: Some methods, like iTunes, sync entire folders, while others allow individual photo selection.
Cable vs. Wireless: USB cable makes it faster to move photos from your PC to your iPhone, especially for large libraries, while wireless options are more convenient but slower.
Software Requirements: Since iPhone and Windows use different ecosystems, transferring photos requires specific tools or apps.
Metadata Preservation: Maintaining album structure, timestamps, and location data may be important for some users.
These are all valid concerns, but the good news is that there are solutions to each of them. The best method for you will depend on how many photos you're transferring, whether you prefer a wired or wireless solution, and your comfort with different tools.
5 Best Methods to Transfer Photos from PC to iPhone
The following reliable methods cover Apple's official tools, third-party software, and popular cloud services. From cable-based transfers to wireless photo syncing, choose the method that best fits your needs.
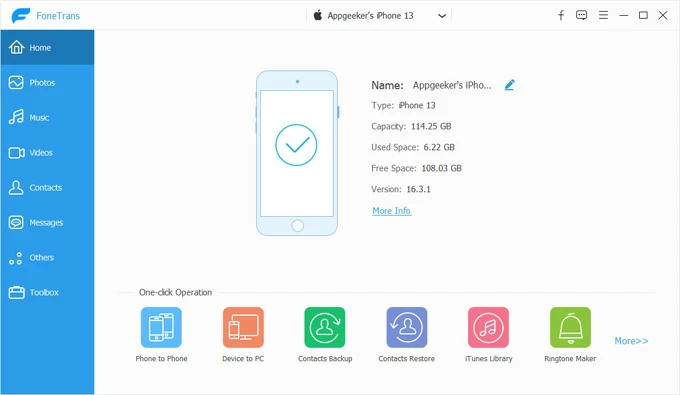
Option 1 - Use Higospot iPhone Data Transfer (Flexible All-in-One Tool)
Best For: Users who want a simple, all-in-one solution to transfer photos and videos between PC and iPhone, with full compatibility across all Windows and iOS versions.
Whether you're moving your entire photo library or just a selected group of specific images, Higospot iPhone Data Transfer is a powerful and versatile third-party tool that makes it effortless to transfer photos from Windows PC to iPhone, and vice versa — no iTunes or iCloud required.
Win Download Mac Download
It supports both bulk transfers and individual photo selections, giving you complete control over what you move. Beyond photos, the tool also handles music, videos, and other media files, making it a one-stop data transfer and management solution for any Windows and iOS device.
Requirements:
- A suitable USB or Lightning cable to connect your iPhone.
Step-by-Step Guide:
1. Install and open Higospot iPhone Data Transfer on your Windows PC.
2. Unlock your iPhone and connect it to your PC via a USB data cable. If asked, tap Trust and verify your passcode to allow data access.
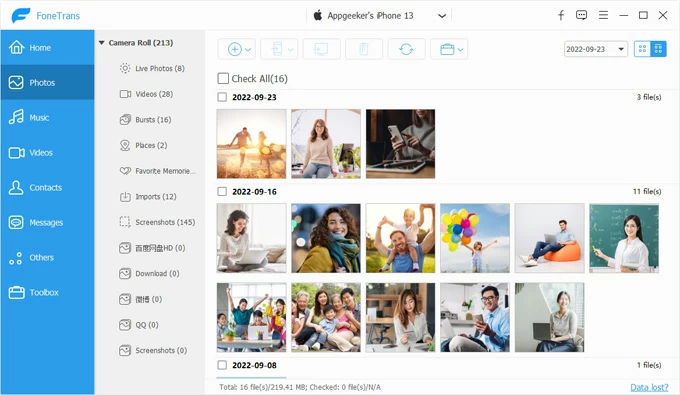
3. Choose Photos tab from the left-side menu. From here, you can view all existing pictures and albums in your iPhone's Photos Library.
4. Click the Add button at the top and select either Add File to choose specific photos or Add Folder to import an entire folder.
The photos will be copied from your PC to your iPhone immediately. After that, open the Photos app on your iPhone to access and view all transferred pictures. Also, if you want to share iPhone photos with non-Apple devices, use its HEIC Converter to ensure better compatibility and avoid viewing issues. Also see: Transfer music from laptop to iPhone
Pros:
- Adds photos from Windows PC to iPhone's Photos Library directly
- Works with Windows 11/10/8/7 and all iOS versions
- Easy to use, no iTunes or network needed
- Bidirectional transfers of photos, videos, and music between PC/Mac and iPhone/iPad
- Supports JPEG, PNG, HEIC, and other common Apple formats
- Includes a built-in HEIC Converter to turn HEIC images into JPEG or PNG for universal compatibility
- Allows selective or full-folder transfers
Cons:
- Requires software installation (desktop app)
- Unlimited transfer may require a paid version
Option 2 - Sync Photos to iPhone Using iTunes or Apple Devices (Official Cable Transfer)
Best for: Users with Windows 10 or 11 who want a cable-based photo transfer that preserves album structure, timestamps, and other photo metadata.
For many years, iTunes was Apple's official and default tool for managing content between Windows PCs and iOS devices. Using a cable-based connection, iTunes lets you transfer photos from your PC directly to your iPhone's Photos app, preserving album structure and metadata.
However, it's important to note that the computer photos synced via iTunes may replace or overwrite existing photos and videos on your iPhone. These synced pictures are managed separately within the Photos app and can't be deleted directly from your iPhone. To remove them, you'll need to organize the photos on your computer and re-sync using iTunes.
Requirements:
- The latest version of iTunes or Apple Devices app installed on your PC.
- A USB cable for iPhone connection.
Step-by-Step Guide:
1. Organize Your Photos on PC: To simplify the transfer process, create a local folder on your PC for the photos you want to add to your iPhone.
2. Launch iTunes or Apple Devices: You can install and open them from Microsoft Store or Apple's official site.
3. Connect Your iPhone: Use a USB cable to connect your iPhone to your computer. If prompted, trust this computer on your iPhone and enter your passcode. See what to do if you forgot iPhone passcode.
4. Select Your Device: Click the phone icon that appears in the top-left corner.
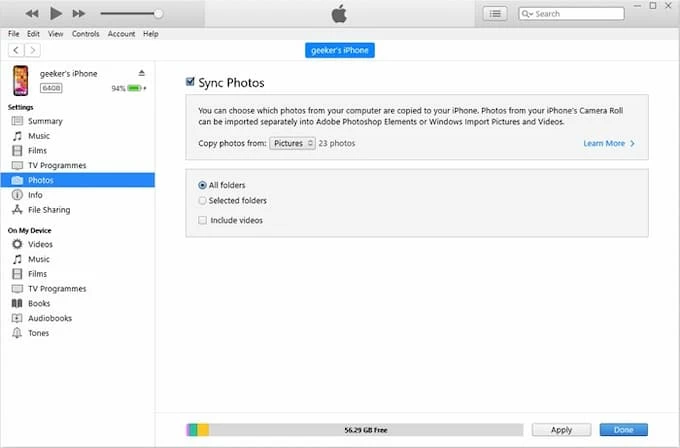
5. Navigate to Photos: In the left-hand sidebar, go to Photos tab.
6. Enable Photo Syncing: Check the box next to Sync Photos.
7. Choose Your Source Folder: Click the drop-down menu next to Copy photos from and move to the folder where your desired photos are stored.
8. Select the Picture Folders for Transfer: Select whether to sync All folders or Selected folders and then choose the PC folders containing the photos you want to transfer to your iPhone.
9. Apply the Sync: Click the Apply or Sync button in the bottom-right corner. The selected photos on your PC will transfer to your iPhone instantly.
If your photos disappeared from iPhone after the transfer, click for more recovery solutions.
Pros:
- Reliable and stable for large photo libraries
- Maintains album and folder organization
- Works offline — no Wi-Fi required
Cons:
- Requires a USB connection and iTunes installation
- Limited flexibility — can't choose individual photos within folders
- Syncing replaces existing photo albums synced from iTunes
Option 3 - Move Photos from PC to iPhone via iCloud Photos (Wireless, Automatic Apple Sync)
Best For: Users who prefer wireless transfer and want photos automatically synced with iPhone and across all linked devices.
iCloud provides a cloud-based photo library accessible on all your devices linked to the same Apple Account, including your iPhone and a Windows PC. iCloud Photos securely stores your entire photo library online and keep them up to date. Any changes you make on one device—such as uploading new photos from your PC — are automatically synced to your iPhone and will appear in your Photos app.
Requirements:
- An Apple ID with iCloud set up and sufficient iCloud storage.
- A stable Wi-Fi connection on both Windows and iOS.
Step-by-Step Guide:
1. Enable iCloud Photos Settings on iPhone: Unlock your iPhone and go to Settings > [your name] > iCloud > iCloud Photos, then enable the toggle next to Sync this iPhone.
2. Sign in to iCloud.com on PC: Open a trusted browser on your computer and visit iCloud.com. Sign in with the same Apple Account and password you use on your iPhone.
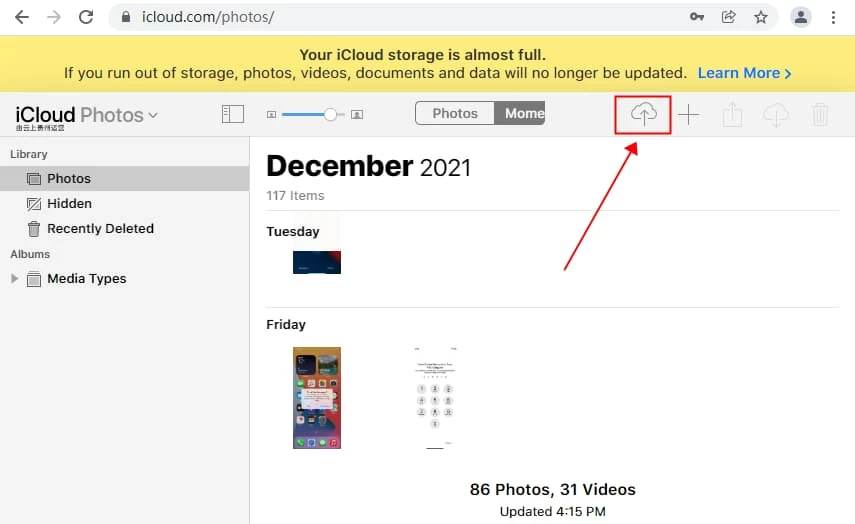
3. Access iCloud Photos Library: Once in, select Photos icon and check Library on the left section.
4. Upload Photos from PC to iCloud: Click the Upload icon from the upper-right corner on iCloud window, then navigate to the picture folder on your PC and select which photos you prefer to move to iPhone.
5. Wait for the Sync: iCloud will now automatically upload these photos to your library. The time this takes will depend on the number and size of the photos and your internet speed.
6. Access and Download PC Photos on Your iPhone: After the sync is complete, open the Photos app on your iPhone. You'll see the newly transferred photos appear in your Library.
If you have a large number of photos to transfer or if you're running out of iCloud storage, consider upgrading to iCloud + for more available space or compressing some images.
Pros:
- Seamless and automatic photo sync across Windows PC, iPhone, and other linked devices
- Preserves photo and video quality
- Integrates perfectly with the Apple Photos app
Cons:
- Free iCloud storage is limited to 5 GB. You'll likely need to upgrade to a paid plan for larger libraries
- Can be slow for initial uploads
Option 4 - Download PC Photos to iPhone from Google Photos (Cross-Platform Cloud Option)
Best For: Users who want platform-independent access and prefer not to rely on iTunes or iCloud for photo transfers.
Cloud storage services like Google Photos allow you to upload photos from any Windows PC and then download them onto your iPhone wirelessly. This approach is ideal for users who already use Google services or want a more flexible, cross-platform solution. If you're not deeply embedded in the Apple ecosystem, Google Photos is an excellent alternative to iCloud, offering broader device compatibility and more generous free cloud storage.
Requirements:
- A valid Google account.
- The Google Photos app installed on your iPhone.
- A stable internet connection.
Step-by-Step Guide:
1. Upload Photos from Windows PC to Google Photos storage.
- Web Browser: Open your web browser, go to photos.google.com, and sign in to your Google account. Drag and drop your Windows photos or folders directly onto the page, or click the Upload > Computer button and pick the images you want.
- Google Drive for Desktop: Download and install the application. You can designate folders on your PC to automatically back up to Google Photos.
2. Install and open the Google Photos on iPhone from App Store.
3. Sign in with the same Google account you used on your PC. You can then view all uploaded in Google Photos.
4. Select and download any PC photos on your iPhone for offline access.
For high-quality images, check cloud service settings and choose to upload in Original quality to avoid compression. But this will use up your storage quota more quickly.
Pros:
- Excellent cross-platform support for photo sharing, not just with iPhone or PC
- Offers 15GB of free storage (shared across Gmail, Drive, and Photos)
- Powerful search and organization features
Cons:
- Photos are stored in the Google Photos app, not directly in iPhone's Photos app (though you can download them)
- Google's Storage saver option will slightly compress photos to save space
Option 5 - Email Photos from PC to iPhone (Quick, Wireless Transfer for A Few Photos)
Best For: Users who want to quickly send a few photos from PC to iPhone without cables or iTunes.
Emailing photos is the simplest way to transfer a small number of pictures from your PC to iPhone without cable. You just attach the photos to an email on your PC, send it to yourself, and save them from your iPhone's Mail app. It's quick, convenient, and doesn't require any extra software—though it's best for small transfers under 25 MB.
Requirements:
- An email account accessible on both your PC and your iPhone.
Step-by-Step Guide:
1. Open your preferred email service and create a new email addressed to yourself.
2. Attach the PC photo(s) you'd like to transfer to your iPhone.
3. Send the email to yourself.
4. Open the Mail app on your iPhone, check the Inbox, and find the email you just sent.
5. Tap on the photo attachment, and tap the Share icon > Save Image. The Windows photos will be saved to your iPhone's Photos Library in no time.
Tip: If file sizes exceed the limit, send a cloud link (Google Drive, OneDrive, etc.) instead of attachments for full-quality downloads.
Pros:
- Extremely simple and requires no cable or iTunes
- Works on any Windows version
- Fast for transferring a few photos of various formats
Cons:
- Not suitable for large albums
- May compress image quality
Tips for Smooth Photo Transfer from Windows PC to iPhone
Transferring photos from Windows PC to iPhone doesn't have to be complicated. Whether you prefer a wired sync with iTunes, a wireless connection through iCloud or Google Photos, or the flexibility of a third-party tool, there's a method above that fits every need. To make the process smoother:
- Keep your iPhone unlocked and trust your computer when using wired methods.
- Update Windows, iTunes, or third-party apps to the latest versions.
- Convert unsupported images to iOS-compatible formats if needed.
- Decide whether you want full sync or selective transfer before moving photos to your iPhone.
- For large libraries, USB cable transfers are generally faster than wireless options.
FAQs
- 1. Can I transfer my photos from a Windows PC to an iPhone without iTunes?
- Yes. You can use iCloud Photos, Google Photos, email, or a third-party transfer tool like HigoSpot iPhone Data Transfer to move photos without iTunes.
- 2. How do you transfer your photos from PC without a cable?
- Use wireless methods such as iCloud, Google Photos, or email. These let you upload photos from your PC and download them to your iPhone over the internet.
- 3. Is there any way to import photos from PC to iPhone without quality loss?
- Yes. Tools like iTunes, iCloud Photos, or HigoSpot iPhone Data Transfer preserve original resolution while transferring the PC photos to your iPhone.
- 4. How to move a large photo library from my Windows PC to my iPhone all at once?
- For large libraries, use the wired options, such as iTunes and Higospot iPhone Data Transfer, for faster and more stable photo transfer. Cloud uploads like iCloud Photos or Google Photos may take a longer time and depend on network speed.
About Mark Anderson
Mark is a passionate content creator with years of experience in technical field. He has written a variety of niches and always shares a unique insight into the world of Internet & technology.
 iPhone UnlockerRemove iPhone & iPad lock screen
 iPhone Data TransferTransfer and manage your iPhone & iPad data
 Android UnlockerRemove Google FRP lock and bypass screen locks
 iPhone Data RecoveryRecover deleted files from iPhone, iPad
 Location ChangerFake a GPS location easily
 Video DownloaderDownload videos from 1000+ sites