How to Transfer Videos from iPhone to Windows 10: Everything to Know
Do you want to import your videos stored on iPhone to your Windows 10 PC for backup? Here's all the gear you'll need to get started with video transfer on iPhone, plus helpful tips for setting it all up.

Katrin Gray
Updated on Oct 11, 2025
Do you want to do a journey of transferring video clips and movies from your iPhone to your Windows 10 machine, but you don't know where to start? We're here to help. From family moments to professional clips, users often rely on their iPhones as their primary video camera. However, iPhones have limited storage, and videos—especially 4K or slow‑motion clips—consume space quickly.
That's why many users look for ways to transfer videos from iPhone to PC Windows 10. Moving videos to a computer not only frees up space but also allows for editing, archiving for long-term organization, and sharing on larger platforms.
Windows 10 provides several built-in and third-party options for importing videos from iPhone to PC. Yet, despite the availability of these tools, many users still struggle with the process. This guide outlines everything you need to get started. If you need a smooth transfer with full control, consider using Higospot iPhone Data Transfer, a popular data management and transfer suite that takes care of all media files for iPhones and iPads.
Table of Contents
What's the best way to transfer videos from iPhone to Windows 10
What is the most effective, reliable, and user-friendly way to transfer videos and photos from iPhone to Windows 10, and how can users choose the right method for their needs?
To answer this, let's explore the different methods of transferring videos from iPhone to Windows 10, evaluate their strengths and weaknesses, and provide a structured guide. We'll also cover reverse transfer (Windows > iPhone) and troubleshooting tips.
Method 1: Transfer via File Explorer (USB Cable)
This is the most direct method and requires no extra software. All you have to prepare is a working USB data cable.
Before doing a photos and videos transfer from iPhone to Windows 10 PC, connect your iPhone first.
1. Unlock iPhone and tap Trust This Computer.
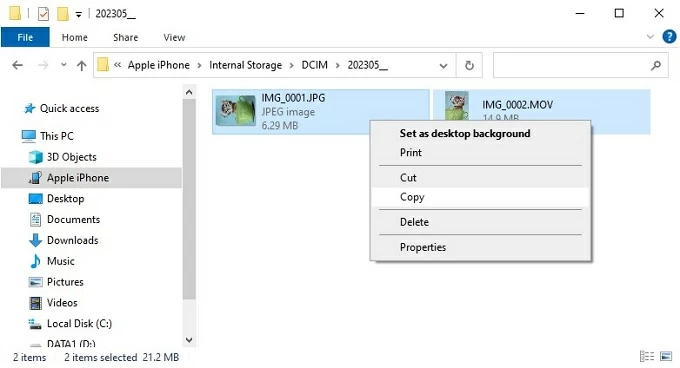
2. Open File Explorer > select This PC on the left sidebar > choose your iPhone.
3. Navigate to Internal Storage > DCIM.
4. Copy videos from folders (e.g., 100APPLE, 101APPLE) to your PC.
Pros:
No internet required. Fast for large files.
Cons:
Folder structure can be confusing. Doesn't allow selective import by date or album.
Method 2: Use Higospot iPhone Data Transfer
Need a more friendly and manageable way to download video from iPhone to PC Windows 10? That's where Higospot iPhone Data Transfer comes in.
The software is a comprehensive data management suite designed for Apple devices, offering seamless file transfers, backups, and content organization across iPhones, iPads, and computers. It supports over 30 data types—including photos, videos, messages, music, contacts—and enables users to migrate content between devices, manage iCloud and iTunes libraries, and even make custom ringtones. With features like de-duplicate, and media format conversion, Higospot iPhone Data Transfer serves as a powerful alternative to iTunes, providing flexible, secure, and user-friendly control over mobile data.
Win Download Mac Download
To transfer videos from your iPhone to your PC Windows 10, follow these simple steps:
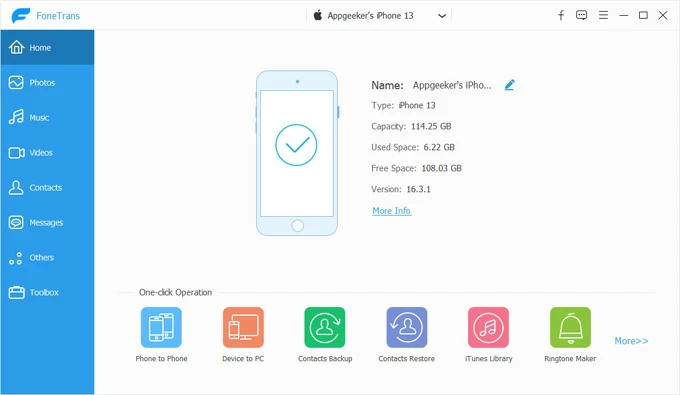
1. Download the Windows version of the software. Install and launch it.
2. Connect your iPhone.
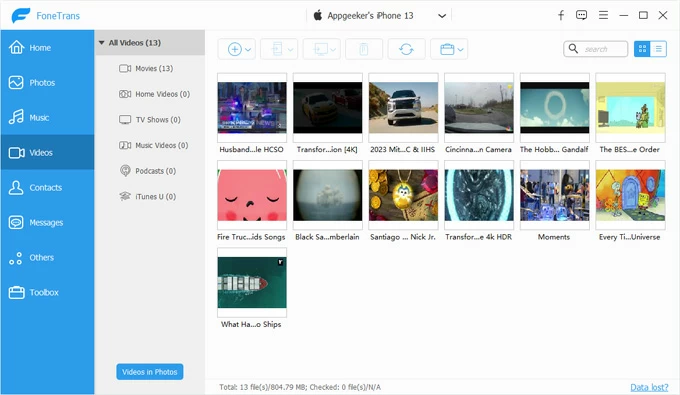
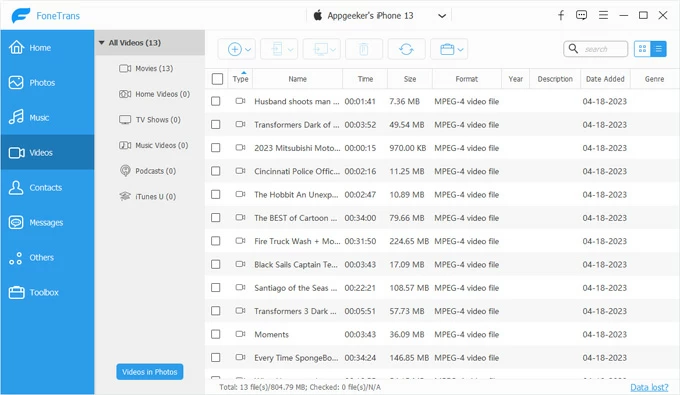
3. Once it detects your device, click the Videos category on the left sidebar. You will see all your videos sorted by different types, including Movies, Home Video, TV Shows, Music Videos, Podcasts, iTunes U. And on the right pane, you get a thumbnail of the video.
Tip: you can choose how the software displays your videos on the screen by clicking the type filter at the upper right corner (see below).
For example, you can click three horizontal lines there to display all your videos by list. From where, you can sort your collection by Name, Date, Time Duration, Size, Format, and Genre. This will be very helpful when you want to quickly locate what you want and export them.
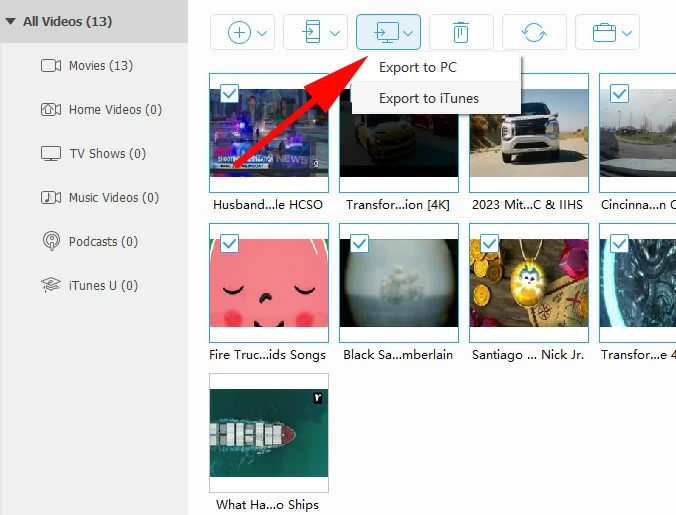
4. To import videos from iPhone to Windows 10, browse and tick the small boxes next to the videos, then click the "PC" icon at the top menu.
From the drop-down list, select "Export to PC." In the opening dialog, specify a directory where you want to save the videos on your computer.
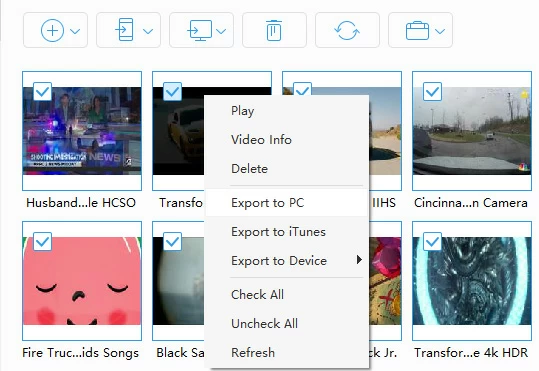
Alternatively, after choosing your videos (you can select individual videos or entire albums), right-click to open the context menu, then select "Export to PC" to get your iPhone videos onto your Windows 10 machine.
Higospot iPhone Data Transfer will transfer and organize your videos and photos automatically.
Pros:
Organizes videos (and other media files) by category. Faster and more flexible. Supports batch transfers and reverse transfer (PC to iPhone).
Cons:
USB cable is required.
Related: iPhone Unavailable error
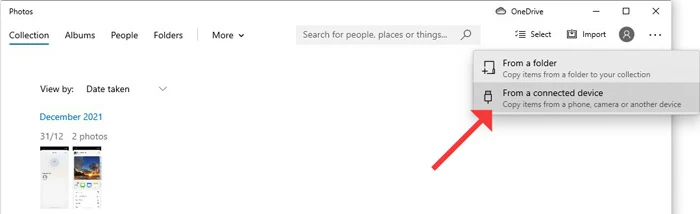
Method 3: Windows 10 Photos App
Microsoft also includes a Photos app in Windows 10 system to help users to import videos to PC from iPhone or Android. The Photos app provides a friendlier interface.
Here're steps to import your iPhone videos and photos.
1. Connect iPhone via USB.
2. Open Photos app on Windows 10.
3. Click Import > From a connected device.
4. Select videos or photos to import.
Pros:
User-friendly interface. Allows selective import.
Cons:
Can be slow with large libraries. Sometimes fails to detect iPhone.
Method 4: iCloud Photos
Apple introduces iCloud Photos feature to assist iPhone users to download photos onto PC when you want to manage content across Apple and Windows devices. Videos and photos taken on your iPhone or iPad are automatically uploaded to iCloud and become accessible on your PC without manual transfers.
Here's how to import videos from iPhone to Windows 10.
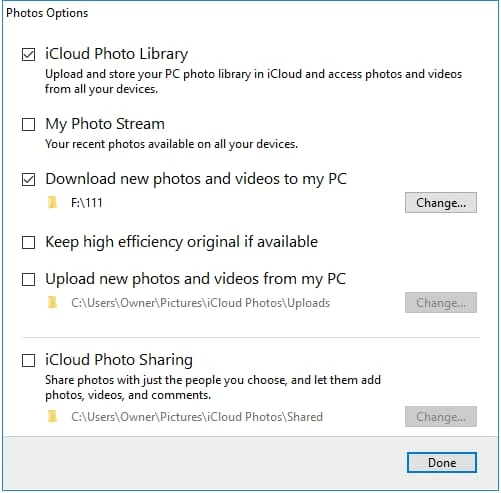
1. Enable iCloud Photos on iPhone: Go to Settings > Photos > iCloud Photos.
2. Install iCloud for Windows on PC.
3. Sign in with the same Apple Account information.
4. Enable iCloud Photos Library and Download new photos and videos to my PC options.
5. Access videos in iCloud Photos folder on PC.
Pros:
Wireless, automatic syncing. Access videos across devices.
Cons:
Requires iCloud storage space. Dependent on internet speed.
Related: How to recover deleted iMessages on iPhone
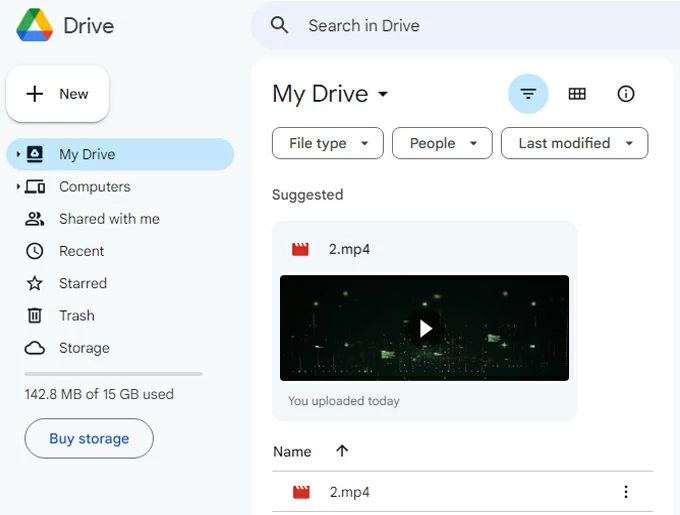
Method 5: Cloud Storage Services
Many of cloud storage services on the market offer videos and photos upload and download services, including Google Drive, OneDrive, or Dropbox.
1. Install the cloud service app on your iPhone.
2. Upload videos from iPhone to cloud app.
3. Install the cloud app on your Windows 10 PC, or go to its web version online.
4. Access and download videos on Windows 10.
Pros:
Wireless. Easy for sharing.
Cons:
Limited free storage. Upload/download time depends on internet.
Troubleshooting Common Issues
iPhone not detected by PC?
Ensure device is unlocked and "Trust This Computer" is tapped.
Videos not showing up?
Check if iCloud Photos is enabled; originals may need to be downloaded first.
Format issues?
Install HEVC codec on Windows 10 for playback.
Transfer interrupted?
Use a certified Lightning cable and avoid low‑quality USB hubs.
Related: How to unlock iPad without passcode
Conclusion
Sending videos from iPhone to Windows 10 doesn't have to be confusing. By understanding the available methods—File Explorer, Photos app, iCloud, third-party tools, and cloud services—you can choose the one that best fits your needs.
Whether you want to download videos from iPhone to Windows 10 PC with USB or wirelessly, this guide provides a structured roadmap.
With the right approach, you can free up iPhone storage, back up precious memories, and enjoy seamless video access across devices.
Check FAQs about how to export videos from an iPhone to a PC Windows 10.
FAQs
- Why can't my PC detect my iPhone when transfering videos?
- Make sure your phone is unlocked, and you tap Trust This Computer on the device screen.
- How do I download videos from iPhone to Windows 10 without iTunes?
- Use File Explorer or iCloud for Windows. With iCloud Photos enabled, your videos sync automatically and can be downloaded from the iCloud Photos folder on your PC.
- How do I transfer large video files from phone to PC?
- Use a USB 3.0 cable for faster speeds.
- Can I send videos wirelessly from phone to Windows 10?
- Yes. Options include iCloud Photos, Google Photos / Drive, OneDrive and Bluetooth.
- Why are my iPhone videos not showing up on Windows 10?
- They may be stored in iCloud instead of locally on the phone. Download them to your iPhone first. Ensure you've tapped Trust This Computer.
- What video formats are supported on Windows 10?
- iPhones often record in HEVC (H.265) with .mp4* or .mov* as file extension. If playback fails, install the HEVC Video Extensions codec from the Microsoft Store.
About Katrin Gray
Katrin Gray is the Junior Editor at HigoSpot. With a bachelor's degree in Computer Applications, he has been covering Microsoft Windows, Apple macOS, iOS, Android, Social Media, Gaming, and more as a professional writer for over 5 years.
 iPhone UnlockerRemove iPhone & iPad lock screen
 iPhone Data TransferTransfer and manage your iPhone & iPad data
 Android UnlockerRemove Google FRP lock and bypass screen locks
 iPhone Data RecoveryRecover deleted files from iPhone, iPad
 Location ChangerFake a GPS location easily
 Video DownloaderDownload videos from 1000+ sites