How to Transfer Photos from iPhone to Windows 11 PC: The Complete Guide
Want to save photos from your iPhone to your Windows 11 PC or laptop? Here, we've listed all the feasible methods, so you can easily transfer all your photos from iPhone to Windows 11.

Alice Estelle
Updated on Nov 28, 2025
In an era where smartphones capture every moment of our lives, transferring photos from an iPhone to a Windows 11 PC isn't merely a standard backup task—it's a vital step in preserving and organizing your digital memories. From clearing out storage on your iPhone and tweaking high-res shots on a bigger monitor to just sorting through your image collection, getting those photos off your iPhone onto your Windows 11 computer is crucial.
Apple and Microsoft may belong to two different ecosystems, but that doesn't mean your iPhone and Windows 11 can't work together smoothly. From built-in apps like Microsoft Photos to cloud solutions such as iCloud and Google Photos, there are multiple ways to effortlessly transfer photos from iPhone to Windows 11 PC — no technical expertise required.
And if you want your iPhone's HEIC photos to be viewable on your computer, Higospot iPhone Data Transfer can import iPhone photos to Windows 11 in one go while converting their format for compatibility with your device.
Table of Contents
The friction of cross-platform photo transfer
Unlike transferring between two Apple devices, Windows doesn't have AirDrop, and connecting an iPhone to a PC can trigger issues like the device not appearing, missing drivers, or photos not loading in correct order. Sometimes, users end up importing only thumbnails or HEIC files that Windows can't open.
The space-saving HEIC image format, while efficient for iPhones, is not natively supported by all Windows PC photo viewers and editors, which creates trouble in the challenge of transferring HEIC photos from iPhone to Windows 11 without losing quality.
The challenge is thus clear: how to transfer all photos from iPhone to Windows 11 PC easily, safely, and in full quality — whether you want to use a USB cable or go completely wireless?
Also see: How to transfer MP3 to iPhone
Best way to transfer photos from iPhone to Windows 11
The process of transferring a large number of photos from an iPhone to a Windows 11 computer often raises curiosity: What are the best and most reliable methods to move photos from iPhone to Windows 11 PC? How can you ensure that all images retain their original resolution and metadata, while avoiding format incompatibility or cumbersome setup issues?
These challenges are ultimately addressed by five dynamic solutions, each crafted to meet different needs. The pathways for photo transfer from iPhone to Windows 11 PC are mainly divided into two categories: wired transfer via USB cable and wireless transfer.
If you want to fully import your photo library from iPhone to Windows 11, wired transfer is the top choice; whereas wireless transfer offers a seamless and automated experience.
Pathway 1: Use the Microsoft Photos app (Best for most users)
If you prefer the simplest, plug-and-play approach, the Microsoft Photos app built into Windows 11 computer is your ideal choice. It can automatically recognize your iPhone and import your photos and videos in batches to save on your computer.
1. Use a high-quality Lightning to USB or USB-C cable to connect your iPhone to Windows 11.
2. Keep your iPhone unlocked and on the Home screen. A prompt will appear on the phone: "Trust this computer?" Tap Trust and enter your passcode. (Related: How to Unlock iPhone When You Forgot the Passcode)
Note: It may also ask if you want to allow the device to access your photos and videos; tap Allow.
3. On your PC, open the Photos app (search for it in the Start menu).
4. Locate the External Devices section on the left and click on your iPhone to start loading your photo library.
Note: Make sure that your iCloud photos are fully downloaded to your iPhone rather than existing as thumbnails; otherwise, iCloud photos won't be detected.
5. Select the iPhone photos you want to transfer to your Windows 11 PC.
- You can check off the images one by one.
- Click Select new to transfer photos and videos that have not yet been imported.
- Click Select all to move the files of your entire photo collection to your computer.
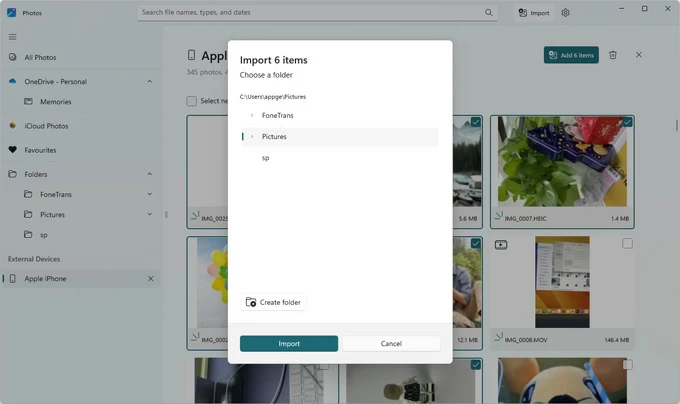
6. Click Add [number] items in the upper left corner, customize your destination folder, then click Import to transfer the photos to your computer.
Troubleshooting:
- If Windows 11 cannot recognize the iPhone's file system, ensure you have installed the latest version of the Apple Devices app or iTunes from the Microsoft Store, as this will install the necessary drivers.
- To view HEIC images, you need to download the additional HEIC Image Extensions.
Pathway 2: Use iPhone Data Transfer (Best for bulk transfer & advanced users)
If you're dealing with thousands of photos without relying on iTunes, or wish to transfer HEIC photos directly to your Windows PC and view them smoothly, a professional Higospot iPhone Data Transfer is your best bet. It offers preview, sorting, and selective export features, and can one-click transfer all your iPhone photos to your computer without losing original quality.
More importantly, this software automatically converts unsupported formats, turning HEIC photos into standard JPG or PNG images during the transfer process, so they can be viewed normally on your Windows 11 PC.
Win Download Mac Download
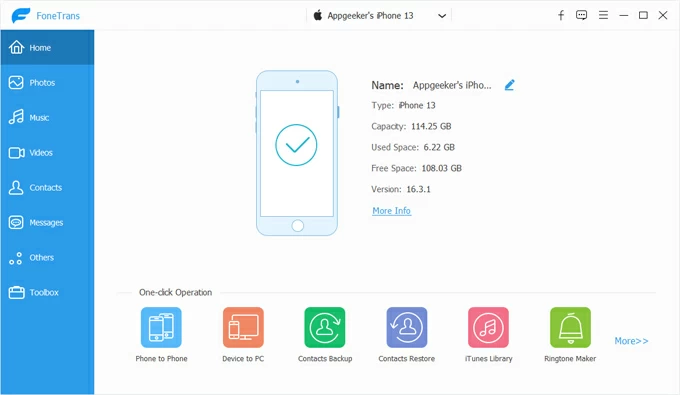
1. Download and install the iPhone Data Transfer software on your Windows 11 PC, then launch it.
2. Plug your iPhone into the computer with a USB data cable. If this is the first connection, your iPhone will prompt you to trust this computer.
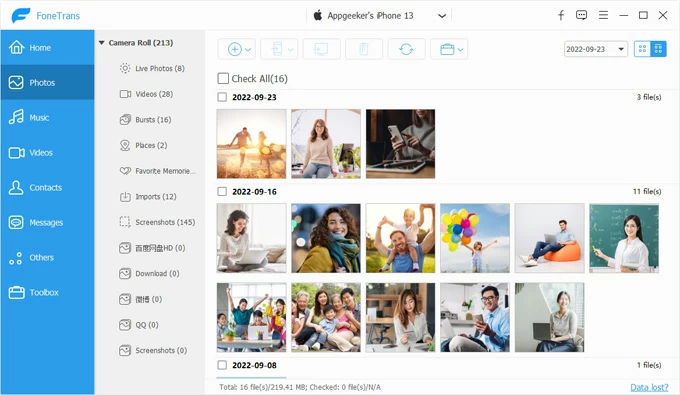
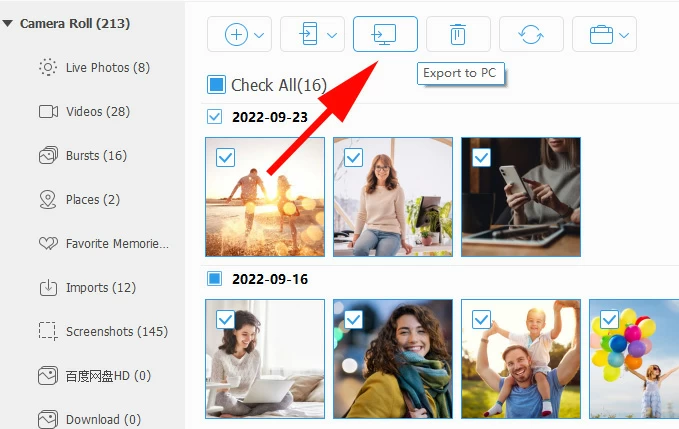
3. Access photos. Once the software detects your iPhone, it will display your device in the right panel. Then, select the Photos option from the left sidebar.
4. All pictures on your device will be displayed. From the photo library, pick the photos you need. You can select all, some, or individual files.
5. Transfer photos from your iPhone to Windows 11. Click the computer icon [Export to PC] in the upper taskbar, then choose the target folder on your computer to start the transfer.
Note: For Windows compatibility, when the software prompts you, make sure to select the option to convert HEIC to JPG.
The tool even supports two-way transfer, so you can import photos from your Windows PC to your iPhone later on as well.
Pathway 3. Use File Explorer (Best for full manual control)
For users who like to manage files directly, Windows File Explorer offers the most robust control. You can copy and paste photos from iPhone to Windows 11 just like files from a USB drive. However, because the DCIM folder interface is somewhat cluttered and requires manual checking one by one, this method can be cumbersome for users who only want to move specific or a small selection of photos.
1. Use a qualified data cable to establish a connection between your unlocked iPhone and Windows 11 PC and allow the computer to access your device.
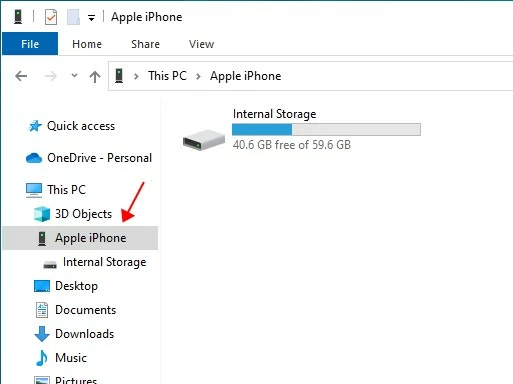
2. Open File Explorer on the desktop (Windows + E), then under This PC, locate your iPhone (it may appear as Apple iPhone).
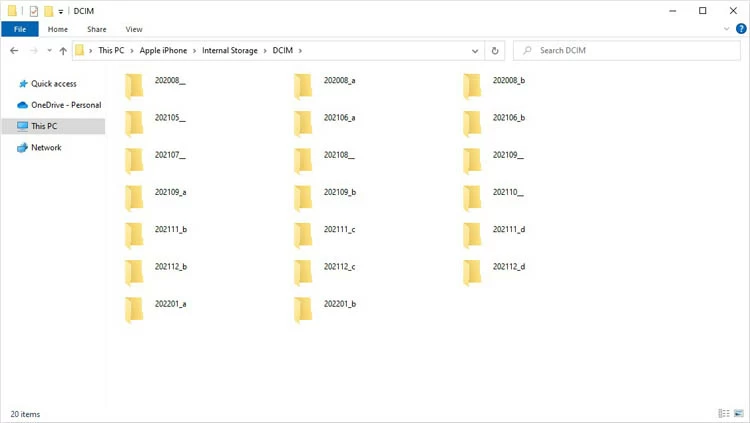
3. Open it, then double-click into Internal Storage, where you'll see DCIM folders organized by date. This is the root directory that stores all your iPhone photos and videos.
4. Within DCIM, photos are organized into multiple nested folders; find the subfolder containing your desired photos.
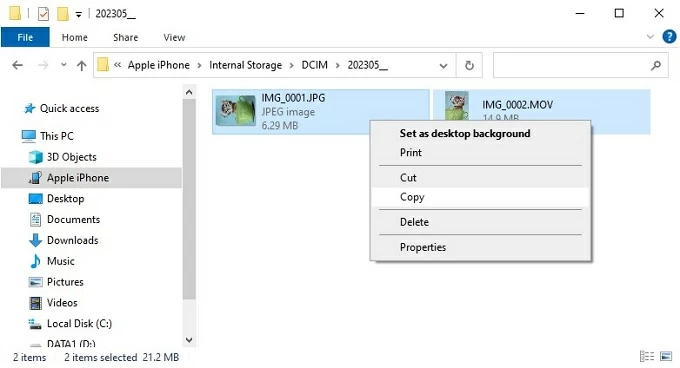
5. Select the required photos, then copy them (Ctrl + C). Navigate to the target archive folder on your computer, then paste (Ctrl + V) the files.
Note: To preserve full-resolution HEIC pictures, make sure your iPhone is set to transfer originals. Go to Settings > Apps > Photos > Transfer to Mac or PC > Keep Originals before connecting.
Pathway 4. Use iCloud Photos (Best for automatic syncing)
For users who prefer background automation and do not mind a short delay for files to sync, Apple's native cross-platform solution is the most hands-off. Once enabled iCloud Photos, your entire iPhone photo library is uploaded to the cloud and can be downloaded from your Windows 11 PC anytime.
Note that this method requires a stable internet connection and sufficient iCloud storage space to hold your photos.
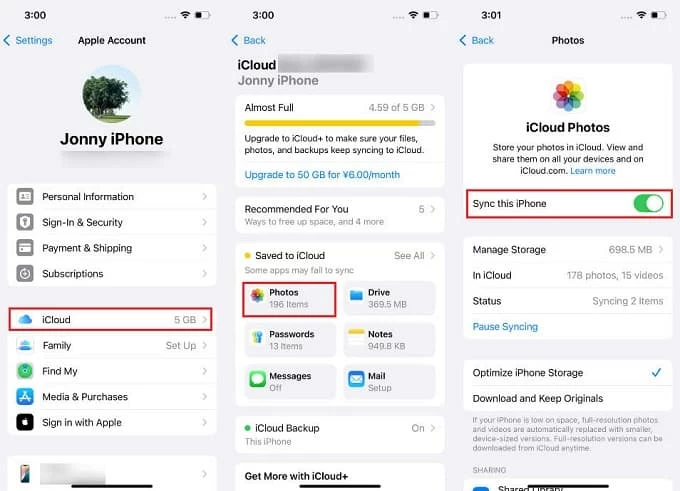
1. On your iPhone, open Settings, go to [your name] > iCloud > Photos, and turn on Sync this iPhone.
2. To keep your iPhone photos synced to Windows 11 in real-time without manual downloads, you need to install iCloud for Windows on your computer. You can get it from the Microsoft Store.
3. Launch iCloud for Windows and sign in with your Apple account credentials, completing two-factor authentication if required.
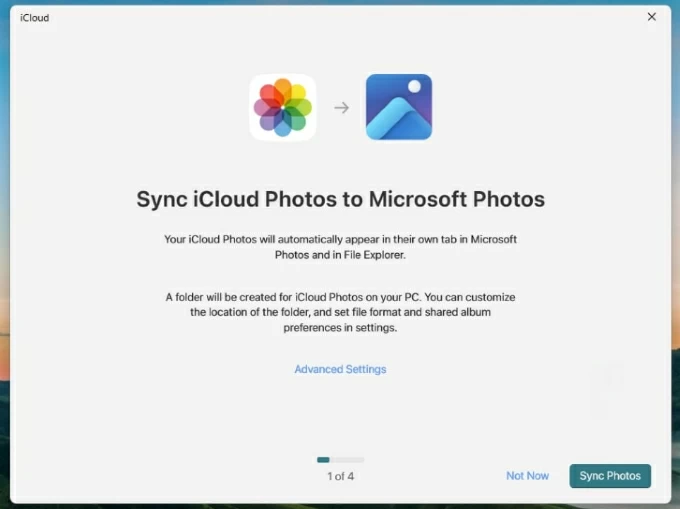
4. In the "Sync iCloud Photos to Microsoft Photos" wizard, click Sync Photos in the bottom right to establish the connection.
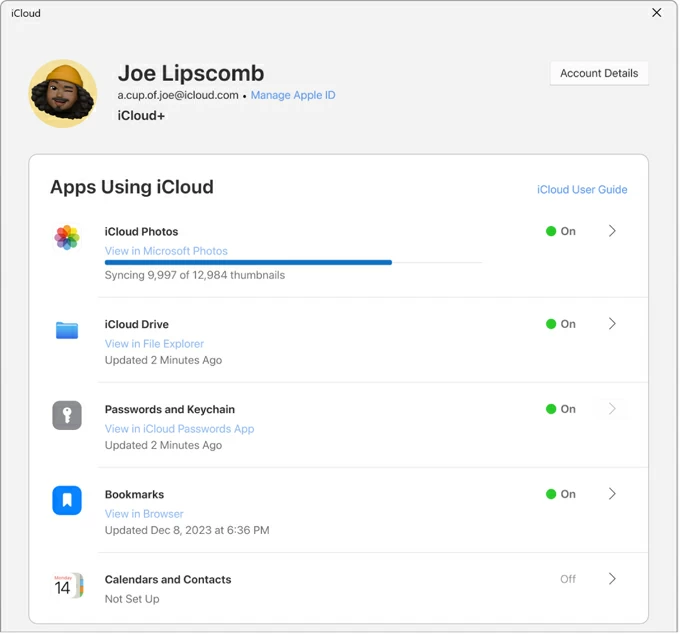
5. Complete the remaining steps and you'll reach the iCloud for Windows homepage, iCloud Photos will show as On and begin updating your library.
Wait for the sync to finish, then open the Microsoft Photos app and navigate to the iCloud Photos section to view and download the transferred photos. Alternatively, in File Explorer, locate the iCloud Photos folder — your iPhone photos will automatically sync here via iCloud.
Note: You can also log in to iCloud.com and download the desired pictures from Photos to save them on your Windows 11 computer.
Read more: Photos Disappeared from iPhone. Why and How to Fix
Pathway 5. Use Google Photos (Best for cross-platform access)
If you want to store and access iPhone photos on any Windows PC without relying on Apple's ecosystem, Google Photos gives a flexible cloud-based alternative. Note that Google Photos only provides 15GB of free storage space.
Step 1. Sync your iPhone photo gallery with Google Photos
- Download and install the Google Photos app from the App Store on your iPhone.
- Open the app and sign in with your Google account.
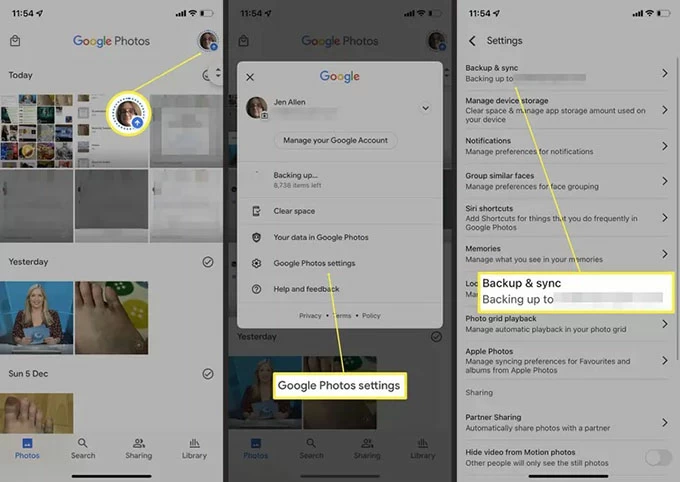
- Tap your profile picture (or name initial) in the upper right corner.
- Head to Google Photos settings > Backup.
- Turn on Backup.
- Scroll to the Backup quality section and ensure you select the desired upload quality.
Step 2. Download photos to Windows 11
- Open any browser on your Windows 11 PC and visit photos.google.com.
- Log in with the same Google account you used on your iPhone.
- Browse the library and pick the pictures you need to transfer to your computer.
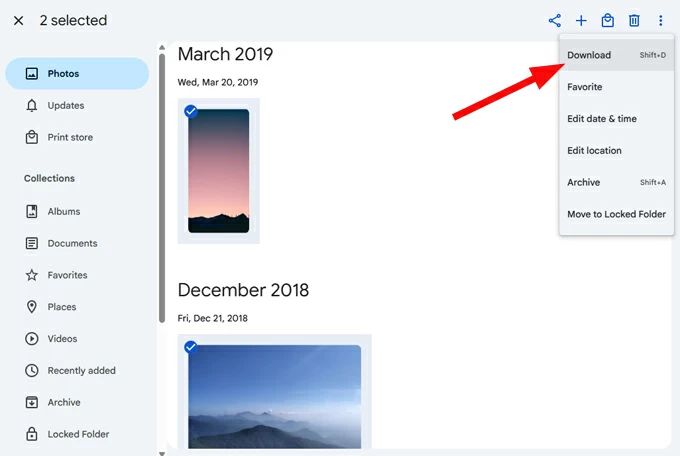
- Click the more menu (…) in the top right corner and select Download.
The selected files will be compressed into a .zip file and downloaded to your computer's "Downloads" folder. You will need to right-click the .zip file and choose Extract All to wirelessly get your iPhone photos on your Windows 11 PC.
Bonus Tip: Fix common photo transfer issues
Sometimes, transferring photos from iPhone to Windows 11 doesn't go as smoothly as planned. Here are solutions to some common problems:
- iPhone not showing up in File Explorer: Reconnect the cable, unlock your iPhone, or reinstall the Apple Mobile Device USB driver.
- HEIC files won't open: Install the HEIF Image Extensions from the Microsoft Store, or change your iPhone's photo transfer format to compatible by going to Settings > Apps > Photos and checking Automatic under the Transfer to Mac or PC section.
- Transfer interrupted: Disable "Optimize iPhone Storage" in iCloud Photos to ensure all originals are available on your device.
iPhone-to-Windows 11 Photo Transfer: FAQs
- How to transfer all my iPhone photos to Windows 11 PC at once?
- You can use the Microsoft Photos app or File Explorer for a full transfer. When using the Windows Photos app, connect your iPhone via USB, open Photos and locate your iPhone, then pick the photos and click Add [number] items > Import. This moves all images to your PC in one go.
- How to transfer HEIC images from iPhone to Windows 11?
- To ensure your HEIC photos can be checked on your computer, you should set your iPhone to transfer in the most compatible format. Open Settings, go to Apps > Photos, scroll to the Transfer to Mac or PC section, and select Automatic. Alternatively, you can use Higospot iPhone Data Transfer for photo transfer, which automatically converts the photo format for you.
- How can I transfer photos from iPhone to Windows 11 PC without a cable?
- You can use iCloud Photos, Google Photos, or other cloud-based service to transfer your iPhone photos to Windows 11 wirelessly. These methods let you upload photos from your iPhone and then download or view them directly on your PC through a browser or the respective desktop app.
- Why can't my iPhone connect to my Windows computer?
- This usually happens if your iPhone isn't trusted or the driver isn't installed correctly. Try unlocking your iPhone, tapping "Trust This Computer" or "Allow the device to access your photos and videos," and reconnecting it. If that doesn't work, reinstall the Apple Mobile Device USB driver or use a different USB port or cable.
About Alice Estelle
Alice Estelle has been a newspaper editor and a book editor with extensive writing experience. She also has deep research in the field of mobile software and is keen on exploring and solving various problems of iOS and Android systems.
 iPhone UnlockerRemove iPhone & iPad lock screen
 iPhone Data TransferTransfer and manage your iPhone & iPad data
 Android UnlockerRemove Google FRP lock and bypass screen locks
 iPhone Data RecoveryRecover deleted files from iPhone, iPad
 Location ChangerFake a GPS location easily
 Video DownloaderDownload videos from 1000+ sites