How to Transfer Photos from iPhone to USB Drive Easily: 6 Options
Want to back up your images or simply free up space on iPhone? These days, transferring iPhone photos to USB is a lot easier than it used to be thanks to modern tools and built-in iOS features.

Katrin Gray
Updated on Oct 23, 2025
Your iPhone fills up quickly with high-resolution photos and videos that you want to transfer to a USB drive—This not only helps declutter your phone but also ensures your media is safely stored offline, away from potential cloud syncing issues or accidental deletions.
There are many ways to import photos from iPhone to USB drive. You can use the Apple's iCloud Photos sync feature, transfer your pictures manually via combination of a classic USB cable and Photos app or File Explorer, or use third-party dedicated transfer utilities like Higospot iPhone Data Transfer to move your media files (images, music, videos, ringtones, podcasts) to and from iPhone with flexible controls.
Here are the most commonly used options to transfer photos from an iPhone to a USB flash drive, USB stick, or USB drive.
Table of Contents
How Can You Transfer Photos from iPhone to USB?
The ability to transfer photos from iPhone to USB is now easier than ever. Whether you're using a traditional USB-A flash drive with a Lightning adapter, a dual-interface USB (Lightning + USB-C), or a wireless USB solution, the process is straightforward.
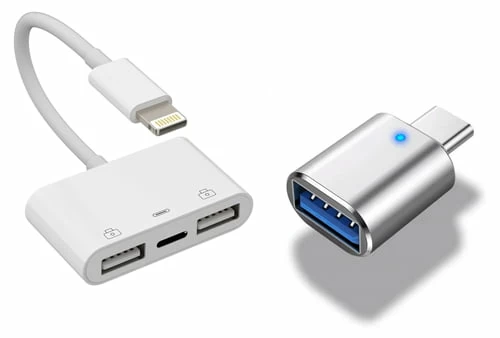
1. Using a Lightning-to-USB Adapter: Connect your USB flash drive to your iPhone using Apple's Lightning to USB Camera Adapter. Open the Files app, select your photos, and move them to the USB.
2. Using a Dual-Port USB Drive: Devices like SanDisk iXpand or Kingston Bolt have Lightning and USB ports. Plug into your iPhone, use the companion app to select and transfer photos, then plug into your PC or Mac.
3. Using a Computer as a Bridge: Connect your iPhone to a PC or Mac, import photos using the Photos app or File Explorer, then copy them to a USB drive.
4. Using Third-Party Apps: Apps like Higospot iPhone Data Transfer simplify the process with drag-and-drop interfaces and batch transfers.
5. Using Apple's iCloud Photos feature: Enable photos sync option on your iPhone, then install iCloud for Windows on your PC, or sign into iCloud.com website, download your photos, then move them to your USB drive.
Method 1 - Via a Lightning-to-USB Adapter
Without relying on a computer, Lightning to USB Adapter now makes it easy to transfer photos and videos from your iPhone to USB.
Requirements:
- Adapter: Apple Lightning to USB 3 Camera Adapter (the version with a Lightning pass-through port), or a USB-C to USB adapter (depending on your phone model) that supports external storage. You can purchase it from Amazon or other online stores.
- USB drive: Formatted ExFAT or FAT32 for best compatibility.
Steps to move photos from iPhone to USB:
1. Plug the USB drive into the adapter's USB-A port, and plug the adapter's Lightning connector into your iPhone.
2. If iPhone prompts you to Trust the connected accessory, unlock the phone and approve.
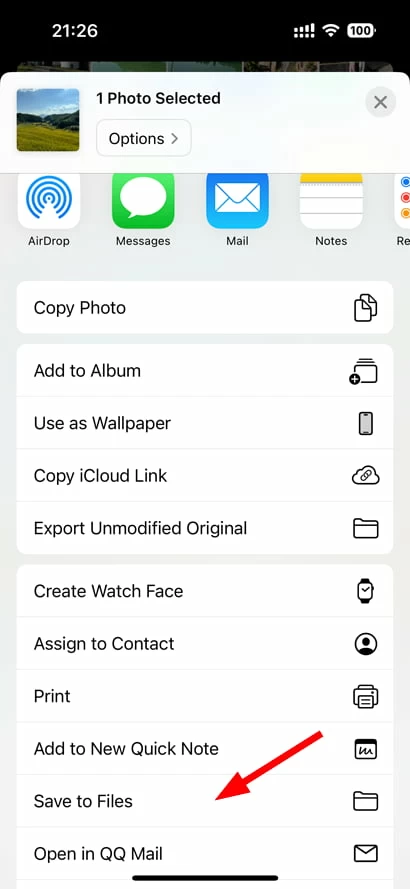
3. Open the Photos app and select the photos or videos you want to transfer.
4. Tap the Share icon.
5. In the Share sheet, choose Save to Files.
6. In Files, navigate to On My iPhone or directly to the connected USB drive shown under Locations, then select the folder you created on the USB drive.
Tip: if photos are in Files already (for example exported earlier), tap Select, choose items, then Move or Copy to the USB drive folder.
7. Tap Save to begin copying. Wait until the progress completes before disconnecting.
Related: How to Reset iPhone if You Forgot Passcode
Method 2 - Via a Dual-Port USB Drive
If you happen to have a Dual-Port USB drive like SanDisk iXpand or Kingston Bolt that has both Lightning and USB ports, you can use the companion app to select and transfer your iPhone photos to USB. You then can access files on your Mac or PC.
Requirements:
- A Dual-Port Flash Drive (Lightning + USB-A or USB-C). You can purchase it from Amazon or other online stores.
- The companion app (for example, iXpand Drive by SanDisk, Bolt by Kingston) used to transfer files. You can download and install the app free from the App Store.
Here's how to transfer photos from iPhone to USB drive Sandisk, see more details here:
1. Plug the Lightning connector of the iXpand drive into your iPhone. If prompted, allow access to the drive.
2. The iXpand Drive app (now SanDisk Memory Zone) should open automatically. If not, open it manually.
3. You may be asked to grant permissions to access your photos—tap Allow Access to All Photos.
4. Choose Backup or Manual Transfer.
5. You will see two main options:
Automatic Backup: Backs up all photos/videos automatically.
Manual Transfer: Lets you choose specific photos to copy.
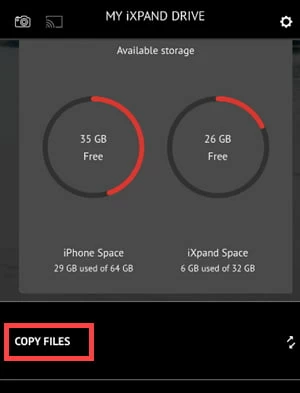
6. For manual transfer, Tap Copy Files > Copy Photos from Phone.
7. Browse your photo albums and select the images or videos you want to transfer.
8. Tap Copy to iXpand Drive.
9. Select an existing folder on the drive or create a new one, then tap Copy Here to begin the transfer.
10. Wait for photo transfer to complete.
11. Once done, close the app and gently unplug the USB drive from your iPhone.
Later, you can plug the USB into your computer, open the drive like a regular USB and access your transferred photos.
Another convenient way to transfer photos from an iPhone to a USB flash drive is using a dedicated transfer software app, something like Higospot iPhone Data Transfer, which stands tall as one of the best file transfer and management tool one can find for Apple users.
The software organizes iPhone photos and videos into clear categories for easy preview and management, and lets you back up and transfer photos between iPhone, iPad, computer, external drives with drag-and-drop or batch operations. It provides one-click export to a chosen computer location while keeping files neatly organized, and then you can choose to create albums and bulk-delete to free iPhone storage. Plus, its built-in HEIC converter can convert HEIC images to widely compatible formats.
Win Download Mac Download
As a versatile tool, Higospot iPhone Data Transfer also takes care of your other media files like music, photos, and podcasts, enabling you to transfer to and from the device. You can even use its integrated ringtone maker to make your own ringtones for iPhone from various audio formats, including MP3, M4R, FLAC, WAV, and more.
Follow these steps to transfer your photos from iPhone to USB stick.
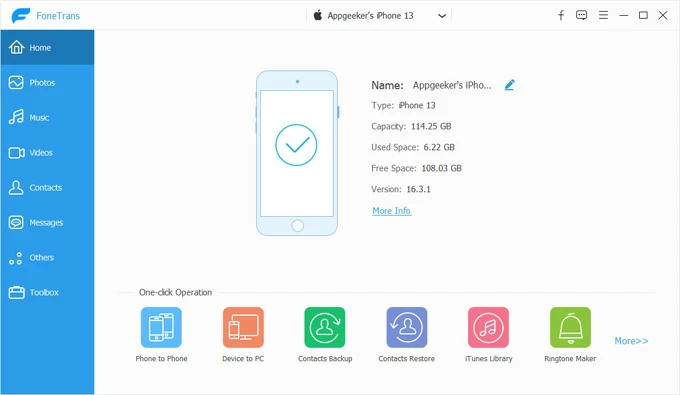
Step 1. Download, install the software on your Mac or PC, and launch it. Then connect both your iPhone and USB drive to the computer.
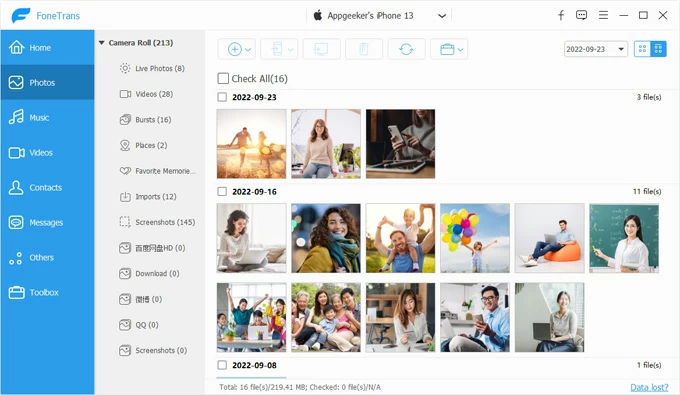
Step 2. Click on Photos from the left sidebar to view all photo categories (Live Photos, Videos, Places, Screenshots, etc.).
Step 3. Browse and select the photos you want to transfer. All your pictures are organized by date. You can select individual photos or entire albums.
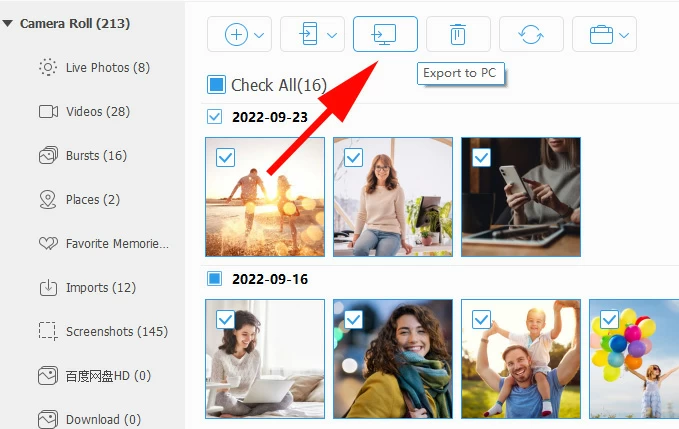
Step 4. Click the Export To PC button (it should say "Export to Mac" in Mac version). In the pop-up window, choose your USB drive as the destination folder.
Click Open or OK to confirm the destination. Make sure your USB drive has enough free space.
The software will begin transferring the selected photos to your USB drive instantly. Once the transfer is complete, you can click Open Folder in the pop-up window to access your photos on your computer.
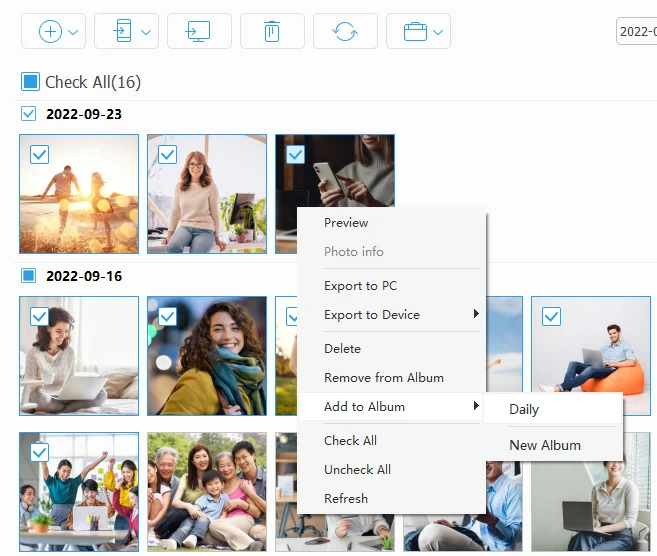
Tips: There are several options to complete transferring photos from iPhone to USB drive within the software window.
- Select Check All box at the top to pick the entire album or library
- Check the box next to a specific date to select the whole list of pictures in the same day
- Right click on a specific picture
- Right click on a specific album
You may download the Higospot iPhone Data Transfer on your computer to explorer more features.
Related: How to Import Music from Laptop to iPhone
Method 4 - Via Windows Photos app or File Explorer
For PC users, Windows allows you to connect your both iPhone and USB drive to the machine, then run the preinstalled Photos app or open File Explorer to import or copy your photos to USB drive from iPhone.
Transfer photos to USB Via File Explorer
1. Connect your iPhone to your computer using the Lightning-to-USB or USB-C cable to get started. Do the same for your USB hard drive.
2. Tap Trust or Allow on your phone when prompted to give your computer access to your photos. You may also have to unlock your iPhone with passcode.
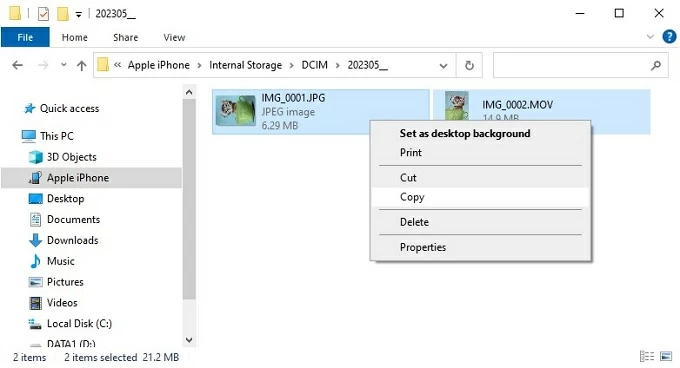
3. Open File Explorer on your Windows 11 or Windows 10 PC.
4. When you see your iPhone appear as a new device under This PC in File Explorer on Windows 10 or Windows 11, select it.
If your iPhone isn't recognized under This PC or Computer, try to disconnect the iPhone, plug it back in, and ensure it's unlocked.
5. You'll see a number of folders that contain your photos. They should be ended with .JPG or .HEIC file extension. videos as .MOV, and screenshots as .PNG files.
6. To transfer photos to USB from iPhone, copy the items you need and the paste them on a folder in your USB drive; alternatively, do a drag-n-drop action to make photos transfer.
Transfer photos to USB Via Photos app
1. Open the Photos app from Start Menu in Windows 10 or Windows 11. You can also search it in the search bar to launch it.
2. Click the Import button on the toolbar, and then select From a USB Drive.
3. Windows will scan your iPhone for photos and videos.
4. Select the photos you want to import or click Select All.
5. Change the saving path by clicking Change where they're saved, then select your USB drive connected as the destination.
6. Click the Import button to begin transferring iPhone photos to USB.
Related: How to Recover Permanently Deleted Photos on iPhone without Backup
Method 5 - Via Mac's Import Capture or Photos app
For Mac users, you can also import photos from iPhone to USB drive by plugging your device directly into your Mac with a Lightning cable or USB-C, and then using the built-in Photos or Image Capture app on your Mac.
First of all, connect your both USB drive and phone to Mac. If your USB drive doesn't appear, check its format using Disk Utility.
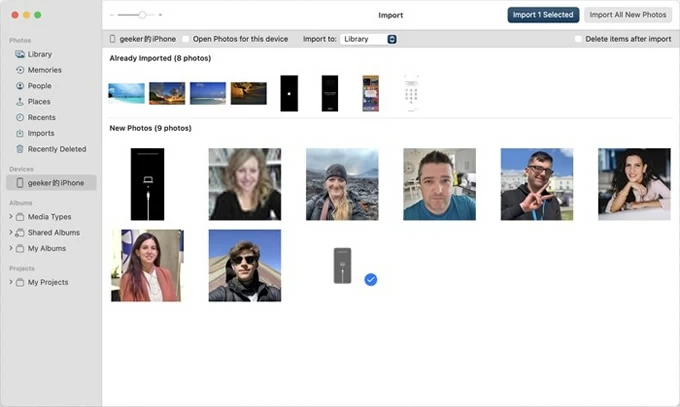
1. Find and open the Photos or Image Capture app on Mac.
2. Browse your library and select the photos you want to transfer. You can hold the Shift key to select multiple photos.
3. Go to the top menu bar and click File > Export > Export [number] Photos.
4. Click Export.
5. In the file picker window, navigate to your USB drive.
6. Select or create a folder on the USB drive where you want to save the photos.
7. Click Export again to begin the photos transfer.
For those who don't like the way Apple route does, you may also use the Mac version of Higospot iPhone Data Transfer (see Method 3 above) to get a much more intuitive and seamless transfer.
Related: iPad Says Security Lockout
Method 6 - Via iCloud Photos for Windows
If you'd prefer not to use a USB cable to transfer photos from iPhone to your USB drive, you can opt for Apple's cloud-based photo syncing service — iCloud, which has already been integrated with your device. It not only uploads your iPhone photos to the cloud, but also syncs them back down to your computer—giving you ability to copy the images to your USB drive.
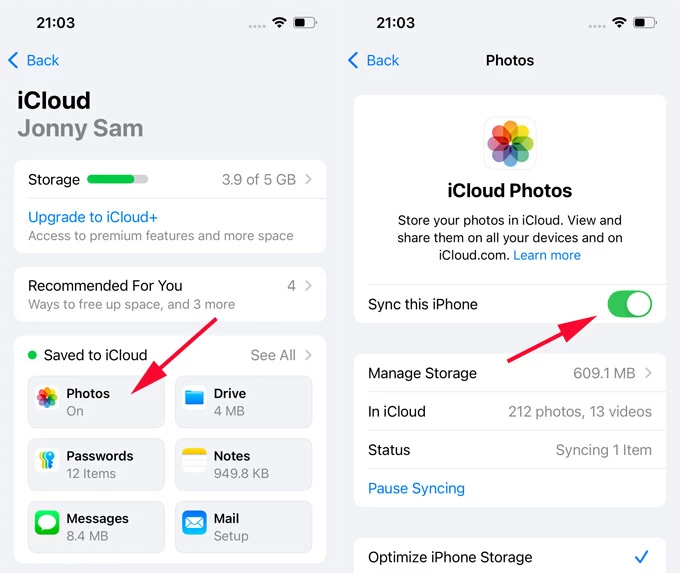
Before transferring photos from your iPhone to USB stick through iCloud, make sure you enable iCloud Photo Library on your iPhone by heading to Settings > [Your Name] > iCloud > Photos and turn on Sync This iPhone if it isn't already enabled. Your photos stored on your device will then automatically be uploaded to your iCloud account.
Steps to move photos to USB drive from iPhone:
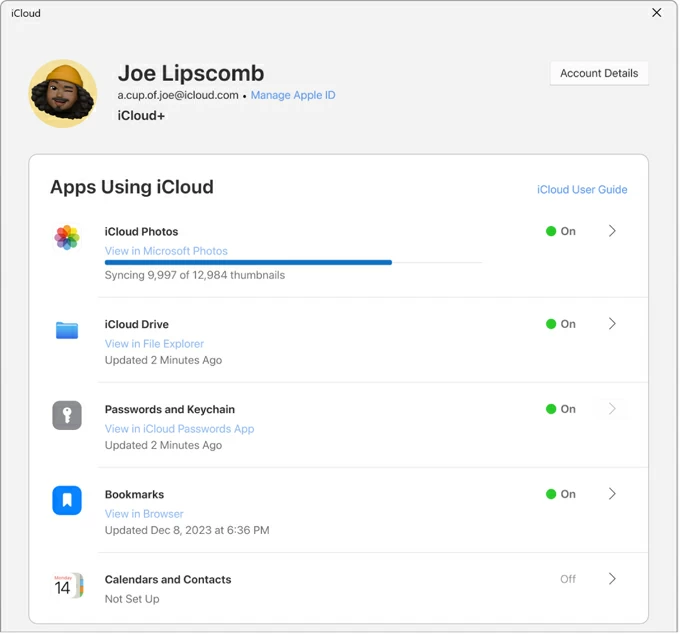
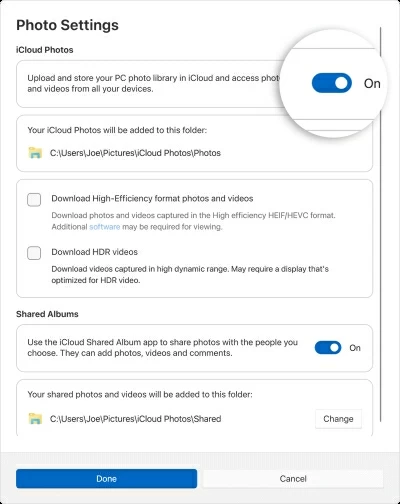
1. Install iCloud for Windows on your PC.
2. Sign in with your Apple account. To the right of iCloud Photos, click the > button. and enable the iCloud Photos option in the iCloud control panel.
3. Go ahead and control where photos are stored on your PC. By default, your iPhone photos and videos are stored in C:\Users\[username]\Pictures\iCloud Photos\Photos.
4. Optionally, select Download High-Efficiency format photos and videos. This will download photos and videos in HEIF and HEVC file format.
5. Wait for the iCloud to download a copy of your iPhone library to your PC.
6. Open the folder you specify on PC, select the photos you want and copy them to USB drive.
iCloud isn't the only cloud service you can use for transferring iPhone photos to a USB drive. The popular Dropbox, OneDrive, and Google Photos all offer automatic photos upload and download features to help you move your photos to USB.
Related: The Full Guide to Transferring Videos from iPhone to Windows 10
Why It's Better Than Cloud Alone
Transferring iPhone photos to USB gives you full control over your media. Unlike cloud services that depend on internet access and subscription plans, USB drives offer offline access, instant portability, and compatibility across devices.
1. No Internet Required: You can transfer photos to USB from iPhone anywhere, anytime—no Wi-Fi or data needed.
2. Cross-Platform Access: USB drives work with Windows, macOS, smart TVs, and even some tablets.
3. Avoid Cloud Limits: Services like iCloud and Google Photos have storage caps. USB drives offer scalable storage without monthly fees.
4. Faster Sharing: Want to give someone a copy of your vacation photos? Just hand them a USB stick.
Conclusion
With the right tools and steps, anyone can transfer photos from your iPhone to a USB drive. Storing your photos on a USB drive protects your memories if your iPhone is lost, stolen, or damaged, frees up valuable iPhone space without deleting any images, as well as creates organized folders by year, event, or person for easy access later.
About Katrin Gray
Katrin Gray is the Junior Editor at HigoSpot. With a bachelor's degree in Computer Applications, he has been covering Microsoft Windows, Apple macOS, iOS, Android, Social Media, Gaming, and more as a professional writer for over 5 years.
 iPhone UnlockerRemove iPhone & iPad lock screen
 iPhone Data TransferTransfer and manage your iPhone & iPad data
 Android UnlockerRemove Google FRP lock and bypass screen locks
 iPhone Data RecoveryRecover deleted files from iPhone, iPad
 Location ChangerFake a GPS location easily
 Video DownloaderDownload videos from 1000+ sites