How to Transfer Photos from iPhone to iPhone: 7 Options For All Scenarios
You get a brand new iPhone and want to import photos from the old one? You have a lot options. We break down everything you need to know so you can take all your photos with you.

Katrin Gray
Updated on Feb 3, 2026
Let's say you just upgraded your iPhone. Now you want to transfer years of photos from the old one to the new one. The problem is that the new iPhone was setup under a different Apple Account and you don't want to reset it that you just set up.
While Apple has built a robust ecosystem with iCloud, AirDrop, and device to device migration, it's not easy for a regular user to know which is the best way to transfer photos from an iPhone to an iPhone.
This tutorial will explain how you can transfer pictures from one iPhone to another with different ways, depending on your situation — whether you have Wi-Fi, a computer, or prefer wireless transfers.
For those who want a solid transfer of media files between iPhones with full control, go with Higospot iPhone Data Transfer (we'll discussion later). Without resetting your device or involving uploading your photos to cloud first, the tool gives you more visibility and flexibility to move music, videos, and photos from iPhone to new iPhone quickly while connecting both devices with USB cables.
How to transfer photos from iPhone to iPhone without iCloud without reset
There are many ways around for iPhone photos transfer. The first way we will use is a reputable tool called Higospot iPhone Data Transfer. It serves as a powerful, user-friendly alternative to Apple tools, giving users greater control and flexibility over media management and transfer. With it, you can browse the iPhone's photos library (or music folder), then handle batch exports, metadata preservation, and album/ playlist transfer.
Why choose it?
1. Allow to transfer photos from multiple devices (iPhone and iPad) onto a single new iPhone
2. It doesn't require you to reset the new iPhone to import images
3. No Wi-Fi or mobile data required while transfer pictures from iPhone to iPhone
4. If you prefer not to use iCloud as like to have copies on your iPhone rather than on cloud.
5. Allows transfer even if both iPhones are not logged into the same Apple ID
6. It doesn't involve buying an iCloud plan for enough storage when you're transfer a huge library of pictures and videos.
7. You don't need to back up your photos first and then restore to the new iPhone.
What can it do?
1. Transfer videos, music, and photos from iPhone to iPhone without limitation.
2. Quickly locate photos from the library or album: images sorted by date by default
3. Select what items to transfer, or choose export all album or whole library
4. Move photos from one album to another
5. Preview photos, view metadata
6. Create/delete album on your new iPhone
7. Add media files to your new iPhone from computer: drag-n-drop supported.
8. Make custom ringtones, manage iCloud drive
8. Integrates a set of tools to manage your messages, contacts, notes, and other data files.
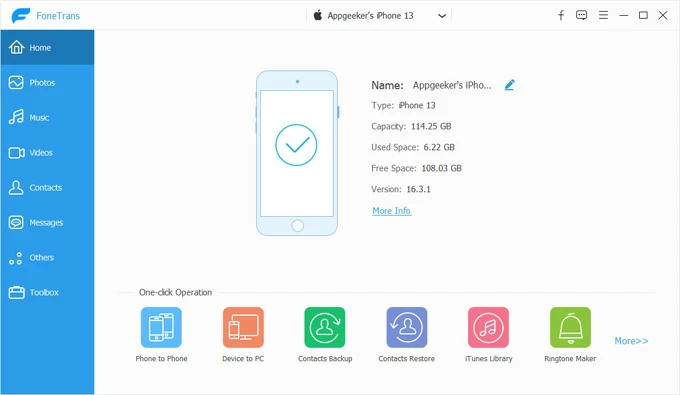
Higospot iPhone Data Transfer works on both Windows PC and Mac. First of all, download and install it on your computer.
Win Download Mac Download
Step 1. Launch the software, and use USB cables to connect your source iPhone (the one with photos) and target iPhone (the one receiving photos). It should detect both devices quickly. Ensure that you select the source one displayed on the screen (important!).
Tip: you will want to trust the computer on both devices when prompted.
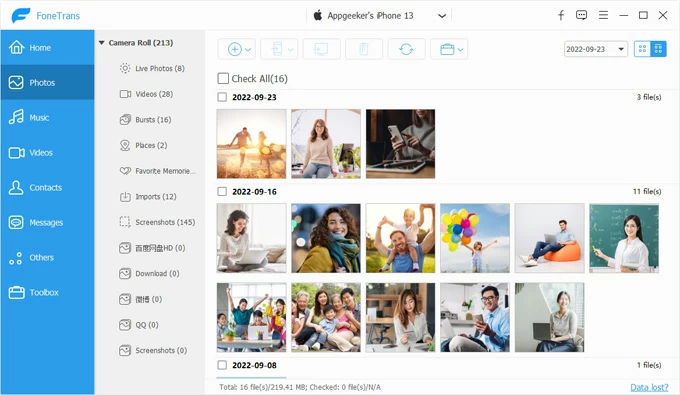
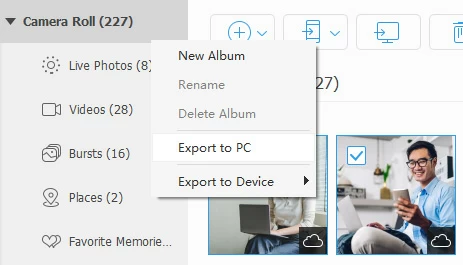
Step 2. Click Photos from the category list in the left sidebar to view all images stored on your iPhone. Browse through albums such as Camera Roll, Videos, Live Photos, Places, Screenshots, Download, etc.
Step 3. Tick the checkboxes next to the individual photos you want to transfer. You can also select entire albums by ticking box next to Check All on the top of the thumbnails window.
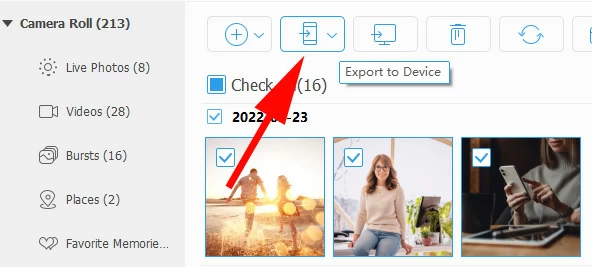
Next, click the Export to Device button at the top menu to begin transferring photos from old iPhone to new iPhone.
To transfer the entire library or a specific album, right-click on Camera Roll or that album, then select Export to Device > [Your new iPhone's name].
Alternatively, after selecting your desired photos, right-click on the program's window, then select Export to Device > [Your new iPhone's name].
For music or video transfer, you can go through the similar operations.
Related: How to Transfer Music from Windows 11 to iPhone
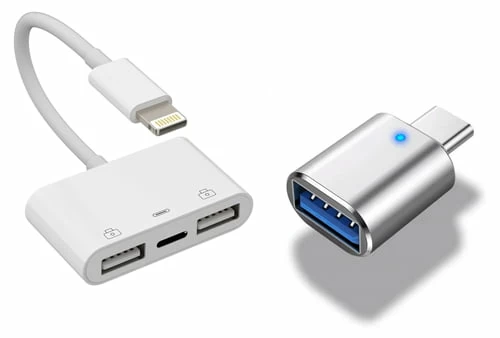
How to transfer pictures from iPhone to iPhone with OTG Adapter
You can transfer photos directly from one iPhone to another using an Apple MFi Certified Lightning to USB Camera Adapter (or USB-C equivalent on newer iPhones) together with a USB cable. The process involves connecting the two iPhones, opening the Photos app import option, and selecting which photos to copy.
Steps to transfer photos from one iPhone to another:
Step 1. Plug the adapter into the receiving iPhone (the one you want to copy photos to).
Step 2. Connect the source iPhone (the one with the photos) using its USB cable into the adapter.
Step 3. Unlock both iPhones. On the source iPhone, tap Trust This Device if prompted.
Step 4. On the receiving iPhone, open the Photos app.
Step 5. Tap Import (this option appears automatically when a connected device is detected).
Step 6. The receiving iPhone will display thumbnails of the photos available on the source iPhone.
Step 7. Browse through the available photos, and select individual photos or choose Import All if you want everything.
Step 8. The selected photos from old iPhone will be copied into the new iPhone's Photos library with original quality.
Your imported photos will appear in the Recents album. The same adapter method works for importing photos from digital cameras, SD cards, or external drives into your new iPhone.
How to transfer photos from one iPhone to another with the same Apple ID?
If you're an iCloud subscriber and rely on iCloud storage to save hundreds of thousands of photos in your media library, you can enabled iCloud Photos to keep them continuously synced between two iPhones as long as they are signed into the same Apple Account. It is ideal for ongoing sync and for transferring large libraries without manual file handling.
What you'll need:
- A decent internet connection to upload photos.
- Enough storage of iCloud (Check and upgrade your iCloud plan if necessary)
- iCloud Photos enabled
Here's how to sync photos from iPhone to iPhone with iCloud:
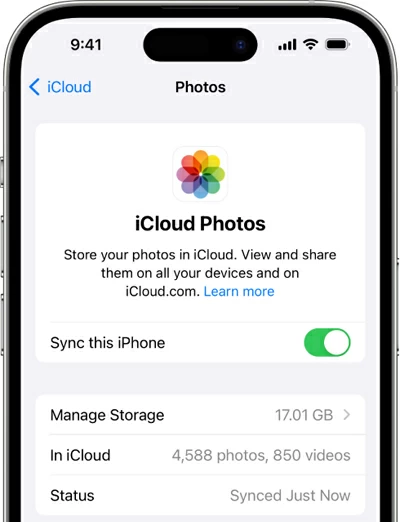
Step 1. On both iPhones go to Settings > [your name] and confirm you are signed in with the correct Apple ID.
Step 2. Enable iCloud Photos on both devices by going to Settings > [Your name] > iCloud > Photos, and toggle on Sync This iPhone. This should transfer all photos into the iCloud.
Step 3. In the same page, select Download and Keep Originals to preserve full resolution on the device, or Optimize iPhone Storage to save local space while originals remain in iCloud.
Step 4. Go to Settings > [your name] > iCloud > Manage Storage to ensure you have enough space. Upgrade your plan if needed.
Step 5. Connect to a stable Wi-Fi network and plug into power for large libraries.
Pictures stored on the old iPhone will appear on the new iPhone automatically once iCloud sync completes (sync time depends on upload speed and library size).
If devices use different Apple Accounts, use Higospot iPhone Data Transfer mentioned above to move your photos.
Note: Photos deleted from one device will simultaneously also get erased from other devices. If you want to get rid of the old iPhone, you should sign out of the Apple Account rather than directly erasing all your photos and video off it.
Related: How to Reset iPhone without Passcode
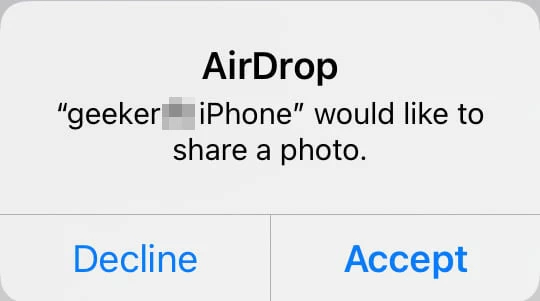
How to send photos from iPhone to iPhone via Airdrop
If you just want to transfer a few pictures from one iPhone to another, AirDrop is the fastest way to handle the task without using cellular data or cloud storage. It preserves original quality and metadata and works peer to peer.
Preflight AirDrop configuration:
- Ensure both iPhones run a compatible iOS version (preferably the latest).
- Turn Bluetooth and Wi-Fi on both iPhones on each device via Control Center.
- Keep both screens on and unlocked during transfer.
- Keep devices within about 30 feet and avoid heavy interference.
- Enable Airdrop: Settings > General > AirDrop, then choose Contacts Only or Everyone.
Contacts Only requires both devices to be signed into iCloud and have each other in Contacts; otherwise use Everyone temporarily.
When you're ready, let's have a look at how to use AirDrop to get photos from iPhone to iPhone.
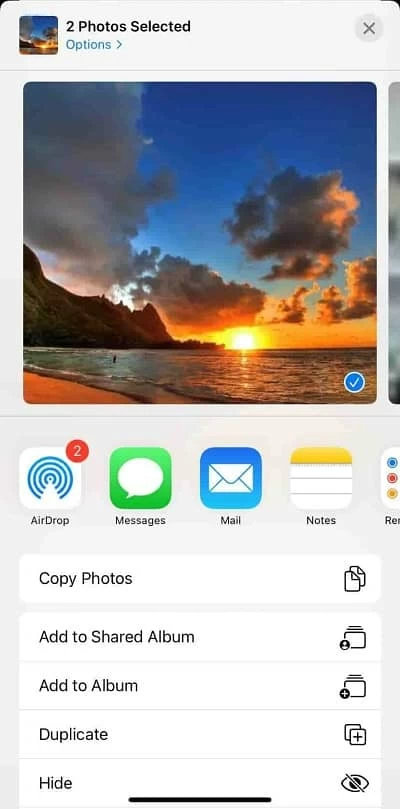
Step 1. On the source iPhone, open Photos app.
Step 2. Select the photos you wish to send.
Step 3. Tap the Share icon and choose AirDrop.
Step 4. Select the recipient device from the AirDrop list.
Step 5. On the target iPhone, tap Accept to start the transfer.
Photos save to the Photos app in the Recents album on the target phone.
It's ideal for AirDrop 5-10 pictures at a time. If you have a large number of items to be transferred, try other methods outlined in this article.
Related: Contacts Disappeared from iPhone
How to transfer all photos from iPhone to iPhone with Quick Start
Get a new iPhone and want to import pictures from the old iPhone during setup? Apple introduces a Quick Start feature to assist you in transferring data, including photos, to the new iPhone by setting up it automatically using an old iPhone.
Please keep in mind that your another (old) iPhone must be running with iOS 11 or later.
Here's how to use Quick Start to automatically transfer all of the iPhone photos to the new iPhone during setup.
Step 1. Place the two iPhones next to each other.
Step 2. Ensure the new iPhone hasn't been set up yet, or reset it to factory settings if you want to start fresh.
Step 3. Turn on the new iPhone, the Quick Start screen will appear automatically, offering to set up the new iPhone using your current iPhone.
Step 4. On your old iPhone, a prompt will appear asking if you want to use Quick Start.
Step 5. Use your old iPhone to scan the animation displayed on the new iPhone's screen.
Step 6. When asked how you want to transfer data, select Transfer from iPhone.
Step 7. Follow the prompts to set up necessary options.
Step 8. The transfer process begins. Photos, apps, settings, and other data will move from the old iPhone to the new one.
Again, transferring pictures from iPhone to iPhone using Quick Start only works during initial setup.
How to transfer photos from one phone to another iPhone with iTunes or Finder
In iTunes, there is an option to sync photos to your new iPhone from PC. One thing to be noted, you will have to download your photos from the old iPhone to your PC first. But that's not a problem.
Here's how to move photos from iPhone to iPhone through iTunes. In macOS, you can handle it through Finder app.
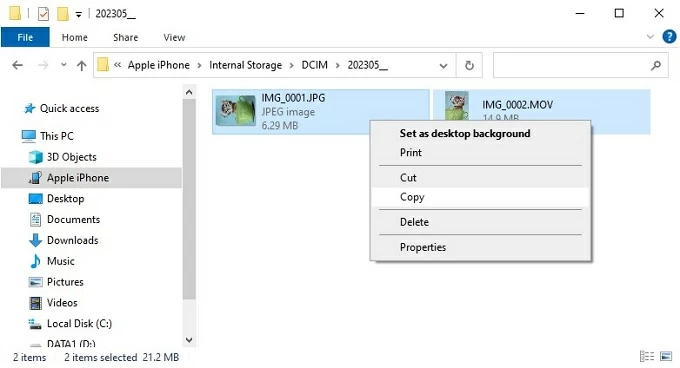
Step 1. Connect your iPhone that you want to download pictures from into your PC.
Step 2. Open File Explorer, under This PC in the left sidebar, click your phone name, then open its internal storage.
Step 3. Open the specific folder where stores pictures, and copy them to a destination location on your PC.
After copying the pictures, disconnect the old device and plug into your new iPhone that you want to receive the photos.
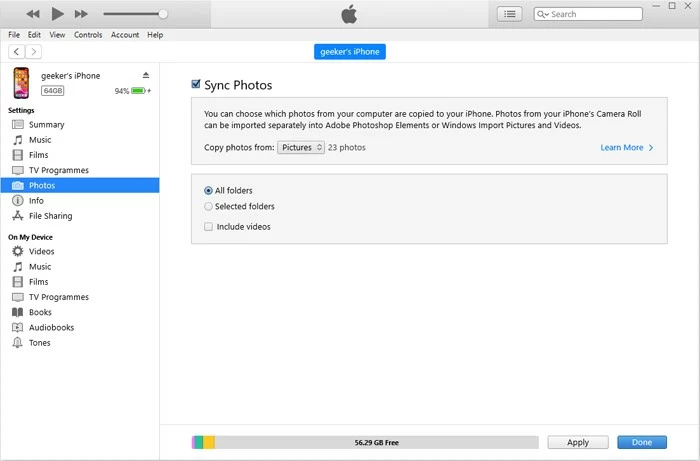
Step 4. Launch iTunes app.
Step 5. click the Device icon in the window to opens the device summary page.
Step 6. In the left sidebar, click Photos.
Step 7. Check the box Sync Photos.
Step 8. From the dropdown menu, select the folder on your PC that contains the photos you downloaded previously.
Step 9. Click Apply or Sync in the bottom right corner.
iTunes will copy the chosen photos to your new iPhone's Photos app.
Related: iPad Disabled Won't Connect to iTunes
Cloud storage services
Like Apple's iCloud, there are a lot of popular cloud storage services (like iCloud Drive, Google Drive, Dropbox, or OneDrive) give a flexible way to transfer photos from one iPhone to another without cables.
Here we take Google Photos as an example:
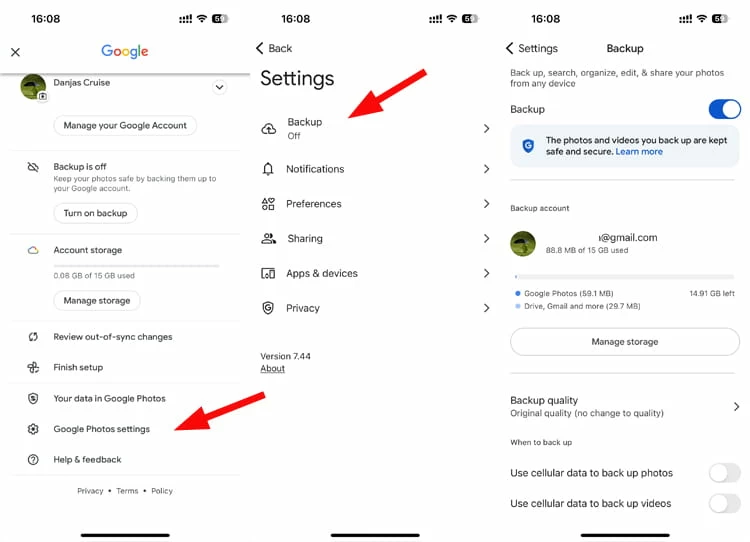
Step 1. Download Google Photos app from App Store and install on your both iPhones.
Step 2. Open the Google Photos app on the iPhone that already has the photos.
Step 3. Tap your profile icon, then go to Google Photos settings, enable Backup. This uploads all photos and videos from the iPhone into your Google Photos cloud account.
Step 4. On the second iPhone, open the Google Photos app.
Step 5. Sign in with the same Google account used on the source iPhone.
Step 6. All uploaded photos will appear automatically once syncing finishes.
Step 7. If you want the photos stored directly in the iPhone's Photos app, select all photos, simply tap the Share icon at the top, followed by Save to device (or Download) to store them to the phon.
FAQs
- How do I transfer photos from iPhone to iPhone?
- You can get photos from old iPhone to new iPhone using iCloud, Quick Start, AirDrop, a cable adapter, or dedicated tool like Higospot iPhone Data Transfer.
- What's the fastest method for transferring large libraries of iPhone?
- If you're setting up your iPhone, you may use Quick Start with a wired connection or wirelessly. If your iPhone has alreadly been set up, you may use Higospot iPhone Data Transfer to copy all your photos with a working USB cable. Wired transfer is always faster and more reliable for large libraries.
- Do I need Wi-Fi or can I transfer photos from iPhone to iPhone offline?
- You don't always need Wi-Fi — you can transfer photos offline using Higospot iPhone Data Transfer.
- Can I move photos from old iPhone to new one without iCloud?
- If you want to transfer just a handful of pictures to your new iPhone from old one without iCloud, you may enable AirDrop and send them instantly.
- Why iCloud Photos not syncing my pictures between iPhones?
- iCloud Photos may not sync if iCloud Photos is turned off, the devices aren't on Wi-Fi, you're out of iCloud storage, or if the iPhones aren't signed into the same Apple ID. Checking these settings usually resolves the issue.
- How can I airdrop photos from an iPhone to an iPhone?
- To AirDrop photos from one iPhone to another, turn on Wi-Fi and Bluetooth on both devices, open the Photos app on the sender iPhone, select the photos, tap Share, then AirDrop, choose the target iPhone, and accept the transfer on the receiving device.
About Katrin Gray
Katrin Gray is the Junior Editor at HigoSpot. With a bachelor's degree in Computer Applications, he has been covering Microsoft Windows, Apple macOS, iOS, Android, Social Media, Gaming, and more as a professional writer for over 5 years.
 iPhone UnlockerRemove iPhone & iPad lock screen
 iPhone Data TransferTransfer and manage your iPhone & iPad data
 Android UnlockerRemove Google FRP lock and bypass screen locks
 iPhone Data RecoveryRecover deleted files from iPhone, iPad
 Location ChangerFake a GPS location easily
 Video DownloaderDownload videos from 1000+ sites