How to Transfer Music from Mac to iPhone: Drag-n-Drop Supported
Get a new iPhone and want to transfer music from your Mac? Here's how to set things up to be able to copy your favorite tracks from Mac to your iPhone's media library and playback on-the-go.

Katrin Gray
Updated on Dec 9, 2025
You have a music collection on your Mac and want the same songs on your iPhone for offline listening. Whether your tracks come from downloads, ripped CDs, or a local library, copying them to your iPhone so they play in the Music app is a common task. Modern macOS uses Finder to manage iPhone content instead of iTunes, and Finder offers a direct, reliable way to transfer music from Mac to iPhone.
There are also other options available to choose from: use AirDrop for immediate transfer of a few songs; upload your music to iCloud Music Library to make it available on the iPhone.
If you want to go through a simple transfer experience where you can drag and drop individual songs to your iPhone directly from Mac without erasing the current library on the device, consider using a reputable tool named Higospot iPhone Data Transfer.
Table of Contents
This article explains the Finder-first workflow to sync music from Mac to iPhone, and other practical ways to handle the music transfer, including selective transfers (no full sync). It also covers troubleshooting common music on Mac not syncing with iPhone problems.
Why use Finder to sync music
The first way we will use to transfer music from a Mac to an iPhone is through Finder. It replaces iTunes for device management on macOS Catalina and later, offering both full library sync and selective sync of albums, artists, playlists, and individual songs. More importantly, Finder preserves metadata and playlists so your iPhone Music app mirrors your Mac library accurately.
Before transferring music to iPhone
Before the actual transfer process, it's crucial to make a preparation checklist:
- macOS version: Finder sync requires macOS Catalina or later. If you run older macOS, you'll use iTunes instead.
- Latest iOS: update your iPhone to the latest iOS version when possible.
- Backup: make a Time Machine or Finder backup of your Mac library and an iCloud or Finder backup of your iPhone before major syncs.
- DRM check: songs purchased from older services or streamed via Apple Music may be DRM-protected and won't transfer as local files unless DRM-free.
- Storage: ensure enough free space on the iPhone for the music you plan to transfer.
- SB cable: use an official or certified cable to avoid connection issues. Wi‑Fi sync is possible but start with USB for reliability.
When you're ready, let's have a look at how to sync songs from Mac to iPhone.
Method 1: How to sync music from Mac to iPhone using Finder
Basic steps: import songs into your Music library, connect and authorize your iPhone, then choose full-sync or selective-sync option.
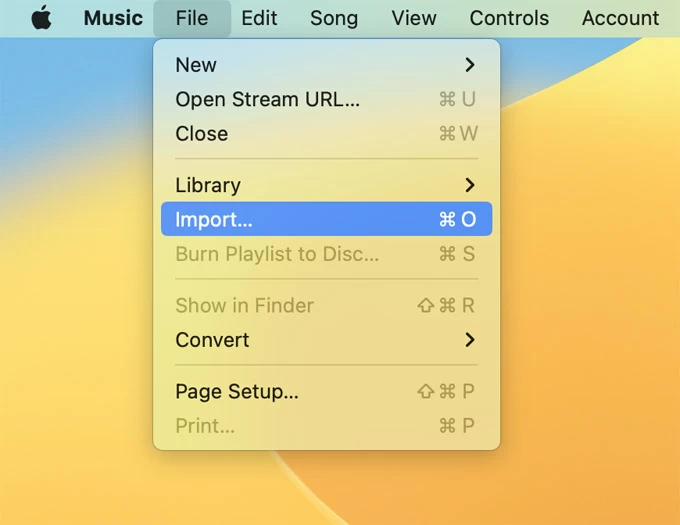
1. Open Music app on your Mac, go to File > Import to add songs to the library if they are not already there.
2. Connect your iPhone to the Mac with a USB or USB-C cable.
3. Open Finder and select your iPhone from the sidebar under Locations.
4. If prompted on the iPhone, tap Trust and enter your device passcode. If prompted on the Mac, click Trust as well.
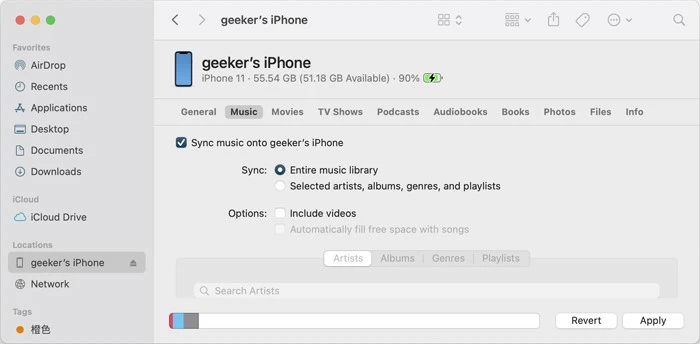
5. In Finder, click the Music tab in the device management view.
6. Check Sync music onto [device name]. You can choose to sync the Entire music library or Selected artists, albums, genres, and playlists. (see screenshot above)
7. To perform a selective sync, choose Selected then check the playlists, artists, or albums you want. If you want to transfer your videos to iPhone, check the box next to Include videos.
8. Click Apply (or Sync) in the lower-right corner. Finder begins syncing music to your iPhone from Mac. Wait until the progress bar finishes.
9. Eject the iPhone from Finder when complete and open the Music app on your iPhone to confirm songs appear.
Finder handles metadata and playlists while respecting track order and album art.
Related: How to transfer videos from iPhone to PC
Troubleshooting: music on Mac not syncing with iPhone
Typically, Finder comes with a reliable way to copy your music from Mac to iPhone. If the sync process fails, do the following:
Check cable and port: replace the USB cable and try a different port. Prefer Apple-certified cables.
Trust and authorization: ensure the Mac is authorized for the Apple ID used in the Music app (Account > Authorizations > Authorize This Computer).
DRM-protected songs: Apple Music tracks and some older purchases are DRM-protected and won't copy as standalone files. Download DRM-free versions or re-purchase DRM-free tracks if necessary.
iCloud Music Library / Apple Music conflict: if you use iCloud Music Library (Sync Library), local syncing via Finder behaves differently. Turn off Sync Library on the iPhone (Settings > Music > Sync Library) to allow local Finder syncs, or use iCloud to sync music across devices.
Storage full: free up space on the iPhone or reduce the selection being synced.
Restart both devices and attempt sync again.
Update OS: install the latest macOS and iOS updates then retry. This may be your last resort and may be time-consuming.
If you don't like the way Finder does or you want more control, then there are plenty of third-party transfer options to consider that are designed especially for Mac. Our favorite is Higospot iPhone Data Transfer. It's all-in-one management suite that allows drag-and-drop transfers directly into the iPhone's Music app without erasing the existing library on your device.
Win Download Mac Download
Features you may be interested in:
- Drag and drop songs, videos, photos to your iPhone from Mac (or PC)
- Transfer media files back to your computer if needed
- Sort music by artists, name, title, size, time, added date, etc.
- Make custom ringtones from songs or recordings
- Automatic music/ video files format conversion to solve compatibility issues while transferring
- Edit music ID3 tags
- Move media files between Apple devices (iPhone, iPad, or iPod Touch 5)
- Create playlists, move tracks to playlist
Steps on how to transfer music from Mac to iPhone without syncing:
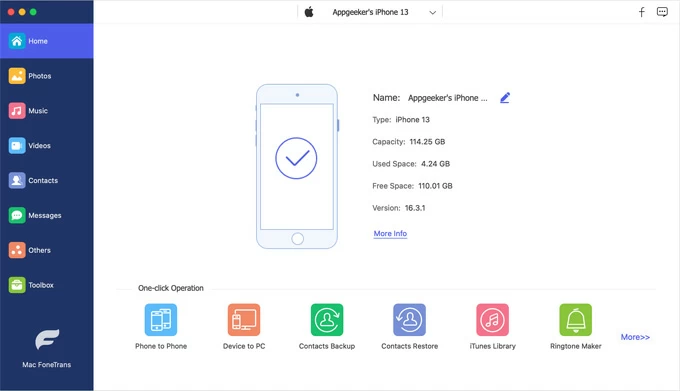
1. Plug your iPhone into your Mac using a USB cable, and launch iPhone Data Transfer.
Wait for the tool to detect your device. If prompted, tap Trust This Computer on your iPhone.
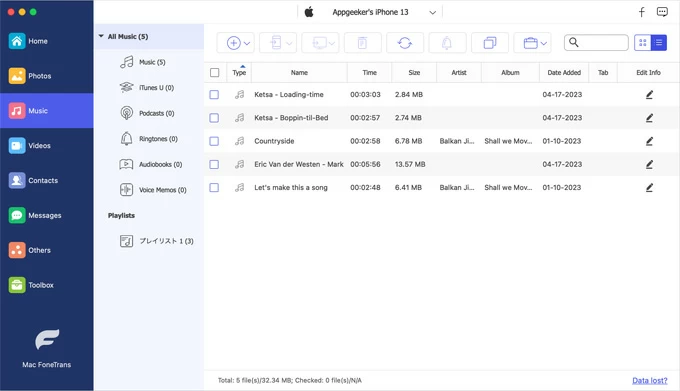
2. In its left sidebar, choose Music from the list of data types to open your iPhone's music library.
You'll see existing tracks and playlists on your device.
Tip: You can also switch to Photos type to transfer pictures from iPhone to Mac seamlessly.
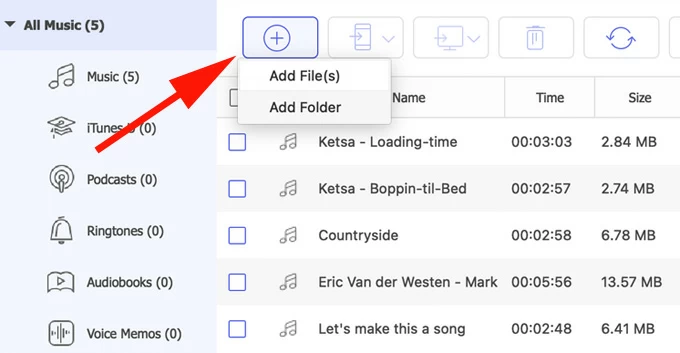
3. Click the Add File(s) or Add Folder button at the top of the music window. Browse your Mac to locate the music files you want to transfer. Select one, multiple files, or the entire folder, then click Open.
Alternatively, import your songs by dragging and dropping them to the music window.
No matter in which format your source music file is, iPhone Data Transfer can convert it to the iPhone readable format automatically while transferring. Compatibility is no more an issue.
Tip: You can also create new album or playlist before importing music to manage it independently.
4. The tool will begin transferring the selected music from your Mac to your iPhone. Wait for the process to complete. Progress will be shown in the status bar.
Once done, the new songs will appear in your iPhone's music library.
Now, open the Music app on your iPhone, navigate to Library > Songs or Albums to confirm the new tracks are available.
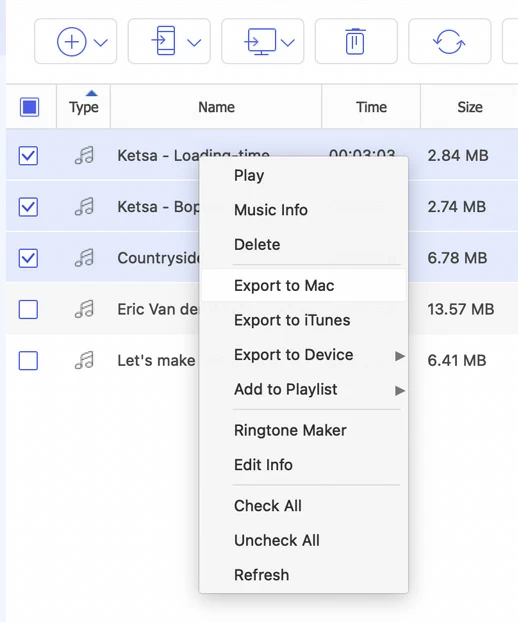
With the tool's right-click context menu, you can do several things to manage your library. see screenshot below:
Method 3: How to Airdrop music from Mac to iPhone
This method works best for transferring non-DRM-protected audio files (like MP3, WAV, or AAC) that you can open in apps like Files, VLC on your iPhone. If you have a large library of tracks to be transferred, it's advisable to use the methods mentioned previously.
Step-by-Step: Move music from Mac to iPhone with Airdrop
Preparation:
- On your iPhone, go to Settings > General > AirDrop. Choose Everyone or Contacts Only (make sure your Mac is in your contacts if you choose the latter).
- On your Mac, open Finder > AirDrop from the sidebar. Set "Allow me to be discovered by" to Everyone or Contacts Only.
1. Open Finder and navigate to the folder containing your music file.
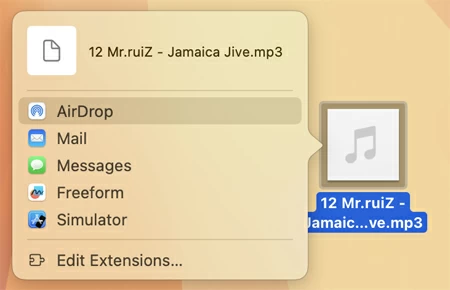
2. Right-click (or Control-click) the music file.
3. Select AirDrop. In the AirDrop window, wait for your iPhone to appear.
4. Click your iPhone's name when it shows up.
5. A prompt will appear on your iPhone asking if you want to accept the file, tap Accept.
6. If prompted, select an app like Files, VLC, or Documents to save or play the file; if no app is selected, the file will be saved to the Files app > Downloads folder by default.
Done! Now, you can open the Files app and navigate to the Downloads folder, tap the song to play it using the built-in player or share it to another app like VLC for better playback options.
AirDrop does not add music to the iPhone's Music app. For that, use Finder sync, or third-party tools like Higospot iPhone Data Transfer.
Related: How to factory reset iPhone when locked
Method 4: Use Sync Library feature (for Apple Music subscribers)
If you want a wireless transfer of your music from Mac to iPhone, you may use Apple's Sync Library feature with your Apple Music subscription, which syncs your entire music library across all your Apple devices via iCloud. This is ideal for maintaining parity, but it requires a subscription to Apple Music.
Be sure to confirm that you've already added music to your Mac library in Music app.
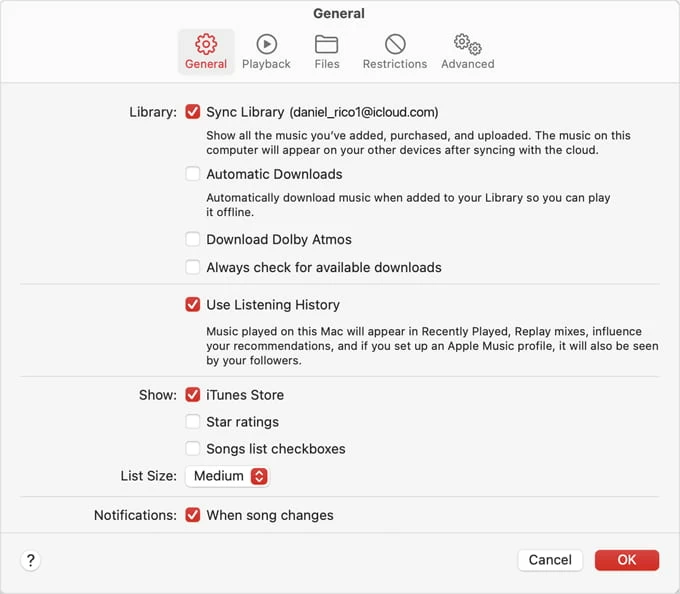
1. In the Music app, go to Music > Settings (or Preferences).
2. Click the General tab, then check the box for Sync Library.
3. Your music will now begin uploading to iCloud. This may take time depending on your library size and internet speed.
If you don't see the "Sync Library" option, make sure you're signed in with an Apple ID that has an active Apple Music or iTunes Match subscription.
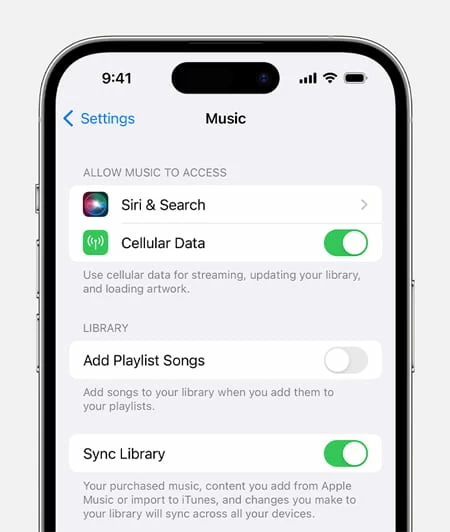
4. On your iPhone, go to Settings > Music.
5. Toggle on Sync Library.
6. Your iPhone will now begin syncing with your iCloud Music Library.
Open the Music app on your iPhone. You should see the songs you added on your Mac appear automatically.
Related: Messages disappeared from iPhone
Conclusion
For most people, the four methods outlined above are the most reliable ways to add music to iPhone from Mac. While Finder is better for syncing your full library, Airdrop excels at quick transfers of a handful of songs. If you want to transfer songs with a simple drag-n-drop operation and more controls, we recommend using a tool like Higospot iPhone Data Transfer. Otherwise, it is better to use wireless transfer method for Apple Music subscriber.
FAQs
- How to transfer music from Mac to iPhone without iTunes?
- Use Finder on macOS Catalina or later; if you prefer no sync, use the third-party tool like Higospot iPhone Data Transfer, which enables you to drag and drop music into your iPhone without touching the existing library.
- Why doesn't my device show up on Locations in the Finder?
- Check physical connection: try a different cable or port; tap "Trust This Computer" when prompted; Open Finder > Settings (or Preferences) > Sidebar tab, then check if the "CDs, DVDs, and iOS Devices" option is checked under Locations. You will also want to restart both your Mac and iPhone, then reconnect.
- How to sync music from Mac to iPhone selectively?
- In Finder's Music tab choose Selected playlists, artists, albums, and genres, pick items, then Apply.
- How to airdrop music from Mac to iPhone?
- Select the file in Finder, choose Share > AirDrop, pick your iPhone, and accept the transfer on the device.
- Will Finder sync delete existing music on my iPhone?
- If you choose to sync music from Mac, it may replace your current library.
- What formats are supported for music transfer?
- Finder offers music sync from Mac to iPhone, include MP3, AAC, M4A, WAV, AIFF. If you want to import other types of audio formats, you may use Higospot iPhone Data Transfer, which automatically converts the song to a file that iPhone accepts while transfer, no more operations.
About Katrin Gray
Katrin Gray is the Junior Editor at HigoSpot. With a bachelor's degree in Computer Applications, he has been covering Microsoft Windows, Apple macOS, iOS, Android, Social Media, Gaming, and more as a professional writer for over 5 years.
 iPhone UnlockerRemove iPhone & iPad lock screen
 iPhone Data TransferTransfer and manage your iPhone & iPad data
 Android UnlockerRemove Google FRP lock and bypass screen locks
 iPhone Data RecoveryRecover deleted files from iPhone, iPad
 Location ChangerFake a GPS location easily
 Video DownloaderDownload videos from 1000+ sites