How to Transfer Photos from iPhone to Laptop: A Complete Guide
If you have a lot of precious pictures stored on an iPhone and want to save on local hard drive of a laptop, there are ways to do it. You should already know one or two, but here's a complete guide.

Katrin Gray
Updated on Oct 9, 2025
Why Transferring Photos Matters
From family gatherings and travel adventures to work-related snapshots, the iPhone has evolved into a primary camera for capturing life's most important moments. With its advanced camera system, high-resolution images, and seamless integration with apps, it's no surprise that millions of people rely on their iPhones as their main photo storage device.
But as convenient as it is to store photos on your iPhone, there comes a time when transferring them to a laptop becomes essential. Laptops provide larger storage capacity, and the ability to edit photos with professional software. More importantly, moving photos from an iPhone to a laptop ensures that your memories are backed up and safe from accidental deletion.
For many users, transferring your iPhone pictures is not just about storage—it's about peace of mind. Having your photos on a laptop means you can create albums, share them easily, and even print them for physical keepsakes. In short, transferring photos from iPhone over to laptop is a fundamental digital skill that every iPhone owner should master.
If you want a selective transfer of your media files, and can manage your iPhone library flexibly, go with Higospot iPhone Data Transfer.
The Challenges Users Face
Despite the importance of transferring photos from iPhone to laptop, the process is not always straightforward. Users often encounter several challenges:
- Compatibility Issues: iPhones and laptops may run on different operating systems (macOS vs. Windows), which can complicate the transfer process.
- Limited Knowledge: Many users are unsure which method to use—USB cable, AirDrop, iCloud, or third-party apps.
- Storage Concerns: Laptops with limited storage may struggle to accommodate thousands of high-resolution photos.
- Technical Barriers: Some users face issues like "device not recognized," failed transfers, or incomplete imports.
- Time Consumption: Large photo libraries can take a long time to transfer to laptop, especially over wireless connections.
These complications often leave users frustrated, searching for reliable, step-by-step guidance. The lack of clarity can make a simple task feel overwhelming, especially for those who are not tech-savvy.
How Can You Transfer Photos from iPhone to Laptop Efficiently and Safely?
This brings us to the central question: What is the most effective way to transfer photos from an iPhone to a laptop, ensuring speed, safety, and simplicity?
The answer depends on several factors:
- The type of laptop you own (Windows or Mac).
- The number of photos you want to transfer.
- Whether you prefer wired or wireless methods.
- Your comfort level with cloud services and third-party tools.
By exploring multiple methods, we can identify the best approach for different scenarios.
Step-by-Step Methods to Transfer Photos
Here's a comprehensive breakdown of the most reliable methods to transfer your photos (and videos) from iPhone to laptop that's running macOS or Windows, complete with pros, cons, and practical tips.
Method 1: Use Higospot iPhone Data Transfer
Best for: Users who want extra features like selective transfer, batch management, or backup.
No matter you want to transfer your photos, music, movies, podcasts, ringtones to and from your iPhone, Higospot iPhone Data Transfer takes care of all. As a versatile media management solution, it also includes a set of tools to help you manage your personal information, including messages, contacts, and other types of data.
Win Download Mac Download
Steps to transfer pictures to laptop from iPhone:
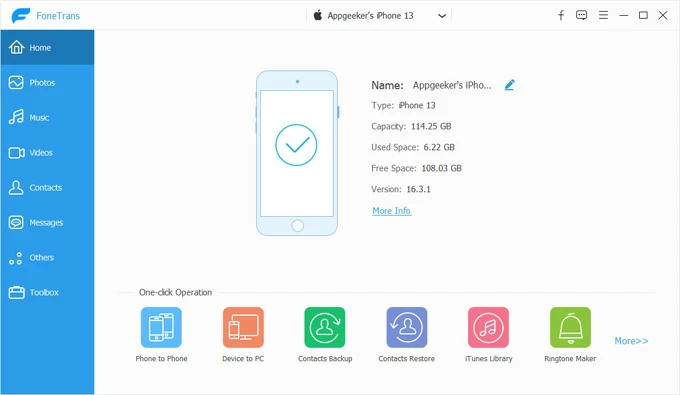
1. Run the program on your either Mac or PC, then connect your iPhone.
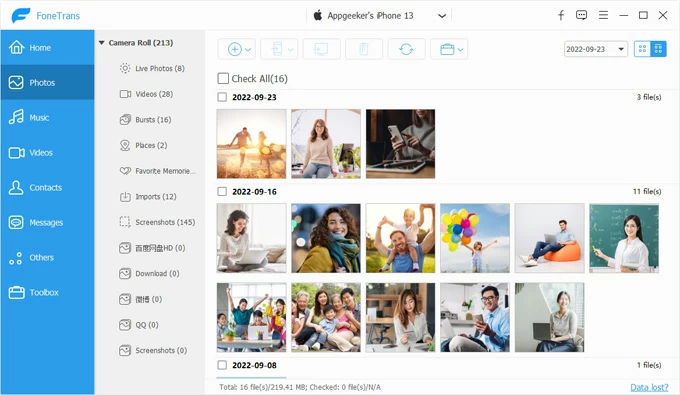
2. Click the "Photos" category on the left side, then on the opening window, you should see all your pictures sorted by date.
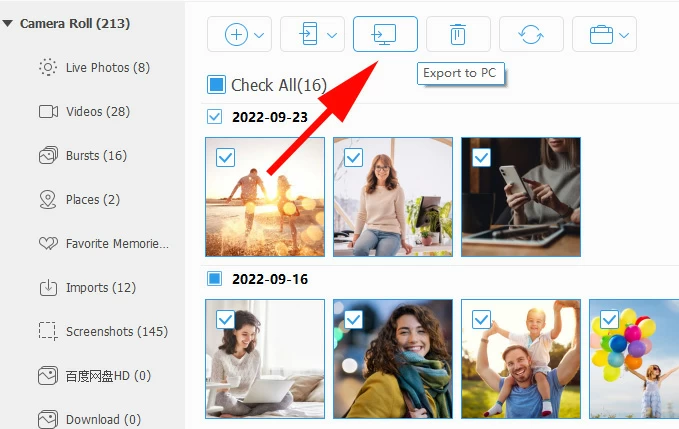
3. Select what image you need to transfer, then click the "Computer" icon (when hovering, it says "Export to PC").
4. In the dialog the opens, specify a folder on your computer, followed by "Save."
Pros: User-friendly interfaces. Bidirectional transfer. Extra features like backup, ringtone maker, and file management.
Cons: Requires installation. USB cable is needed.
Method 2: Transfer via USB Cable (Direct Connection)
Best for: Large photo libraries, fast transfers, offline use.
Steps:
1. Connect your iPhone to your laptop using a Lightning-to-USB cable.
2. Unlock your iPhone and tap "Trust This Computer" if prompted.
3. On Windows: Open File Explorer, click on your iPhone under Devices (or External Devices) on the left sidebar. Navigate to Internal Storage > DCIM to access photos. Copy and paste them into your desired folder.
4. On Mac: Open the Photos app. Your iPhone should appear in the sidebar. Select the photos you want and click Import.
Pro: Fast and reliable. No internet required. Works with large files.
Cons: Requires a cable. File navigation on Windows can feel clunky.
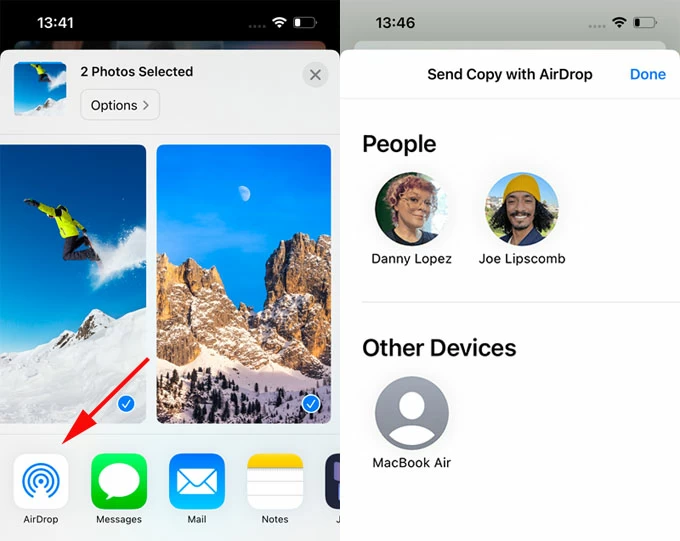
Method 3: AirDrop (Mac Only)
Best for: Quick transfers of small batches of photos.
Steps on transferring photos to Mac laptop:
1. Ensure both iPhone and Mac have Wi-Fi and Bluetooth enabled.
2. On iPhone, open Photos, select images, and tap Share > AirDrop.
3. Choose your Mac from the list.
4. Accept the transfer on your Mac.
Pros: Wireless and fast. No cables or apps needed.
Cons: Only works with Apple devices. Not ideal for very large libraries.
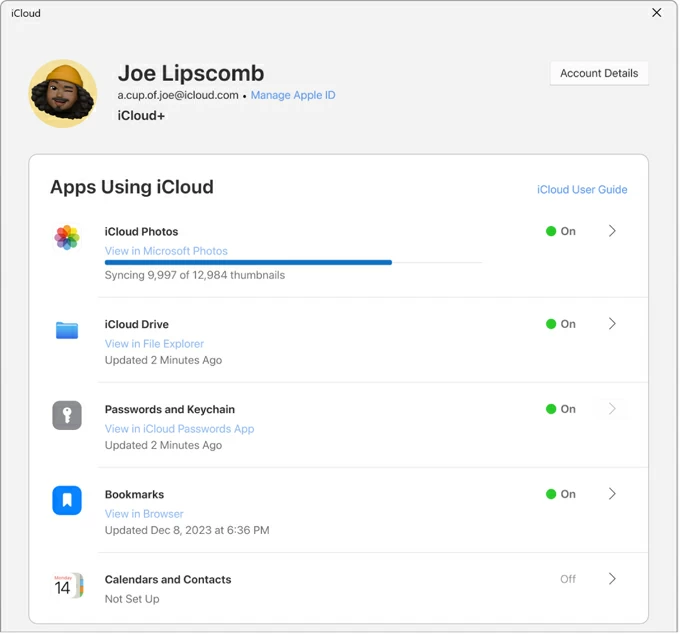
Method 4: iCloud Photos
Best for: Automatic syncing and access across devices.
Steps to transfer pictures from iPhone to laptop with iCloud:
1. On iPhone, go to Settings > Photos > iCloud Photos and enable it.
2. On Windows: Install iCloud for Windows, sign in, and enable Photos. Your photos will sync automatically.
3. On Mac: iCloud Photos integrates directly with the Photos app.
Pros: Automatic and seamless. Access photos anywhere with internet.
Cons: Requires iCloud storage (may need to purchase extra). Dependent on internet speed.
Method 5: Google Photos or Other Cloud Services
Best for: Cross-platform access and backup.
Steps:
1. Install Google Photos on your iPhone.
2. Enable Backup & Sync.
3. On your laptop, log into Google Photos via browser or app.
Pros: Works across devices and platforms. Free storage (up to a limit).
Cons: Requires internet. Privacy concerns for some users.
Best Practices for Smooth Transfers
To get your photo transfer from iPhone to laptop smoother, do the following:
- Organize Before Transfer: Create albums on your iPhone to make sorting easier later.
- Check Storage: Ensure your laptop has enough free space.
- Use Original Cables: Third-party cables may cause connection issues.
- Backup Regularly: Don't wait until your phone is full—make transfers a routine.
- Verify After Transfer: Always double-check that files are intact before deleting them from your iPhone.
Conclusion: Choosing the Right Path
Transferring photos from iPhone to laptop doesn't have to be complicated. By understanding your needs—whether it's speed, convenience, or automation—you can choose the method that works best for you.
1. If you want to all-in-one transfer and management solution, Higospot iPhone Data Transfer provide a professional edge.
2. If you want speed and reliability, go with a USB cable.
3. If you're in the Apple ecosystem, AirDrop is unbeatable for quick transfers.
4. If you prefer automation and cloud access, iCloud or Google Photos is the way to go.
5. Ultimately, the best method is the one that balances your priorities: convenience, storage, and peace of mind. By following the steps outlined above, you'll ensure that your memories are safely transferred, organized, and ready to enjoy on your laptop.
FAQs
- Why doesn't my laptop recognize my iPhone?
- This usually happens if the iPhone is locked; you haven't tapped Trust This Computer; The USB cable is faulty or not Apple-certified; iTunes or Apple drivers are missing (on Windows) - Try unlocking your phone, using a different cable, or reinstalling iTunes.
- Will transferring photos delete them from my iPhone?
- No. Copying or importing photos does not delete them. However, if you choose Move instead of Copy in some apps, the originals may be removed. Always verify before deleting anything. Also, you can use Higospot iPhone Data Transfer to move, delete, and manage your iPhone library.
- How long does it take to transfer iPhone photos?
- It depends on the method you take and number of photos you want to transfer over to laptop.
- Can I transfer HEIC photos to my laptop?
- Yes. iPhones often save photos in HEIC format. On Windows, you may need the HEIF Image Extensions from the Microsoft Store to view them. On Mac, HEIC is supported natively. You can use Higospot iPhone Data Transfer to make a conversion.
- Is iCloud the best option for photo transfer to laptop?
- iCloud is great for automatic syncing and backup, but it requires internet and enough iCloud storage. For large one-time transfers, a USB cable is usually faster.
- Do I need iTunes to transfer photos from iPhone?
- Not always. On Windows, iTunes (or Apple drivers) may be required for your PC to recognize the iPhone. On Mac, iTunes is not needed for photo transfers.
- How do I make sure my photos transferred successfully?
- After the transfer, open the destination folder on your laptop and preview several photos. Confirm that the files open correctly before deleting them from your iPhone.
About Katrin Gray
Katrin Gray is the Junior Editor at HigoSpot. With a bachelor's degree in Computer Applications, he has been covering Microsoft Windows, Apple macOS, iOS, Android, Social Media, Gaming, and more as a professional writer for over 5 years.
 iPhone UnlockerRemove iPhone & iPad lock screen
 iPhone Data TransferTransfer and manage your iPhone & iPad data
 Android UnlockerRemove Google FRP lock and bypass screen locks
 iPhone Data RecoveryRecover deleted files from iPhone, iPad
 Location ChangerFake a GPS location easily
 Video DownloaderDownload videos from 1000+ sites